Scrap Happy and Allietare Updates

Fair warning – lots of photos!  

Just a few years ago, I dug in the scrap storage boxes and put together about 30 blocks using Pat Sloan’s pattern Scrap Happy Little Wishes Star Challenge. (See Pat’s post – Scrap Happy Stars for the free pattern)

I wrote about the project once or twice at the time and showed off my blocks, joined together with black sashing here – Just a border or two.

Well, if you have been following me for any time at all, you know you sometimes never see the end result…or maybe I left you wondering “what did she decide?”…..

Well, let me tell you….NOTHING for almost 5 years!  Honestly, I have told others that I am a “top maker’ not a quilter at times.  I have a LOT of tops made, hanging on hangers on my storage shelves that get forgotten because something ‘new and exciting’ comes along.  In fact, some are hanging so long I had to put them on NEW hangers because the hook of the hanger was stretched out due to the weight.

I get tempted by shiny new fun patters.  Why, just the other day, Pat Sloan started another “new sew along” and I was really feeling tempted.   And then, our local quilt shop, Serendipity Quilt Shop in Dagsboro Delaware announced a new sew along.  The pattern, Serendipity House in the Pumpkin patch, calls to me. Check it out here – House in the Pumpkin Patch.  You know if you follow me that I always have a container of “autumn colors” just waiting on another opportunity! Now I have TWO fun sew alongs to think about.

Before I could l do anything else though, I needed to fold up the massive (111″ x 120″) backing  for my Allietare quilt and get the backing and top in the mail to California for quilting by my wonderful sister in law, the One Block Wonder Woman .

Remember the fabrics I was using?  (Some of this may be a repeat of a previous post/photos…but I just love this fabric group!)

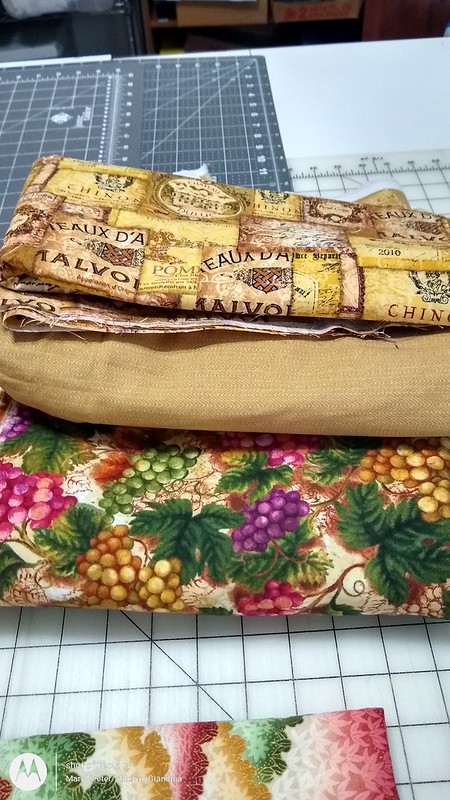
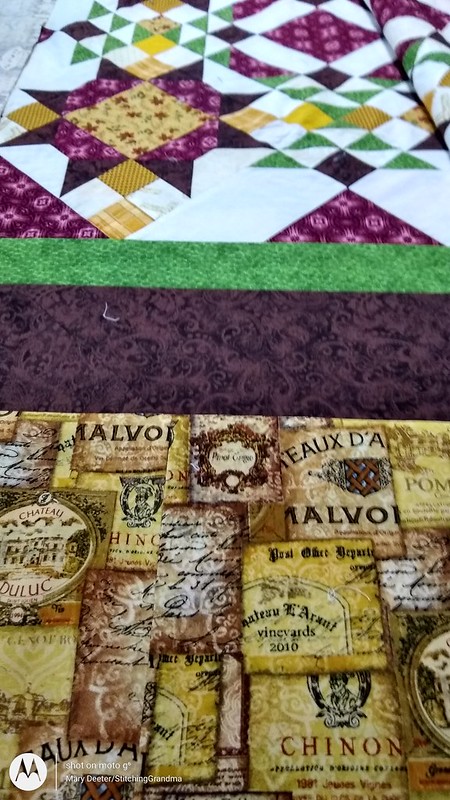
Border fabric choices

Top fabric (wine labels) is the border fabric. The herringbone gold and the grape fabric are on the back, along with this wonderful Bella Toscana fabric I was inspired by last month –

Bella Toscana by Windham Fabrics

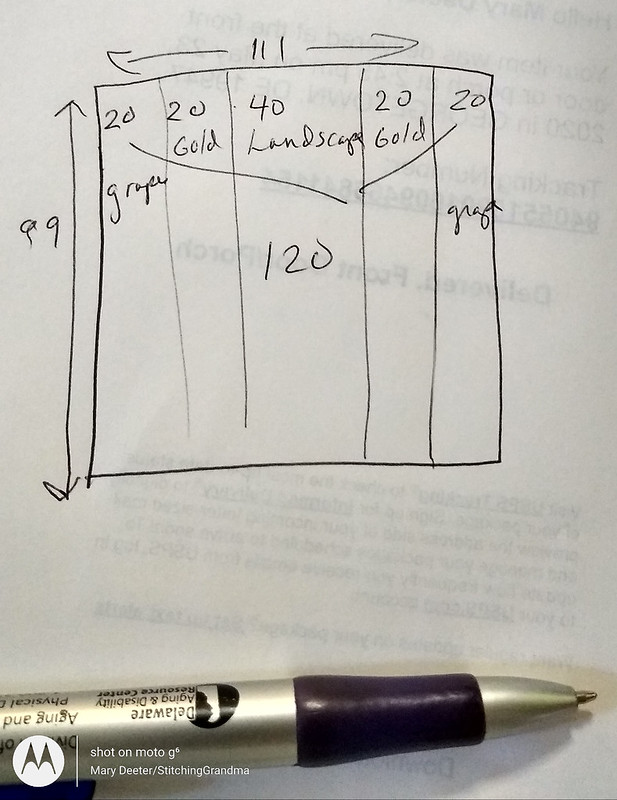
My plan was pretty simple for the backing – scribbled out quickly.  (The quilt will be WIDE because of the drop on our king size bed. I like a quilt to hang over the sides and get to the bottom of the thick top  mattress.)  My quilt top is 111″ wide by 99 ” long.

Planning the backing

Careful planning…no, what I call “quilt math”, but careful measurements of the actual project, careful cutting etc and I fairly quickly had a quilt back ready. What really slowed me down was ironing those massive pieces before cutting, and after stitching.

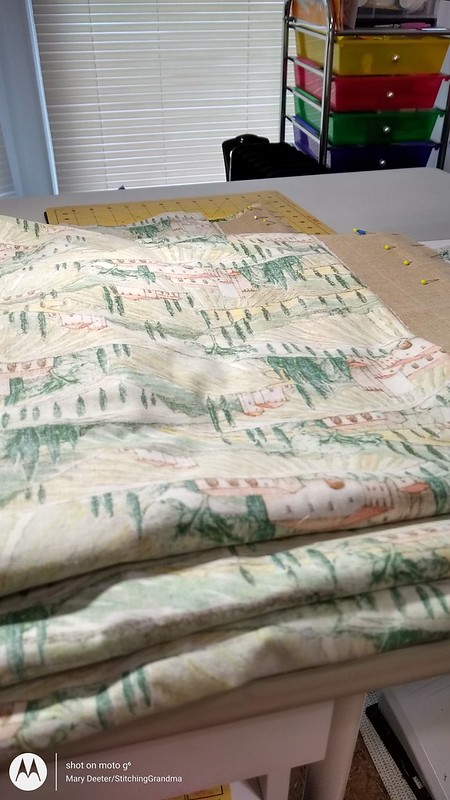
Backing ready to stitch Allietare

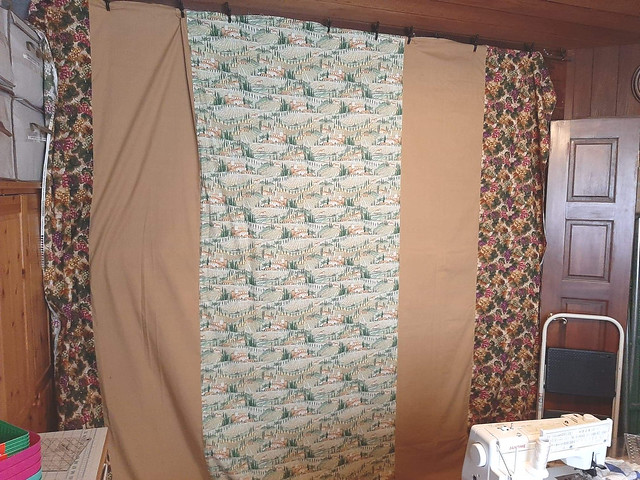
Carolyn was kind enough to advise me she needed 4 inches on the sides for the long arm clamps; and to remember to do 1/2″ seams, pressed open. I did leave the selvedge on the edges of the final pieces, as they will be where the clamps are and they will get trimmed off after the quilting. I’d forgotten to take a photo of the backing before I shipped it, but Carolyn, the One Block Wonder Woman was kind enough to snap a picture of it on her design wall.  She said it was so big it took over her sewing room! The backing is about 120″ wide by 110″ long.

Quilt backing for Allietare

Remember the front?

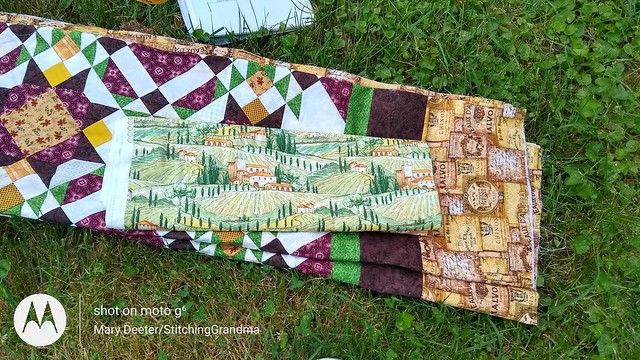
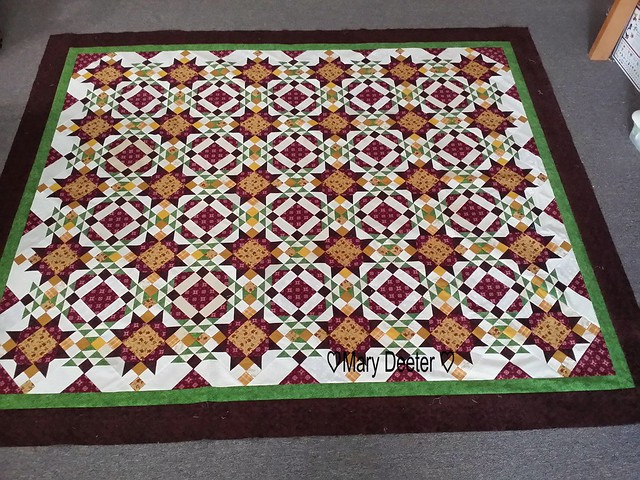
Alllietare Winter Mystery Quilt outside

I’m so glad it arrived by mail without TOO many wrinkles.  Hanging up for a bit will help them to shake out I hope.  I hate to see her have to iron that beast, enough that she is loading it on the long arm and doing all the quilting.  If you quilt for others and they mail you tops/backings, how do you manage the inevitable winkling from the shipping?  Does a steamer work or do you have to iron the whole thing??   Allietare is a pattern by the queen of scraps, Bonnie Hunter and the pattern is available on her online store.

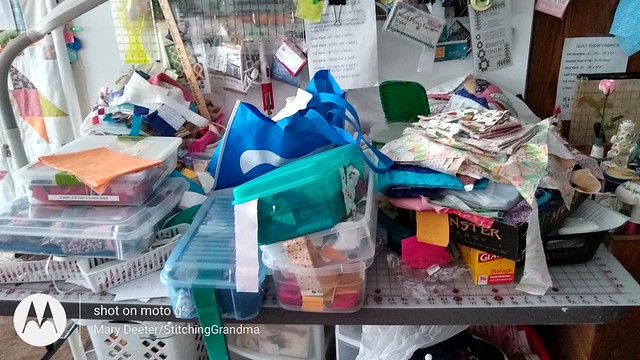
Anyway; now that Allietare is ‘under control’ and OFF my table, back to my Pat Sloan  Scrap Happy Little Wishes story!  I went to the sewing room and looked at one of my cutting tables, buried in STUFF.  A disaster zone for sure!  I went up with the intent of “cleaning it up” but to be honest, it looks like this 4 days later STILL.

Disaster zone

Last week I was making “string blocks” for borders, so there are bins of stings, baskets of scraps and so much more on that table.  I had one basket of string blocks made, and decided to join them together into a “string border”.  (I wanted to sew, not clean….at least, that is what I told myself when I picked up the baskets).  Sewing string blocks uses scraps, which I needed to clear up, right?  I use phone book paper as a foundation for my string blocks.  At one time, I had my strings sorted by width, then as I was digging for the right color, I resorted by color. Sometimes I have to get in the scrap aver boxes to find the perfect strip.  Anyway, working on string blocks is what I do when I have no sewing “plan”, and I hadn’t quite gotten to the Scrap Happy Little Wishes quilt.  (I’ve had vertigo for a week now, so mindless sewing of string blocks was about all I could manage) . Honestly, cleaning up from multiple projects was more than my wobbly head could manage last week.

Since my BIG cutting table was cleared off, I could lay out all the string blocks and arrange them so there were not similar fabrics too close together.

More string border blocks

Anyway, at some point I measured what I had sewn together and discovered I had enough to go around something that was hanging on a hanger waiting on borders.  I had made 268″ of a 6″ wide border, and while getting down my Scrap Happy Quilt, I found 336″ of  4″ borders all done too.

String borders

I laid out my Scrap Happy Stars on the table and immediately decided I didn’t want to put either of those string borders “next to the black sashing”.

Scrap Happy Stars on the table

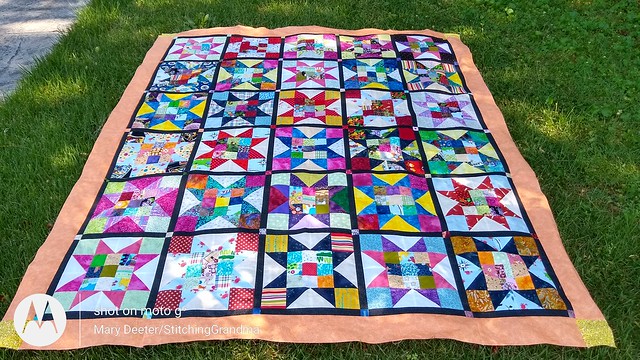
There JUST wasn’t enough space between the busy scrappy stars and the scrap borders.  So, I executed plan B.  I got out a bin of reds and oranges and yellows, did some more quilt math, and decided a 4″ border was what would work.  I have a tone on tone ORANGE (shown at the top of the photo above) that was also used in the sashing stones, and I decided it was perfect.  At this point, the quilt top was feeling rather “dark” to me, but the orange really brightened  it up.  I cut the sashing into 4″ strips, sewed it all together and then sub cut to length for the sizes I needed.  I added some cornerstones from my 4″ scrap storage, and in no time at all I had the borders attached.

Scrap Happy Little Wishes Challenge

At this point, I think I am going to leave “well enough alone” and figure out a backing and start quilting it.  My brain this morning was running along the line of putting it on my quilting machine frame (the one with the 9″ throat and the Janome 1500).  I need to learn how to use that machine, loading etc, and it is high time.  I am glad I bought some wide backing last winter from Marshall’s Dry Goods, but not sure if grey paisley is what I want to use.  I have some purple wide backing, but have to check and see if there is “enough”.  If not, I may order something else.  Did you know they sell 108″ wide back for $7.99 a yard, and you can get a 15 yard BOLT for under $80.  Great choices and I am thinking I have some shopping to do.

Sidenote Serendipity Quilt Shop is a small business in a very small town, and since the onset of the COVID-19 lockdowns, they have converted to totally online sales until it is safe for everyone to shop in person in their store. If you need something, new fabric is arriving daily, and they have $5 flat rate shipping or porch pick-up. Their amazing online shopping website is running well and this week (through July 12) there is 20% off on Moda Grunge.  So, if you need some fabric or notions, try to support the small business so they will be there after COVID-19 is history.  Serendipity is where I ordered that fabulous Bella Toscana fabric, catching it on sale.  I think I bought 7 or 8 yards, so I have enough for matching pillowcases.  The facebook post by Serendipity inspired me to get my Bonnie Hunter Allietare off the hanger!!  

It is a very nice feeling to move two projects forward that have been “hanging around” for so long.  No worries though, I have lots more UFO’s to tackle.  All but one of the series of Scrap Dance Mystery Quilts I have done over the years are still “on hangers” . Well, except the last one, it is still on the design wall.  Carole is publishing the TWIST soon.  When I was looking through photos yesterday I realised I had ONE of the Scrap Dance series finished.  I had to go back to my blog and find the post about it.  Turns out, I finished it around September 2015, about the same time I was making the blocks for the Scrap Happy Stars!

Scrap Dance Quilt Along Finish!

Seems I like those scrappy projects!!!I was busy that year.  (You may see some of the same fabrics in BOTH projects!)

If you made it this far, thanks for reading.  I appreciate all of your comments when you take the time to post them.  I often say I am slow to blog anymore because I don’t have much to say, or I don’t have any photos to support the post. Today it seems like I might be overwhelming you with photos and narrative.   So, I am glad you took the time to get this far, and hope you enjoyed the post.

What are you doing on this hot July day for fun???

2015 was a good year

Lots of discussion around the web about just fast forwarding to 2021 and totally skipping 2020. I decided to make my time spent in 2020 productive, so I am pulling out small (and large) UFO’s.

2015 was a good year for starting things, and not finishing them all. Do you remember https://stitchinggrandma.wordpress.com/2015/11/12/wild-and-free-and-bluebirds/ ? I had fun taking a 2 day class in person with Pat Sloan at the Quilters by the Sea Quilt Guild in Ocean Pines Maryland.

One of the projects was called “Wild & Free”. Really, go take a look back at that blog post I linked above. We had a great time getting wild with making a background for a small applique project. The second day of the class we did a different project, and believe it or not, I FINISHED that project in the SAME DECADE! https://stitchinggrandma.wordpress.com/2015/11/11/my-little-blue-bird/

My Little Blue Bird

Anyway, back to the “Wild & Free” – Pat Sloan was seen “HOLDING MY PROJECT” – https://stitchinggrandma.wordpress.com/2015/11/09/such-a-groupie-moment/ and needless to say, I was tickled. We all made our backgrounds to use for one of Pat Sloan’s patterns called Mama’s Garden. One student even started the applique the night of the class.

Marti started her applique
Pat Sloan holding ” my version” of the background during the Wild & Free class. The pattern is Mama’s Garden designed by Pat Sloan
Marguerite’s
Anna’s project

I got to sit next to Anna during this class and learned that she was a “machine embroidery wiz”. She invited me to come and play with her group and I am SO glad I met her and have.

You know me, you know that I put the project away after the class, sort of, and haven’t touched it since. Oh, I did all the tracing of the applique pieces on Heat & Bond Light, and saved them in a zip lock bag, with the background piece. I had the background ready to go, with a stack of fabric that I wanted to use for the applique, and there it sat on top of my cabinet for the last 5 years.

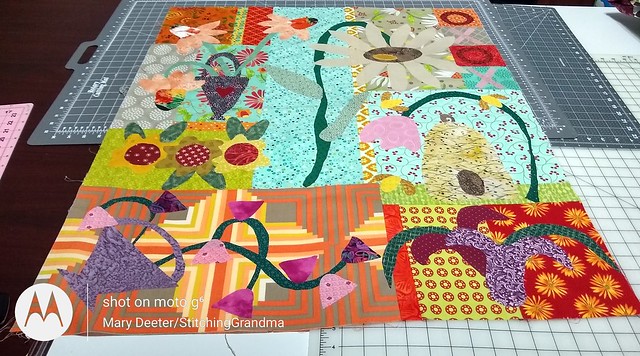
Since I am digging my way through UFO’s, I thought a “smaller” project was in order after I got the border on my Allietare. (Note, Allietare distracted me back in 2015-16). I pulled down the box this Wednesday and started the process of picking fabrics for each of the applique elements. By the end of the evening on Thursday, I have all of the elements fused to the background and it is ready to start stitching down those pieces.

Mama's Garden

The pattern calls for 2 borders, and I think I need to figure out which fabric I will use for them. I have to go back and “re-read” the pattern instructions. I can’t remember if I stitch the applique first, or add the border first. I think I will use some stabilizer “behind” the fabric to give a little “heft” to the project and allow for a better outcome with the machine applique stitching.

This is a raw edge, fusible applique project, and it will be fun selecting thread colors to stitch with. The majority of the background fabric is from Pat’s line called Bobbin’s and Bit’s by Moda (again – circa 2015 or earlier). The applique pieces are from yardage, fat quarters and scraps.

I don’t know if those in the class finished their projects right away or not, but I know that this was a LOT of fun to work on, and will be a lot of fun to do the stitching too.

Still no UFO list in my life, too many to count. Lots of projects I have in mind to make, but I am keeping my eyes focused on the old projects and feeling quite good about moving forward with things.

Not sure what I will do with this when it is finished….but I am enjoying the process.

So, I’m not skipping ahead to 2021, I will make 2020 the year I finish some of last decades projects! How are you spending your week??

Progress on a UFO – Allietare Mystery Quilt Circa 2015-16

This month seems to have motivated me a little bit to work on some projects that have been “fermenting” on the shelf or on hangers! Last blog post I talked a little about getting stalled when it came to putting borders on quilts.

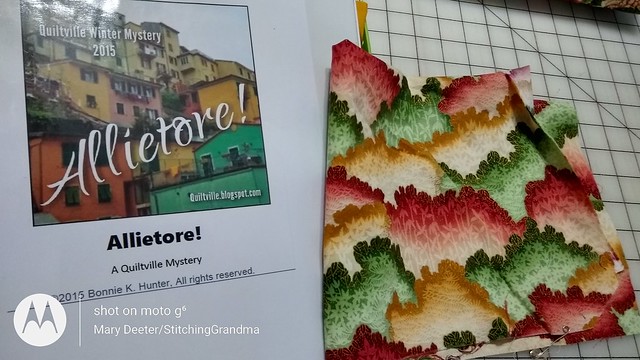
One project that has been quietly hanging in my quilting room is a Bonnie Hunter pattern. It was the Winter 2015/16 mystery quilt she called Allietare. The pattern was inspired by one of Bonnie’s trips to Europe and the Tuscan countryside.

My quilt top has been assembled since about March, 2016, all but the last border. Apparently, I had shopped for border fabric, because I had a box, with 4 different fabrics.

Looking back through my project notebook, I had receipts from Hancock Fabrics (RIP) and Hobby Lobby for various pieces in the quilt. I also had the “color chips” from the original pattern, where Bonnie recommended, 5 color groups for the project. I remember when I started to shop for fabric that the colors on Bonnie’s graphic were not the same colors in the “suggested” colors. I had a scrap of fabric that really “matched” the graphic.

Colors

(Note…the “spelling changed from Allietore to Allietare” about the 2nd week of the project. I never made a new book cover.)

I really felt like the choice of black was too harsh for these colors, so I opted for a brown. And Bonnie suggested just one constant color and that was a GREY. Again, I felt like I need to use the green, like in my inspiration fabric.

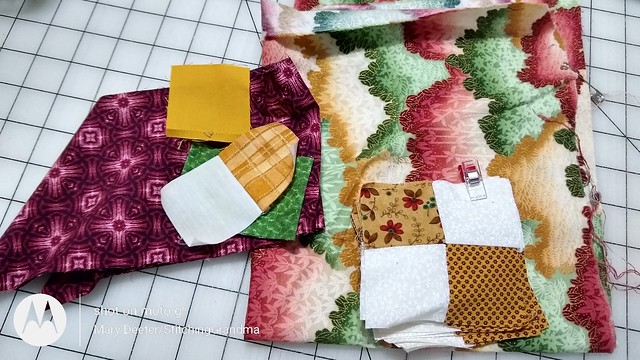
Bits and pieces from the project
Inspiration fabric
inspiration fabric with “leftover blocks”

I was really happy with my fabric choices for the quilt top, but when it came to the border fabric, I stopped. I have to say I had 4 & 5 yard pieces of three different fabrics, and at the time, they just didn’t click with me for the project.

One more round if borders to go

Early this week, my local quilt shop posted a sale and some photos of fabric and one of them caught my eye. In fact, I got so excited, I had to go out to my quilt room, get the quilt top off the hanger and spread it out on the table to measure for borders.

Bella Toscana by Windham Fabrics

I debated and debated ordering this fabric for the borders. Because we still can’t enter the store, I didn’t have a good feel for it and how the width and the height of the repeat (12″) would work for my border. And in the long run, I thought it might be to light alongside that chocolate brown border.

So, I decided against ordering it for the border. What made my decision easier was pulling the box of fabric that I had originally purchased.

Border fabric choices
border fabric choices

As I set out the 3 fabrics on top of the quilt top, I knew why the grapes wouldn’t work, and why the gold wouldn’t work. But, I didn’t know why that top fabric had been previously thought “unworthy”. It was perfect.

So, I did my measuring and decided to cut 8.5″ strips of the wine label fabric for the borders. Lots of discussion with my husband about how to best show the labels. Yesterday after lunch I got busy, did the cutting and got the borders on, and the quilt top is now READY to be quilted.

on the work table
on the work table
border fabric choices

Now that the borders are on, the quilt top is 99 x 111″, perfect for our king size bed.

Borders are finally on
99″ long x 111″ wide King Size Allietare
Alllietare Winter Mystery Quilt outside

So, now, what about that Bella Toscana? I think it is going on the back of the quilt. I just loved that fabric, and have to do some quilt math in order to use it. The quilt is 99″ long. So, I think I will order 4 yards, and build the backing with that piece of Bella Toscana down the center. Because the quilt is very wide (111″), I need to build it up with something else. I initially thought to use the GRAPES fabric, but there is not enough to get the width I need on both sides of the center. I think that gold herringbone will come into play in the process, so, yes, a pieced back, with several sections. It will be fantastic, and I can’t wait to place my order today!

The big debate then is the quilting. As soon as my sister-in-law, Carolyn (aka OneBlockWonderWoman.wordpress.com) saw the photo, she volunteered to quilt it for me. We had lots of fun discussion about mailing it to her, or arriving with my suitcases full of quilts to long arm at her house on Greta the Gammil. That debate is still underway. In any event, I am really pleased with the outcome of the border.

If you are interested in the pattern, you can find it on Bonnie Hunter’s digital store https://quiltville.com/shop.html#!/Allietare-Digital-Pattern/p/59334161/category=13038426

For more about my adventures making this quilt top, just put Allietare in the search block on this page.

Are you catching up on anything this week?

Planning ahead

My husband belongs to a model railroad club.  I belong to a quilt guild.  We often get calls  from the grieving family members who have lost a beloved train hobbyist, or a quilter.  The family left behind is trying to figure out what to do with all that hobby “STUFF”. Most are so overwhelmed with grief they are at a loss for ideas of how to handle the train room or the craft room.  Some are convinced the stuff is worth millions, while others think the hobby stuff is just JUNK.  

In that light, perhaps you might want to “think ahead” and make things easier on YOUR family, for that eventual time when we all take our last “ride” on the caboose.

While you have some time at home, I want to encourage you to take “stock” of your  hobby gear. Take an inventory,  match up the equipment to the box, put together a listing of the age, date of purchase and price for what you own. List your tools, and what they are and where they are located.  Think about what the family is interested in and if you want a special piece of equipment to be given to a particular son, daughter, grandchild. Talk to them now, video chat and be clear about what they do and don’t want.

If you have equipment or tools at a club, think about what you have, where it is located, and what your plan is for it as well. Make certain your equipment is marked with your name, and  the club turns the property over to the appropriate family member, or helps get the donation to the club sorted out.

Over the years, this has been a challenge at the model railroad club, with members abandoning equipment, passing without written direction, etc.  A few years ago the club modified their “rules” and have a provision now to handle the situation. Something similar might work in your club.

From the “Club Rules” X. Personal Property: A. Responsibility: Members are responsible for their own personal property they bring into the Clubrooms. If any member departs from the club, or is no longer a member, they must take any and all of their personal property with them. The Club will appropriate property that is left behind by former members after a period of no less than 180 days.

Make a plan so your loved ones KNOW your intentions. Tell them how to sell the gear, or how to donate and where you want it donated. Check NOW with that place you want to donate to and make certain they are able to accept your donation in the future. Do some checking on your own on Ebay or Marketplace, craft stores etc.,  to determine recent value in the “second hand” marketplace. Let the family know which pieces you have that are very valuable so they don’t end up on a picnic table at a yard sale years from now.

Take that list, and put it in your “important papers” file, for the time “down the line” when it is needed. Let your loved ones know what you want “done” with your fabric, sewing machines, crafting items, or other hobby tools when you are no longer able to enjoy them.

To the quilters, I especially want to encourage you to label your project bins(Include the pattern, and who it was supposed to be given to, etc) finish up your UFO’s, use up your stash, donate what you know you will never use NOW.  Take this extended time at home to survey and sort and SEW!  Most often, we find peace and tranquility in our sewing rooms, so I encourage you to settle in to the space.

If your space is not tranquil, work on changing it a little. Consider organizing, adding some colors that inspire, hanging pictures that calm, you.  This is an especially challenging thing for me, because my space is full of “other people’s stuff”.  Bins, totes, shelves, cupboards make things more orderly.  The next time someone offers to help you organize, don’t say no. Maybe you can help in exchange someone else.

Until the next time, STITCH ON, stay safe, and make something that makes you happy.


When Time Runs Away

I realized it has been TWO months since I wrote a blog post!  Time has certainly run away from me.  When I travel for any length of time, I always feel like I have so much to catch up on when I get home.  My trip to Alaska was fabulous.  In fact, it was so great, that another opportunity has arisen and I will be making a similar trip NEXT August.

My wonderful sister-in-law; Carolyn, known to many as the One Block Wonder Woman   suggested a QUILTING CRUISE !  She has suggested this before, but I always said no, because the cruise lines were not Princess Cruise Lines.  I’ve been busy building loyalty status on Princess, and was edging my way to the top level and didn’t want to miss out on those loyalty perks. Well, she picked up a flyer at a quilt show recently and low and behold, the quilting cruise will be on a Princess ship.  So; we are doing a 10 day trip out of San Francisco next August to Alaska and taking advantage of the 4 days at sea to learn and sew with like-minded people. This trip will include Sitka and Haines Alaska, which are new ports to me.  Of course, booking this trip and looking ahead at which class(es) to take etc has kept me busy. The big details are worked out; and in the coming months I need to figure out air & hotels; but for now, I am sliding the trip into the recesses of my mind and getting back to my current projects.

Would you believe I have a UFO finish?  It only took me 25 months…..Back in Sept of 2017 I took a class with Sandi Blackwell and used her method called Square-Agonals to make this –

Square-agonals BEFORE the cut

After some “slicing and dicing” of the block –

Spiral Out workshop

I reconstructed according to the SPIRAL OUT pattern, and ended up with this great project –

Square-agonals project

I brought it home from the class; did some quilting and then set it aside…..for 2 years.  Well, I had a 3 day Sit & Sew Camp at the end of October and got busy and finished up quilting.  I can’t believe I let it sit for 2 years when just the borders needed quilting.  I got the quilting done on the first day of sit & sew camp, and started making the binding. On day two, I finished making the binding and made a hanging sleeve too.

Spiral Out

Of course, I used my favorite binding method “Susie’s Magic Binding”.  (If you follow me on a regular basis, you KNOW that this is the only way I do binding anymore. All by machine!!  LINK to the method at the bottom of this post.)

Binding went on and the project was completed….sorta….It still needed a label.  More about the label in my next blog post! (SOON….really……)

Before I show you the back…I have to confess I was lazy when I quilted this back in 2017.  I used my Janome 8900 and let the machine do a locking stitch instead of being good and pulling my bobbin thread to the top.  While it looks ‘ok’ on the front, the back looks like a lot of “thread throw-up”.  You know, chunks where the top thread and the bottom thread get all yucky.  Since this photo I have used my micro tweezers and gotten a lot of it cleaned up, but it is NOT show worthy, and certainly not “judge” worthy.  Lesson to myself.

The other lesson is about “details”.  When I pulled this out to “finish” I could not remember what thread I had used to do the quilting. WHY didn’t I just pin a note to it..??????  Hindsight being 20-20, I won’t do that again.  When I did the quilting on the last two borders (the cream and gold border and the green), I ended up using a different thread.  I see it; but maybe others won’t.  The original thread was a silver variegated Superior Fantastico thread.  The thread for the last two borders was silver Bottom Line thread from Superior. It is slightly different, since the Fantastico is 50 weight and the darker silver runs through it.  The Bottom line is much finer at 60 weight and all but disappears.  (Wish I had used it on the entire project in hindsight).

So; here is the back…..and on the outer borders you can see how the thread is almost invisible.  And yes, I pulled my bobbin thread to the top and tied off…so it is a little cleaner all around the borders.

Back of Spiral out

So, here we are, nearly the middle of November and in two months I have one project finished…..at least to talk about.  I have a Christmas project underway that I can’t share until Dec 26th.  I will “write” and “photograph” along the way, and just save that post to publish after the item is gifted.

I’ve had lots of other activities going on, and will save them for future posts!  I won’t wait quite so long for the next blog!

Go hug a Veteran and thank them for their service!


Link to Susie’s Magic Binding


Retreat and UFO

Every year, since I have been a member of Ocean Waves Quilt Guild, there has been a retreat in early February.  I’ve attended many of these retreats and always enjoy the time spent with so many creative, talented people. As in the past, we meet at a lovely beach front hotel in Ocean City Maryland, where we are greeted most mornings with spectacular sunrises in our ocean front rooms. 

640 Dawn's early light - Ocean City MD Sunrise

There are 9 more photo’s in this sunrise series you can see hereOcean City Sunrise photo’s

It is inspiring to wake up early at this retreat, so you don’t miss the glorious sunrise.  Breakfast is at 7:30, and we are sewing by 9 am !

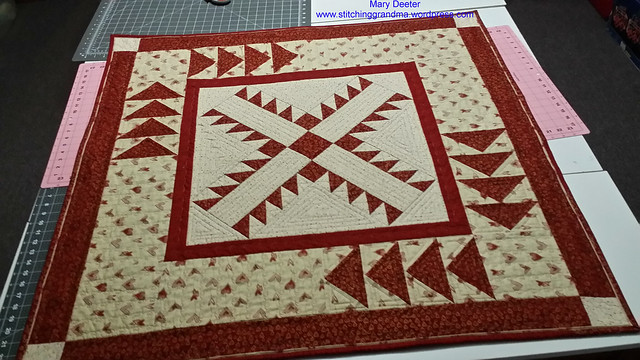
I took with me many items to work on at the retreat.  Turns out, only ONE project captured most of my time and energy.  I dug out one of my oldest UFO’s and brought it along, with the intent of quilting.  Just how old is it?   You can read about it back in 2012 here – https://stitchinggrandma.wordpress.com/2013/11/25/unfinished-projects-starting-to-bug-me/

and here https://stitchinggrandma.wordpress.com/2013/01/18/crossroads-pattern/

and here-  https://stitchinggrandma.wordpress.com/2013/01/18/playing-with-borders/

About a year ago, I came across a bit of fabric that was in the same deep red/brown tones and I tucked it into the box for backing of this project.  So, when I pulled it out to take to retreat, I just needed a bit of batting.  This project was about 44″ square.  I am happy to say I finished all the quilting during the retreat. I cut the backing and batting and pin basted in our hotel suite on Tuesday night, so I was ready to start stitching when the classroom opened on Wednesday morning.  I worked two solid days quilting this, and thought it is small, there were TONS of starts and stops, and turning constantly. I decided right away I was going to “pull up” the bobbin thread, and use my lock stitch on my Janome for my start & stops, and not burying all those threads. It’s a wall hanging and a 6 year old UFO !  (I’m not putting it in a show, so hush you quilt police)  (Oh, and by the way, I KNOW there are a few crappy HST and a few geese that lost their points in this project….they jumped out at me while quilting….hey it was before I knew what I was doing…..)

Quilted and bound


I did most of the quilting using my walking foot. The exception is in the wide border of hearts, I used a stitch that is connected hearts, and in the narrow red border I did the same stitch.  On the outer red heart border I did some wavy stitching.  I like to use these built in to the machine stitches if possible.  They make quilting a lot easier.  If you want to see close-ups of the various quilting that I did, look at the photo’s here – UFO Finish  .  (There is also a photo of the back where the techniques I used really show). 

Yesterday,  I trimmed it down to about 40″ square, as I felt the final borders were TOO wide.  I used up a bunch of left over bits of the red to make a scrappy binding, and did the Susie’s Magic Binding technique. (Some call it binding with a flange or piping) If you have never tried this method, check out the tutorial here – Susie’s Magic Binding Tutorial(Watch the video’s too…)

I used the same fabric that is in the area around the flying geese in the flange for the binding. I love that little pop of color along the edge. I added a hanging sleeve while I was doing the binding, and the last thing that needs to be finished is to hand stitch the bottom and ends of the hanging sleeve and make a label!

Since this was the “big deal” for me at the retreat, I will stop here and ask – what is the OLDEST UFO you have sitting around, and WHY didn’t you finish what you started?  

I will tell you why this went “in the box”.  We were doing a new project every week in the class and I was overwhelmed.  I also could not figure out how to “finish”.  Our instructor had scaled the pattern in Pat Sloan’s “I Can’t Believe I’m Quilting” down to just a 1 block project instead of a whole quilt, and I didn’t “know” what to do at the time.  Of course, a few years of experience were needed under my belt before I could say, enough is enough and a wall hanging is just “fine”.  🙂

More about the retreat in the next post!


Working on UFO # 1 – Swirly Bird and more

Oh, was I ever disappointed that when I looked at my UFO list, I discovered that my “Crusty Crab” was #2, not #1.  My new quilt bee – The Queen Bees has a UFO challenge and # 1 was the project that needs to be finished by TUESDAY!!!!!  Dagnabit!

Well, I tried to renumber the list, but the “challenge Queen” said NO WAY GIRL…..

So, I got out # 1…and worked on it some on Saturday.  The pattern was by Linda Poole, and I took a workshop from her in June of 2015 when she came to Ocean Waves Quilt Guild in Lewes, DE. By the end of the week of the class, I had all the applique  stitched down, and I just needed to add tail feathers and an eye.  But, I was busy and the project went in the “box” and in the cupboard.

The UFO challenge has me pulling it out to see what I need to do to finish and move on. I added the tail feathers using variegated embroidery machine thread, but using my Janome and one of the fancy stitches that is built in.  I did trace the general shape from the pattern, but went “free form” with the stitching.  Hubby helped choose the clear button for the eye from the mason jar o’buttons.

Once the tail feathers and eye were on, the more I looked at it, the more I wanted to “play around” with some “thread painting”.  This is the result….and no, I am not finished quite yet.

Swirly Bird

Swirly Bird pattern by Linda Poole

Tail Feathers

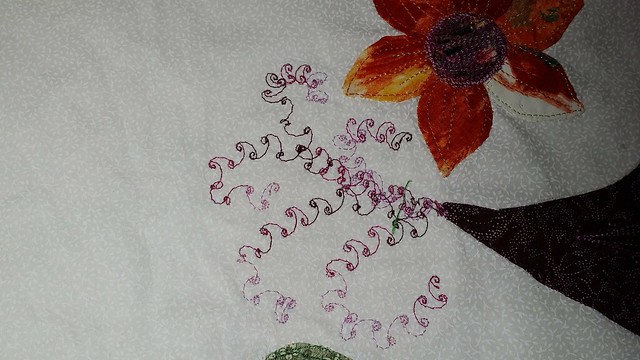
The green thread is not supposed to be there..just a loose thread to pick off of the project…… I picked a stitch that is built into my sewing machine and just played with it to make tail feathers. I used variegated embroidery thread and put some tear away stabilizer behind the feathers.

Bird feathers

Played with the same variegated thread on the wing. Dumped out the button jar and hubby picked the clear button for the eye.

20160723_192855-1

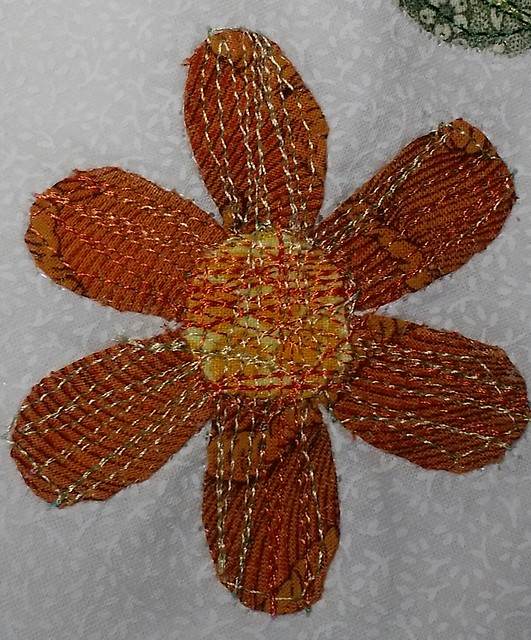
This is the “first flower” I played with doing a little “thread painting/stitching”. Again I chose the variegated thread, but this time orange/yellow/green.   It was fun!

And then I went nuts and here are some of the other parts…..up close……

20160723_192912-2

20160723_192919-1

I still need to do a little something on the green stems. I did the leaves, but forgot to take a close up.  You can get an idea if you click on the picture of the full project (first photo) and zoom in.  Anyway, once the stems are “stitched”  I can layer it up and quilt it.  The size is about 22×22.  I really had fun playing with my embroidery thread collection as I worked on this!  So many choices with the wonderful threads I was given. Having it all on thread racks makes it so easy to choose too!!

Hoping to knock it out this afternoon.  My sewing room was hitting 85 degrees yesterday; with 2 a/c units running; so not sure how much I will get done.  My room is over the garage and in this heat, it is tough to get it comfortable.  Our whole house is struggling with the temperature. The house is over 110 years old, and not the most “efficient, and no central air. At least the pool is still refreshing, though I may have to add a little cold water to it this afternoon.    What are you doing to stay cool during this heat wave?

(Note – my “other bee” – The Material Girls is also doing a UFO challenge, and I have NOT kept up with them!! This project was on that list too, but I can’t remember which number it was…)  I keep saying I am not starting any new projects until I finish a few things….so if I can get this out of the way, I won’t feel so guilty!

Update on June’s Quilt — I mailed it to my wonderful sister in law, Carolyn ( One Block Wonder Woman ) and she quilted it yesterday for me.  She is amazing!!  I had ordered the backing and she just got it on Wednesday and she is finished already!! June will be so tickled.  I have the binding all cut, but need to prep it.  While I was on a bus trip on Friday, I found more of the fabric that I used for the borders.  I bought what was left on the bolt (4 3/8 yard). June wants to recover her fabric headboard, and I didn’t have enough of any of the fabrics left, so this should give her what she needs. Any leftovers, I will turn into matching pillow cases or a throw pillow or something. I was tickled to find that fabric again, and this time I didn’t have to pay for shipping!

Update on Addison’s Quilt – it is still on the big table and I am still staring at the borders.  But…..I did get a wonderful thread that will look great on the borders at the quilt show on Friday (Quilt Odyssey 2016 – Hershey PA). I had a visit to the Superior Thread Company booth and got a wonderful grey variegated – Fantastico #5169.

I love to get my thread at the shows, because you save a couple of dollars on each spool if you buy 3 or more.  So I came home with 3 spools of Fantastico (5035-cashmere- variegated) (5169 – grey variegated) (5075-silver black variegated), and 3 spools of Masterpiece.  The Masterpiece I use for piecing and my colors are boring – granite # 156  – canvas #151 – and graystone #155.   My spreadsheet of Superior Thread is growing longer.  I dated the bottom of the cones of all the ones I bought this time and last March, so I can see “how long” they are lasting me.  I am on my 3rd greystone cone since I started using it and my second canvas. Those cones are 2500 yards! I am on my second spool of the cashmere too.   What thread do you love to piece with? Do you have a “go to” color for quilting?  My go-to is either the cashmere or Bottom Line Silver #623.  I am on my 2nd cone of it too.  I also love playing with the embroidery threads that I have.  My daughters have gifted me so many and I just love having so many color choices.

Time to go! Enjoy your day and stay cool!