My friend Carole, From My Carolina Home is in need of help with the Safelight Project 2024. This is a project that she undertook for at least the last 8 years. Safelight is a place for women in desperate situations, a safe harbor so to speak, as they leave abusive situations and start life on their own again.
You can read all about how you might be able to help in some small way, and what a monumental task Carole is taking on AGAIN, this year.
There are LOTS of different ways you can help, financially, making cards of encouragement, sewing. Please visit Carole’s blog today, and do subscribe for updates.
My mission to finish up some of my long hanging Scrap Dance quilts continues.
I got a phone call on Thursday last week that my Scrap Dance Minuet was finished at the long arm quilters.
I wanted to finish working on Scrap Dance Tango 2016 on Friday and take it with me when I picked up my king sized Scrap Dance Minuet. I did a LOT of ironing on Friday night and Saturday morning before I traveled to pick up and drop off Scrap Dance quilts.
Scrap Dance Tango 2016 ready to go to the quilter
I love how I can see the quilting on Scrap Dance Minuet, even while it is folded up in the bag to go home.
Ready to take home and bind Scrap Dance Minuet
Steps to finish
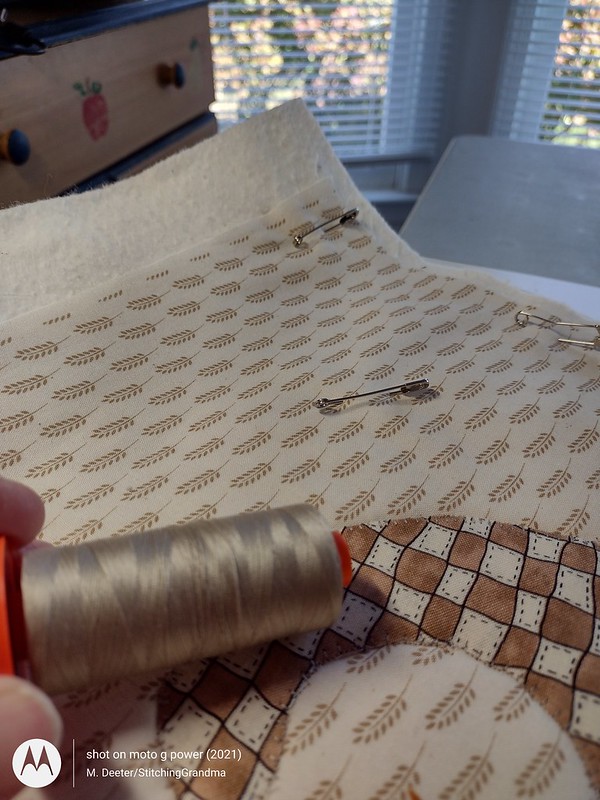
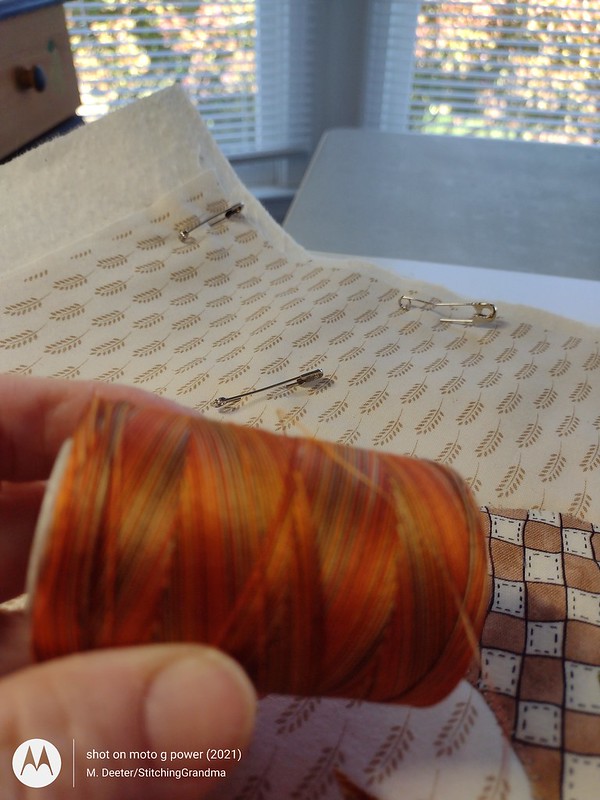
As soon as I got home I got busy measuring and calculating how long the binding needed to be and cutting the strips. I needed 376″ to go around the quilt, and I usually increase by about 20″ to allow for corners and joining the tails. I cut them all out of fabric that was wide backing, so not a lot of seams in the binding.
Ready to make Susie’s Magic Binding
I started on Monday to attach the binding, and stopped to make a hanging sleeve and label. The hanging sleeve is the same turquoise as the backing and kind of disappears on the back. The label I stitched out on my Janome 11000 embroidery machine, while I worked on the sleeve. I attached the label to the back of the quilt while stitching the binding.
Scrap Dance Minuet label
When I made the label, I used a design from OH MY Crafty Supplies , called Four Flower Floral Pattern. I think the design is retired. The font came from Designs by JuJu and is a half inch font, which I find works best with labels. I made my label the way I have been doing lately, with a piece of batting behind the fabric. The green that I bordered the label with is the same green as the flange on the binding.
I still have to stitch down two sides of the label by hand and the sides and bottom of the hanging sleeve by hand, but I think I can say Scrap Dance Minuet is complete!
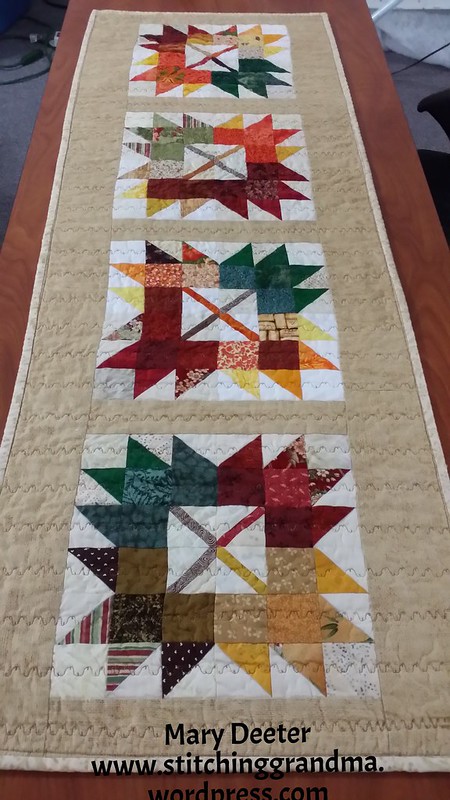
Scrap Dance Minuet 2019 (88″ x 100″)
I love how the quilting still shows on the back even with the busy fabric pattern
SCRAP DANCE FINISHES –
If you are keeping track, Minuet makes the third Scrap Dance finish so far this year! The last large Scrap Dance is Tango at the quilter, and it is from 2016. It will be a few weeks before it comes back.
I still have this year’s Scrap Dance Quadrille (2023) hanging on the design wall, waiting for borders. And for big quilts waiting for quilting, I have my Summer in the Park from a retreat in 2014, I believe. Yes, it’s on a hanger now. I took it out of its storage tote a couple of days ago and hung it up. I think I have a plan for the borders, but it may have to “air out on a hanger” for a few weeks!
Every one of these Scrap Dance quilts have been a joy to make. All credit for the wonderful patterns goes to Carole Carter. The patterns are available to purchase from her on her blog – https://frommycarolinahome.com/my-patterns/
Lessons learnt!!
I’ve learned a lot in the time all these big quilts have been hanging around, and that is, they are not going to get finished if I don’t get them off the hanger. I’ve always gotten distracted by the next quilt, and the large quilts intimidated me from quilting them. Last year I started buying wide backing and thinking ahead to getting them quilted, and 2023 is going to be my year of clearing up the big ones. Having them professionally quilted was a hard decision for me. While dealing with a massive quilt in the process of binding them, I think I made the best possible decision for me. It’s a weight off my mind getting them done!
Going Forward –
Someone asked me what was I going to do with all of these quilts, and at this point, I think I will start rotating them between the guest room and the master bedroom and simply enjoy them. I look at them each with all their scrappiness and find joy in knowing I saved every little bit I could from being tossed in the trash, and turning that scrap into a thing of beauty.
What is happening in your sewing room this first week of August?
I am on a “self imposed” mission to get all these quilt tops off of hangers and finished this year! Did the last little bit of stitching on my Scrap Dance Twist, and it is now completed! (And in the washing machine with color catchers as I type……always a nerve wracking event for the first wash!)
Scrap Dance TWIST was a mystery quilt by Carole Carter – From My Carolina Home during 2020. (The pattern is available for purchase on Carole’s blog – https://frommycarolinahome.com/my-patterns/ )
I’m thinking we didn’t know where the world would be heading when we started this in January of 2020. The monthly “mystery clues” helped get us through a terrible spring. Once I had the top made, I did what I do with all my tops; give it a final press and delegated it to a hanger. I had so much going on with making masks and making do with life that spring.
In my endeavor to get this quilt top moving along into an actual quilt, all it needed was a “couple of borders”. I’ve said this before, my hangers that are full of tops, are there because they just lack a final border. When I pulled Scrap Dance Twist off the hanger and started looking at it a couple of months ago, I knew what border it needed, and got busy. I added a two inch white border, and then a nice “string border”….that I had already made.
Borders on Scrap Dance Twist
At some point in my scrappy life, I decided to do string blocks sewn to telephone book pages, join them all together and then there were 600 plus inches of borders, neatly folded on the cabinet shelf, just waiting for a quilt to call it’s name.
Once I added the string borders, I did some stay stitching around the outer edge and measured it up…..yep, a king size batting was in order, and I ordered some Warm & White from Amazon. I measured, and remeasured and made certain I had enough wide back grey backing, cut it and squared it up and took the quilt top, the batting and the backing to a local long arm quilter. We picked a lovely thread that reads off white for the quilting, and left it to Catherine on the edge to edge quilting design. You will see that it is a lovely open design with swirls and leaves. The turn-around time was terrific, and I picked up a trimmed, quilted top last week.
Of course, I had to remeasure for the 100th time and get busy with the binding. I had set aside enough of the grey fabric to use for the binding, and chose this lovely green for the piping. I keep a little spiral notebook with notes about sizes, and how much binding to make etc. Susie’s Magic Binding is a two piece binding, and I was lucky to have 108″ fabric to cut my strips from, so not too many joins!
Susie’s Magic Binding
I decided to add a hanging sleeve and label BEFORE I put the binding on, saving me some hand stitching too. I made the label on my Janome 11000 embroidery machine. I decided to put a nice frame of that lovely green around the label to tie it in with the binding.
Label for quilt made on Janome 11000
Once I had the sleeve (same color as the backing) pinned on, the label pinned on, I was ready to bind. It’s a big quilt so I split it up over the course of two days, and here is the final result.
Two sides of the label stitched into the binding
FINISHED Scrap Dance TWIST – 2020-2023
Susie’s Magic Binding on the Scrap Dance Twist.
The quilt, prior to washing is 91″ x 102″. When I picked up the Scrap Dance Twist, I dropped off another Scrap Dance Quilt (2016 era) for long arm quilting. So, more binding of a big quilt and labels in the future. I’ve got ONE more quilt from the Scrap Dance series that is king size to get ready for the quilter in the next week. I am also working on this years (2023) Scrap Dance mystery, and it is also “waiting on borders”. I don’t think it will be left too long to get finished.
What’s hanging around at your house waiting for a finish??? I know I am tempted by so many patterns and projects but I am holding firm on starting too many new things!
I have been feeling “weighed down” for several months, staring at unfinished quilt tops, hanging around in my sewing room. I will NOT count how many unquilted tops I have….it’s slightly embarrassing. When friends ask why they aren’t finished, I always say, all they need are some kind of border. Truth is, I love making the blocks and assembling the quilt tops. Then, something else I want to make comes along, and the tops have all ended up on hangers in my sewing room. I also wanted to master that quilting machine on the frame and that has not yet happened. In fact, the quilt below was my inspiration to try again, so I loaded a test piece, oiled, cleaned and threaded the machine again and got about 6 inches of stitching done only to be fooled again with tension trouble. Big sigh. So, back to the domestic sewing machine for now.
At some point last year I started ordering online or buying in person wide backing fabric. I have acquired purple, grey, teal, light blue, and a lovely multi color spotted print all 108″ wide.
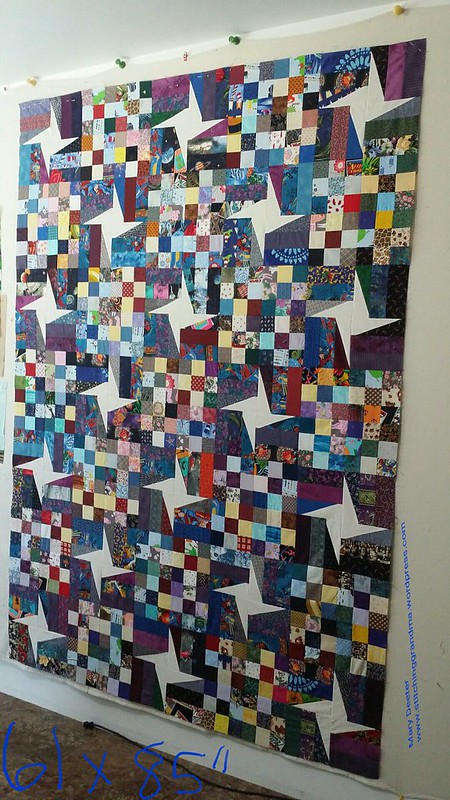
I pulled one of my smaller projects (61×85) off the hanger and started testing fabrics from my stash for the borders. Scrap Dance Square Dance was a mystery quilt I made starting in January 2018. The top went on a hanger around June or July of 2018. This is what it looked like coming off the hanger.
I can now report it is a finished quilt in 2023 ! I added a narrow white border, and my dear husband made the suggestion for the border fabric. I used some of that 108″ wide purple and put on the final border. I even had enough left to make the binding. Of course, I made binding with a flange – also known as Susie’s Magic Binding. It goes on quickly with no hand sewing.
I quilted it on my domestic sewing machine, using a wavy stitch that was built in the machine. I elongated and widened the stitch across the quilt, and using a purple thread from Superior threads (Bottom line) top & bottom. Not totally thrilled with the quilting, but it is finished!
As soon as I put the binding on, I took it outside for a beauty shot. Then it went straight into the washer. Hanging around so long in the sewing room I think it was gathering dust!
I made the label on my embroidery machine, and stitched it on last week. That to me is the “big finish”.
I put that purple wide backing to good use, and still have about 3/4 of a yard left. Notes about the pattern – This was a mystery quilt by Carole Carter on her blog — https://frommycarolinahome.com// and is available for purchase.
I was tempted after this top was completed to work on another. More about that next time. (It is in progress on my table). Also happening in my sewing room is the 2023 Scrap Dance Quadrille mystery quilt. That pattern is free on Carole’s blog this month, so go take a look. (After July, it will be available as a pattern for sale, so now is your chance. )
Scrap Dance Quadrille
Do you notice anything missing on the Scrap Dance Quadrille? BORDERS….but the mystery is not over, and they will be part of the final step in July. So, once this came off the lawn, it went back on the design wall, not a hanger! Funny how that keeps it front and center in my head!
Do you have any old projects hanging around that need to be finished? What motivates you?
If you have been following along, you know I left on a trip halfway thru October, and left my Autumn Jubilee 2022 quilt project partially made. Pattern details came out on Fridays on the blog From My Carolina Home so I couldn’t finish before I left.
Coming home from travels in early November, I was inspired by the fall colors along the way. Time to get my Autumn Jubilee projects finished.
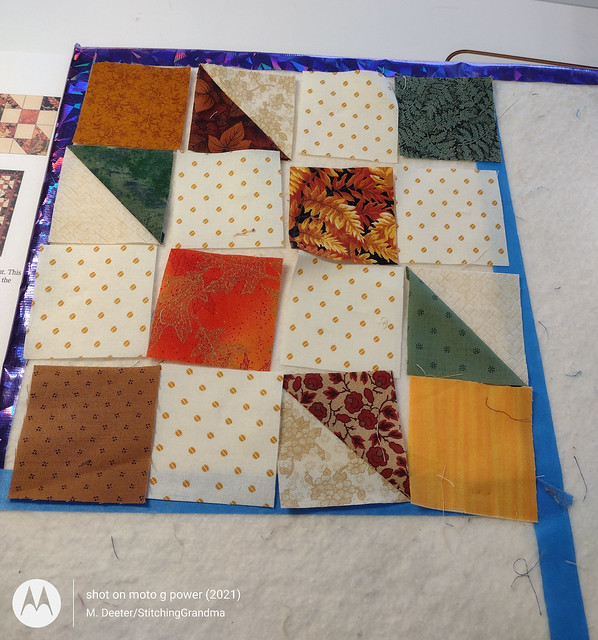
The quilt along is the largest project, and I wanted to finish it first. When I stopped in October I had 8 blocks made and up on the design wall.
8 blocks on the design wall with one of the layout options
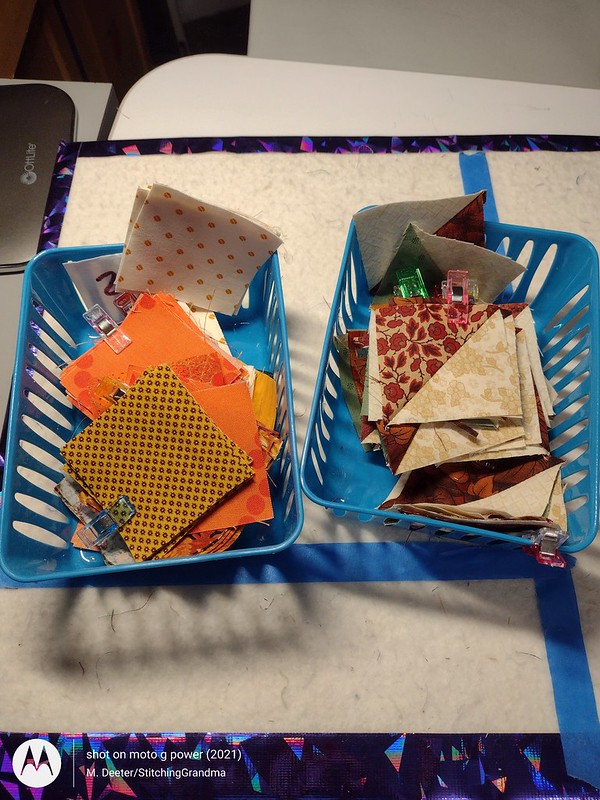
My method when I put the blocks together is to layout the pieces I want to use on my design board . I made my own design board by cutting a piece of foam core board, used some spray adhesive and covered in batting, and pretty tape around the edges. The blue tape was from another project, but it helped guide me for this size block. I keep the pattern info close so I don’t goof up the placement of the 16 pieces going in the block. I had baskets of pieces cut and ready to sew.
Arranging the placement on the design board
Trying to stay organized with all the pieces
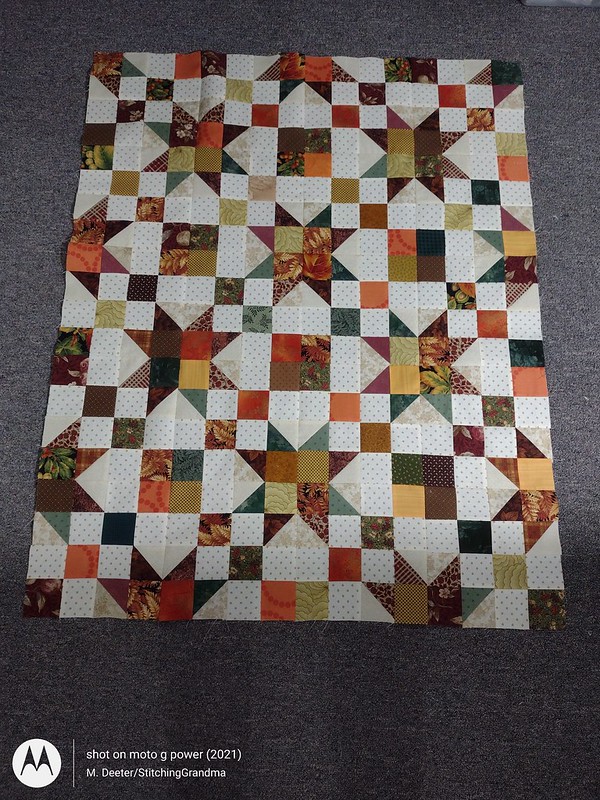
At first, I thought I would make the blocks into a table runner, but then, I set them 3 by 5 and it was just too wide for a table. It was plenty long, but I didn’t want to “unstitch” a whole row. I decided to “make 4 more blocks”, and ended up with this.
Blocks set 4 across and 5 down
Then on to borders.
The first border went on to frame the blocks.
I deviated from the pattern at this point, because I didn’t want to cut up more yardage for the pieced border. Instead, I got out my “shoeboxes” of strings, and started making a string border or a “piano key” border. My method mimics Bonnie Hunter’s String Piecing on phone book paper. I decided how wide I wanted the border, and ripped out some phone book pages and trimmed them to that width with my paper cutter. I did a little math (gasp), measuring the diameter of the quilt and divided the length of the pages into it. That way, I knew I cut enough pages. My little local book phone book pages were about 9″ long. (Yes, we still get phone books here in Delaware, and I save them all on top of my sewing room cabinet).
When I make these blocks I do a lot of chain piecing, so when I go to the iron, I might have 6 or 8 blocks to press at once. Yes, the fabric hangs off the edge a bit, and I trim once all the blocks are made. Once trimmed, I take the paper off the back using my “purple thang” and a pair of tweezers. The paper comes off easily because you shorten the stitch length.
String Borders
I sort them out into a pleasing arrangement, joining the ends and before you know it….I have enough to go completely around the quilt. I cut them to length, and attach to the quilt.
String borders added bringing the project to 44 1/4 x 52 3/4
Because of the size, I either have to trim off a couple of inches or piece a backing. Giving it a little thought, I decided to dig in my bins and see what I could come up with. I came across some border print fabric that had been cut into 36″ widths. I did a little piecing and came up with a backing fabric that would turn this Autumn Jubilee quilt into a 2 season quilt.
I spent a couple of afternoons working on the quilting, using my walking foot. I used Superior Bottom line #653, tan, on top and a Superior bottom line # 622, silver on the back. The quilting shows better on the back of the quilt. It is simple but effective.
Simple walking foot quilting
I selected fabric for the binding and made the 2 piece “binding with a flange” also known as Susie’s Magic Binding. It goes on by machine on the back, gets rolled to the front and “stitched in the ditch” of the flange by machine. I like the effect it gives the finished quilt.
Gold binding with a green flange
The binding just shows the gold fabric on the back
Finished Autumn Jubilee Quilt
Last job is to make a label for the quilt. I am happy with the colors and the fun of making this two season quilt. The thing I love most about this quilt is the Autumn colors and the scrappy feel of it. If you know me, you know that I never met a scrap I didn’t love, and I love being able to put them into a quilt that feels cohesive. Sewing is for my own joy with colors and patterns I love. If a loved one looks at the project and express an interest, I am happy to give it away. I did that a couple of years ago with a bag I made during Autumn Jubilee. A dear friend was enamored over the bag, so I gifted it to her. We can’t keep everything, but I do want to make certain that the gift is always welcomed. We all have such different tastes, don’t we?
Time to go on to finishing another project. What is happening in your sewing space?
Last week, I shared with you my 1st project for #AutumnJubilee2022 . This week, the next step in the Autumn Jubilee Wool Stitch Along, was to “embellish your wool Cornucopia”. Go take a look at Carole’s post when you finish here, and see how fantastic her project is coming along. As you may remember, I deviated from the Wool & all that hand stitching. When I read today’s post, I got inspired to get busy, and do the machine applique stitching on my fusible applique pieces.
Before I could start the machine applique stitching, I needed to do a couple of things. I layered up my project with a piece of Warm and Natural Quilt batting and a piece of Pellon 806, stitch and tear stabilizer, behind my background fabric and batting. I will confess to using some 505 spray to keep everything in position until I could get a few safety pins in place. You may ask why do all that before applique stitching, and the answer is, I like the stitches to have something to “bite into”. I could use just batting, but putting the stabilizer behind the batting keeps me from getting all that batting fluff in my machine. Of course, some will get in there with each puncture of the needle, but my feed dogs will be clean.
I pulled out threads that I thought might work well, and started with an Aurifil tan, a 50 wt cotton for around the cornucopia and other light colored items.
Aurifil 5011, 50 weight cotton.
I also used some Coats & Clark variegated thread, which is also a 50 weight quilting cotton. This was used around many of the leaves and pumpkin.
Coats and Clark quilting thread
As I stitched, I decided that I needed a dark red and a green, and pulled those from my wall of embroidery threads. Using a blanket stitch, (#42 on my Janome 8900) I was soon finished. (I did take a short break this afternoon for an eye appointment, and was SO happy that they didn’t dilate my eyes, and I could get back to stitching!)
Machine applique complete
After reading Carole’s post today about embellishing her Cornucopia, and her suggestion to maybe do a little embroidery, I decided that I would do just that.
Early this month, I downloaded a cute embroidery design from Sew Sweetly, and thought it would work nicely on this project. If you are looking for cute Fall designs, the ones sold by Sew Sweetly stitch out very well. You might remember I used some of Sew Sweetly designs in a 2020 project during Autumn Jubilee 2020.
I decided to add the embroidery design on an angle on the left corner of the project, using the same thread colors that I had previously stitched with in the machine applique. The exception is the gold for the leaf. I couldn’t use the Coats & Clark in my embroidery machine, so I pulled a deep gold for one part of the embroidery. Note, I started with a 5×7 design, and resized it by reducing it to 80 % and rotating it in the machine. In the photo below, you can see the basting stitch that my machine does (black thread); which really helps me with the placement.
I think the final stitching looks pretty darn good. Note – the machine embroidery was done on my Janome 11000. This time I used the 6×8 magnetic hoop, and just hooped a piece of tear away stabilizer. I did a basting stitch in my hoop to hold the project in place, showing me the “field” that it would stitch in. Once the stitching was finished that stabilizer that was hooped easily tore away. There is still a piece on the entire back of the project that will be carefully removed once the project is closer to finished.
So here is how it looks at the end of Monday – and oh, dinner was late because I was just having such fun!
I’ve pretty well decided it will be a wall hanging. I think I might want to do a bit of embellishing stitching on the leaves, acorns, and pumpkin so that Pellon will stay on the back until I know I am ready to quilt. I’m kind of waiting for the “next” from Carole at From My Carolina Home, just in case she has another brilliant idea. When I cut the background piece, I cut it at 18×21, so I do have some room to play a little bit more. It’s a nice size for a small wall hanging.
Are you stitching along with #AutumnJubilee2022? ? ? Go take a look at Carole’s blog and keep your eye on her wide variety of projects! She will be covering everything from quilting, cooking, sewing, stamping gardening along with the wool applique, and there are lots of giveaways. When you follow, tell her I sent you!
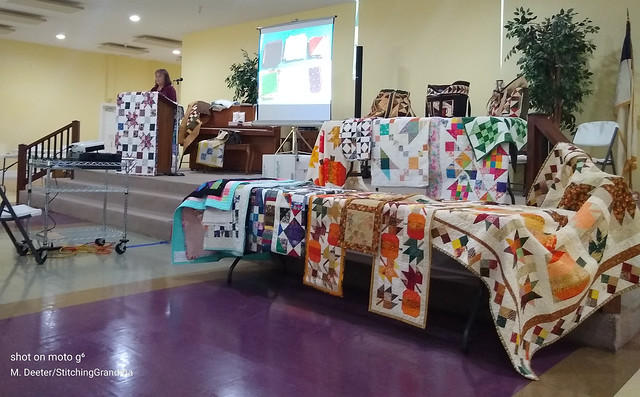
This week I had the pleasure to meet in person a fellow blogger – Carole Carter, who writes the blog called From My Carolina Home. If you have followed me for long you know that I love her projects and often share links to what is happening on Carole’s blog.
Carole agreed to be a speaker at Ocean Waves Quilt Guild in Lewes Delaware and to teach a class. Normally she doesn’t travel this far, but she was able to tie it in with some other activities, so she made the exception.
Her presentation at the guild was delightful, inspiring and interesting. She made lots of sense in her methods for storing scraps, or what she calls “Scrap Dancing”. She really is a dynamic speaker and if your guild is looking for speakers, I would highly recommend Carole. Her personality bubbles, and her projects are so much fun. To help cut down on how much she had to pack, several of us brought projects that we had made using Carole’s patterns. It was fun to see them on the stage along with her projects.
During the guild meeting
We had the joy of going out to dinner with Carole and her husband on Monday night, and were joined by fellow blogger Pat and her husband. Pat’s blog is called Sunlight Through My Windows . I hope we didn’t bore the men while we talked blogging and quilting and other hobbies. It was fun getting to know the husbands. Pat & I are moderators for Carole on her facebook group, so we had lots to talk about.
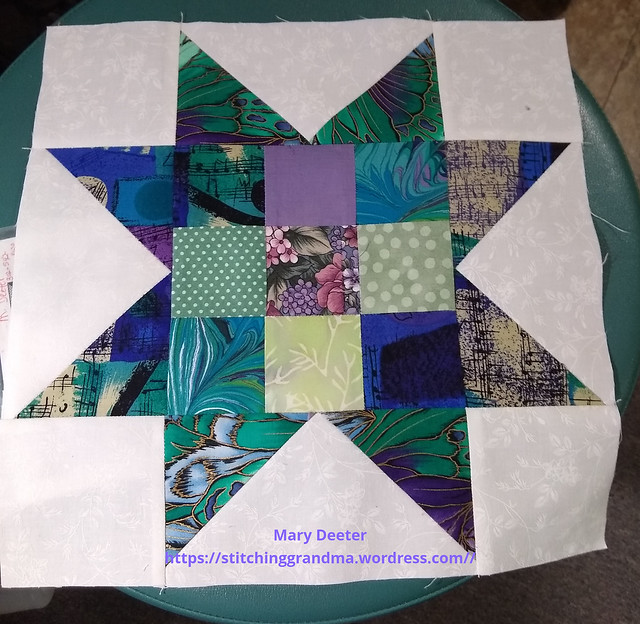
On Tuesday, Carole taught a class for the guild, which I signed up for. It was a joy to be back “in a quilting class” after so long. Carole provided her pattern called “TO THE NINES” to the students, along with a special tool from Studio 180 for marking 1/4″ lines. We used it when we were making those flying geese. We also received several brands of batting samples in very nice booklets that we can refer back to the next time we are shopping or ordering.
We learned lots of techniques in the class, a speedy way to make flying geese, some fast methods for piecing 9 patches called webbing. Of course, only those speedy sewers and those that don’t talk in class get everything done, so I did come home with some unfinished sewing. Truth is, my 1/4 inch seam allowance got fat, and rather than ‘rip’ out seams, I decided to just make a bunch more at home so I could assemble my project. I was using my featherweight and my magnetic seam guide and I were not getting along. I finished up my sewing today. My first block looked pretty darn good!
These blocks went together pretty quickly using Carole’s methods for chain piecing and webbing. The top at this point is 36×36. A small inner border and a bit wider boarder will finish it off nicely. All the fabrics except the background came out of my scrap storage system. I have the sizes this pattern uses already cut and on hand, so once I decided on a focus fabric, I pulled things that I thought would blend prettily. My focus fabric had purple, lavender, and multiple shades of blue and greens.
This was pretty fun to do, and I needed a day where my brain could just focus on sewing and nothing else for a few hours.
Have you had a chance to take a class from a quilter you follow on line? What do you suppose I will do with those “9 patches” that came up just a little “short” ?? I think they are perfect size for pot holders!!!
My all time favorite blogger, Carole Carter, has done Autumn Jubilee for at least six years. I told her recently that when she announces Autumn Jubilee, I feel like It’s the most WONDERFUL time of the year! Her blog, From My Carolina Home is so much fun to read. Beyond quilting, she is an avid gardener and cook, and enjoys several other types of crafts. And of course, she is a wonderful writer, and an avid reader, with book reviews monthly. She writes for a national blog, and she has had patterns published on some of my favorite shop websites. There is so much more to tell you, but I think you might have more fun exploring her blog on your own.
I want to encourage you to participate in Autumn Jubilee 2021. She has a wide range of projects planned and I am certain you will find something you enjoy. There is a button on the side of my blog near the bottom to link back to her blog as well.
Even more exciting for me, Carole is coming next Monday to Ocean Waves Quilt Guild in Lewes, Delaware to do a program and teach a class! It will be so nice to finally meet her in person after so many years of following her blog, and working on her mystery quilts and Autumn Jubilee projects. Since she is driving up from North Carolina, and has limited space to bring things, several of us are sharing “our versions” of her projects during the guild meeting. It was fun pulling them out, and making sure we had a good variety to bring for next Monday. (Now, many of you know that my Scrap Dance series are “just tops” and still need quilted…)
If you read today’s post on Carole’s page, you will see she gave cutting instructions for her Autumn Jubilee 2021 quilt along, which is table topper size. Time for me to go get into my Autumn Jubilee bin of fabrics that I save for these projects every year!
Here are a couple of projects I have done over the years with Carole’s Autumn Jubilee patterns –
Edit – I forgot to ask – What is your favorite time of the year?
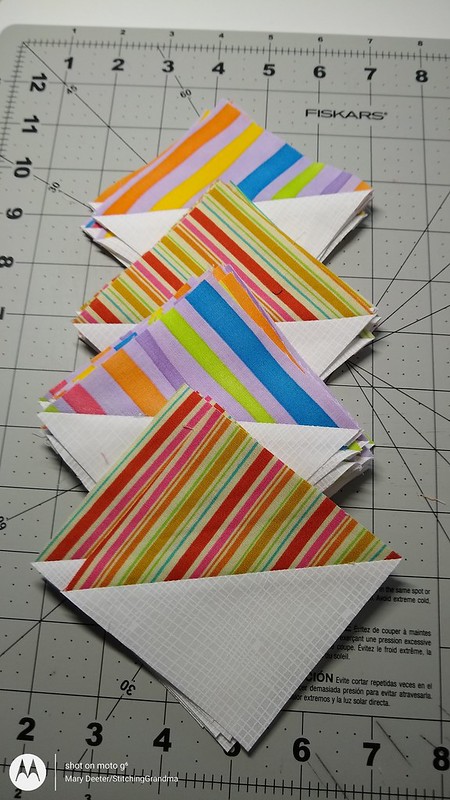
Scrap Dance Pachanga 2021 is a mystery quilt designed by Carole Carter. She hosts the mystery on her blog, From My Carolina Home. This past Friday Carole revealed the B block and the layout for the mystery.
I’ve been sharing my progress all along here on my blog, but thought you might like a recap.
I started with the fabric pulled to use for the project. Most came from my scrap storage, with only a couple of fat quarters getting thrown in for variety. I did cut yardage for the white background of my units.
Twice a month since January directions were given for various block elements. We have made 2 patches
and then 4 patches
And then there were the flying geese and half square triangles big and small.
Last month we assembled the “A” block using some of the elements.
A Blocks
And with the release of the B block on Friday I got busy laying out the block, ready to sew.
Having all the elements already made is terrific when it comes time to assemble the blocks. I do have to admit that I wasn’t happy with my fabric for the center of the B blocks. Below are the original blocks I made for the small half square triangles that make up the center 4 patch –
I decided I needed “more variety” when it came time to assemble the block, so stopped and made MORE of the half square triangles from a variety of bright fabric I had held aside. I am quite pleased with the outcome.
B Block Scrap Dance Pachanga
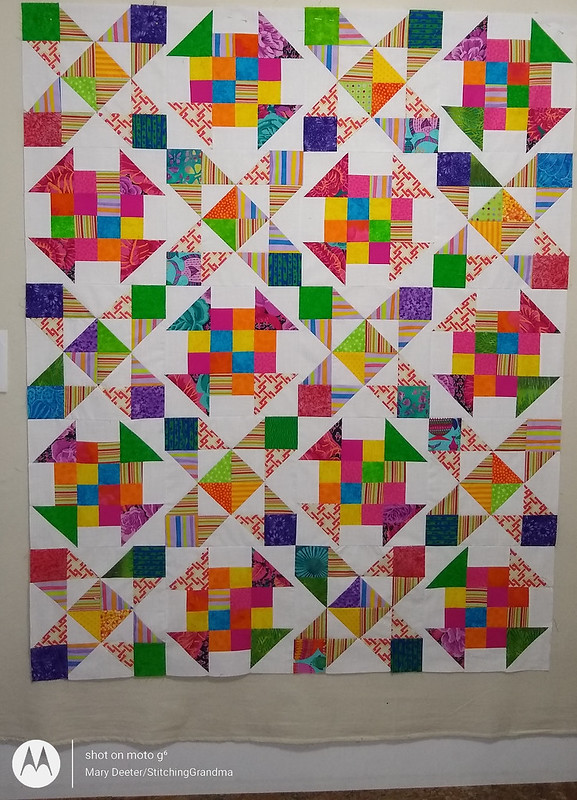
Once I made those extra half square triangles, it was fairly easy to assemble the B Block, and I had most of them on the design wall by Saturday morning. I hope you can see that adding more variety to the fabric for the centers of the B block make the quilt more interesting. It is always fun to start seeing the pattern come to life as you place the blocks on the design wall. The first thing I saw was the secondary pattern that the B block introduced.
A & B layout
I did a little shopping on Saturday afternoon and happened to find a fabric at Hobby Lobby, that I think will make a nice border and maybe the backing. It is brighter than the photo, but does read PINK to me. It has the greens, blues and yellows in it as well and I think it will be a nice finishing touch to the quilt. I prewashed it, and now I have 4 yards to iron!
border fabric
Now all I have left to do is put on a narrow white border, and get that border fabric ironed and cut and put on. I think I will go for a 2 or 2.5″ white border and then a 6″ multi color border.
Here is what the top looks like before the borders are attached. It’s a nice throw size now at 48×60.
Scrap Dance Pachanga 2021
I love the way the B Block makes a run of “arrows” across the quilt. The A Block almost looks like it is floating on the white background. I find it very visually appealing, and it may be my “favorite” Scrap Dance project so far!
If you like this pattern, it is not too late to download the elements at Carole’s blog, but hurry. It is a free mystery quilt for her readers, for now. After a short period of time, the free pattern usually comes down and becomes a pattern for sale later on.
Did you “dance along” with Scrap Dance Pachanga this year? If so, what did you use for background fabrics? Do you like mystery quilts?
Edit – forgot to mention I am linking up today to OH SCRAP – If you have never visited, go check out the “linky party” and see what other scrap lovers are doing .
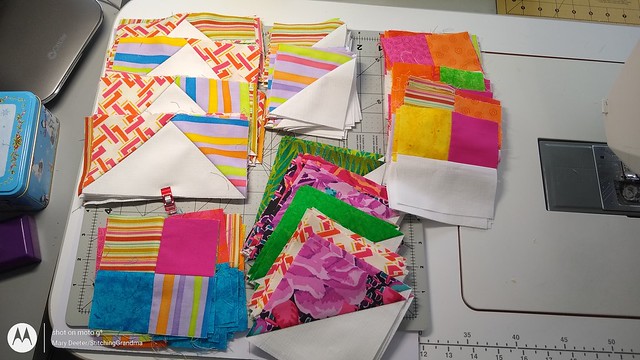
This has been a lovely relaxing sewing week, playing with two scrap projects.
I worked on Step 7 of the Scrap Dance Pachanga Mystery quilt from Carole’s blog, From My Carolina Home. Steps come out on the 2nd and 4th Friday of the month, so I was a few days late getting mine done. This was an easy step for me as I love making half-square triangles. Some people don’t but I do. I like that they are sized enough to “trim” easily. I use the June Tailor Perfect Quarter Square/Half Square triangle ruler when I make mine.
We now have quite a collection of elements for this mystery quilt, but still have many pieces left for future “steps”.
I am resisting the urge to play with the elements. Banished to the basket to await the next step coming at the end of this week!
I continued to play with the scrap basket that I took on vacation. I have made quite a few more “Traffic Jam” blocks. This time I picked the 2.5″ squares out of my never ending basket and put together lots of combinations. I’m up to 24 blocks made. I had to “trim” these blocks to 12″ as some of the ones done on vacation were a tad “wonky”. I think some of that had to do with 2.5″ squares that didn’t quite measure up, or fat seam allowances.
Traffic Jam blocks
The pattern is available on Pat Sloan’s website for free. I love doing scrappy quilts. I also like to see what others have done with the sashing and borders on Pat’s website. If you take a look you will see all different ways this block is finished off into a quilt. I haven’t quite decided how I am going to sash it, but I am gathering ideas.
I am using a bit of the Bonnie Hunter scrap saver system for my bits and pieces. I seem to have a lot of scraps that need to be “cut up” into that system, but I am lazy about doing it. My sewing space has gotten cluttered and it is time for a bit of “clean up”. Do you save scraps for projects? How do you collect and store them?
Edit — forgot to add this — Linking up to OH SCRAP! If you like to work with scraps, check out all the fun things others are sharing there!
Welcome aboard and nice to meet you. My wife and I are seasoned cruisers having first dipped our toes into the world of cruising in 1990, a one week cruise on board the Cunard Countess. The majority of our cruising has been with two cruise lines, Cunard and P&O. We have, however, sailed on 21 different cruise ships, some many times over, on 11 different cruise lines while completing 619 cruise nights on board.
Steve Sews Stuff! Bowl cozies, zipper pouches, wrist key fob keychain lanyard, Scrunchies, pocket tissue holders, decorative pillows, quilting and other sewing projects that Steve Sews. Plus Steve blogs about sewing and quilting and other things.
Mostbet UZ platformasi orqali Mostbet-da qanday yutish mumkinligini bilib oling. Jonli tikish takliflari va g'alaba qozonish imkoniyatlari haqida ma'lumot olish uchun o'zingizni tashrif buyuring.