Senior Quilts, circa 2021

Every year since 2008 I have worked on quilts for the high school graduates of my church. Some years we have had half a dozen or more. Our biggest year had about 13 or 14 quilts. Last year we had just one graduate and this year there are only 2 graduates. When there are so few, it is easy to have a little more fun and make the quilts very unique.

Working with fabric donated for the purpose, my partners in quilting came up with an idea for this quilt together. The grandma of the graduate is a quilter and provided the fabric and some of the sweat equity in the construction of the quilt. We got together and cut out the fabric and then one member of the group stitched all the half square triangles. We got back together and cut the units apart, pressed and squared them up, and laid out the design. With three sewing machines going, we got the rows together quickly. I brought it home and joined up three sections and added the borders and photo’s and verses. Then we got together again and tied the quilt with white crochet thread. I decided it needed some quilting in the borders to finish it off. I added a verse for the back and a special label. Ordinary times the members of the church would leave messages of love and faith and sign the quilt. Since that isn’t possible this year we put more verses than usual on, along with the special label.

Christopher's senior quilt
Verses for Christopher
Serenity prayer on the back of the quilt
Label for Christopher
Quilt label on the back of the quilt
Isaiah 40 31
Isaiah 40:31
Proverbs 19 20
Proverbs 19:20
Jeremiah 29 11
Jeremiah 29:11
church photo
A photo of the church goes in one corner

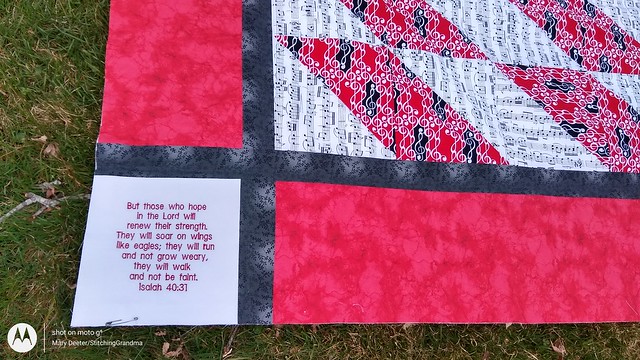
All the bible verses were digitized by Designs by JuJu along with the Serenity prayer. The quilt label comes from Kreative Kiwi. The photo is printed on fabric. The binding is ready to be put on. I prepped the binding using the two border fabrics, using the method I like best – Susie’s Magic Binding.

binding for Christopher's quilt

One of our group will be doing that in April . The red border fabric and the backing fabric came from Marshall Dry Goods. They have lovely quality fabric and a reasonable price for wide backing.

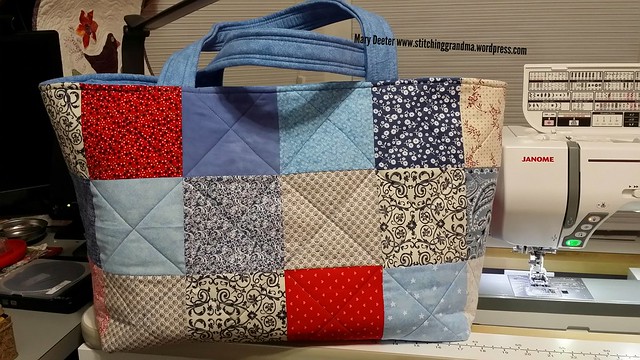
Our second quilt is a bit more complex. When the mother told me the student liked all shades of blue, I decided to get a little “scrappy”. We had a church member donate a lot of fabric a few years back, and I have had my eyes on this lovely butterfly fabric for a long time. I found a stack of 5″ squares in the stash she donated that were all shades of blue and they were perfect.

Blocks in Emily's quilt
On the design wall.

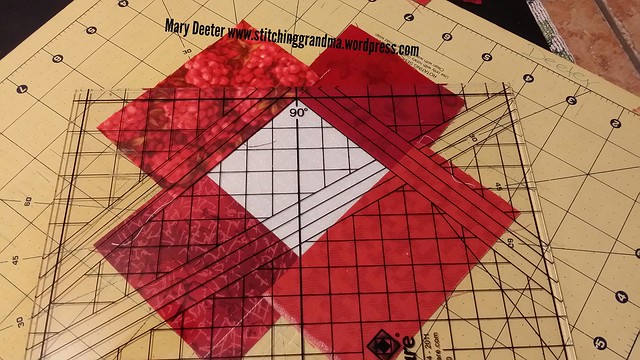
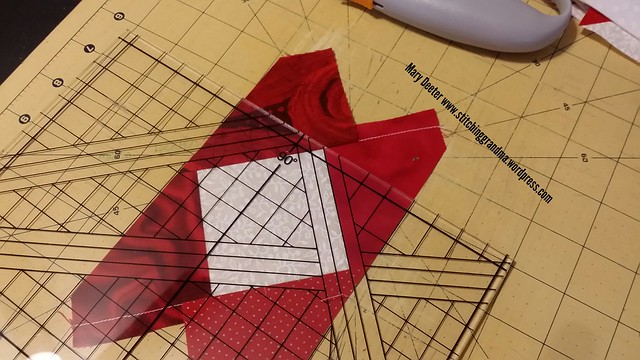
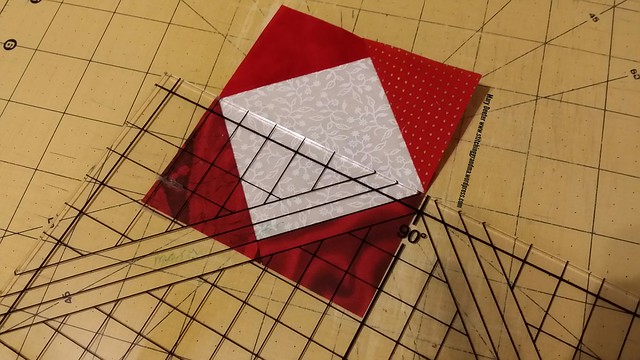
I thought an alternate block using the Square in a Square would bring out the blues of the butterflies. I used the Jodi Barrows Square in a Square ruler, and “option 2″ for the alternate blocks. I was able to dig out plenty of interesting blue fabrics from the donated stash, so there are lots of shades of blue in the blocks. I worked on these blocks at home during February and finally got it put together in March. These are 8.5” blocks.

Emily's quilt partially assembled
Webbing together the quilt top

Once I had the blocks together I decided it needed a border, and looked to the scraps that were trimmed away when squaring the blocks up. Using my favorite Bonnie Hunter method, I made a pieced border using phone book pages cut to width. I made a narrow inner border out of yellow and the wider blue scrappy pieced border. I decided to measure my border lengths, and stitch the yellow and blue border together before attaching to the side of the quilt. That made it so easy, and I only had to struggle with getting the large quilt through the machine for “one” border. I made certain to stay stitch along the edge of the border before attaching it to the quilt as well.

Senior Quilt 2021 for Emily
outside on the lawn

The lighting wasn’t great when I took this photo outside, and the yellows do fade away. The color is more true on the design wall photo. This quilt has the church photo in one corner and just one verse in the upper right. I’m still working on the embroidery for the back of the quilt, the label and an additional 2 verses.

The backing fabric is on the way from Marshall Dry goods, a lovely royal blue in 108″ width. I made an error when I selected the color for the backing and the original order was too turquoise. There is a bit of turquoise in the quilt, but i wasn’t happy with it for this project, so I reordered. I will put the turquoise to work on the back of something else in the future. After the Easter break my quilting group will get together again and we will tie this quilt as well. I will probably do a little stitch in the ditch around the narrow yellow border just to secure things. As with the other quilt, there is a church member who has offered to do the binding on this quilt.

This year was a challenge to get together for a group sewing project because of COVID-19, and the work responsibilities and health issues of some of our regular quilters at church. I was so thankful to the two ladies who worked together on the red & white quilt, and the willingness of two others offering their help binding the quilts. It is nice to have willing workers and it takes the stress off when I have to keep things organized. So far we are “on time’ for these quilts and I imagine they will be presented in May to the graduates during a service.

That’s it for me for March! What’s going on in your sewing room?

Square in a Square Tool Review

My sister-in-law, Carolyn, aka One-Block-Wonder-Woman and I both have purchased the Jodi Barrows “Square in a Square” ruler and book. (Since we live on opposite sides of the country, we don’t share our tools, but DO share what we love in terms of information with each other).

I’ve posted in the past about using  Option 3   to make several hundred flying geese https://stitchinggrandma.wordpress.com/2017/05/28/small-projects/ .  I have great plans for using many of the other options in the future.

Recently, Carolyn has used her Square in A Square to make many of the “options” for which you can use this ruler. She wrote a great blog post last week, and I would encourage you to take a look – I have a tool for that too

WHY do you need this ruler?  If you have never used the ruler or don’t know what it is, take a look at some of the videos on You Tube that Jodi had published – Jodi Barrows You Tube Video

Many times we buy specialty rulers that only do I thing.  This one has LOTS of uses. And, you work from strips and squares , not with triangles which can be problematic because of bias.

If you purchase the ruler, do your self a BIG favor and purchase the companion book. Honestly, to use the ruler to it’s full function the book is an ABSOLUTE necessity.  It is full of information, techniques.  You will be much happier if you do.   If you purchase directly from Jodi’s website, http://squareinasquare.com/Pattern-BooksPatterns_c_12.html    , then she gets a greater share of the profit, vs purchasing through another retailer.  (I like to support these designers by purchasing directly!) (Same thing with Bonnie Hunter & Pat Sloan books/tools)

Disclaimer – Nobody is paying me a dime for sharing this info!  I love this ruler!!!

So, my quilting friends – put this on your Christmas Wish List….give the family a link to the tool on Jodi’s website, and enjoy making square in a square blocks, and flying geese and all those other blocks that in the past might have been a struggle.  Having the “right tool” in your inventory that is so multi-functional is like having one of those screwdrivers with 42 tips and a flashlight!

What is your “favorite tool” in your quilt room?

A couple of projects and FOOD

The last few days have been filled with good food and projects.  I won’t bore you with the details, just suffice to say that since Saturday, I have been to a luncheon tea, a church shrimp & rockfish dinner, a guild pot luck luncheon, lunch at a friends house while sewing, and soup supper at church!  I just love it when I get to eat different, interesting foods made by other people.  The tea sandwiches were so delicious, along with scones and cheesecakes; and the shrimp was gigantic at church.  Guild luncheons always bring out the best cooks, and the lunch at my friends house included a fresh baked bread, filled with ham & cheese along with strawberries and chocolate frosted brownies. Soup supper tonight at church included a wonderful Italian salad to complement the 3 soups.

IMG_20170406_003811

Tea Sandwiches – Starting from the top – meatloaf, bleu cheese and grapes, peas and carrots  egg salad flowers, and salmon with radish

Aren’t they pretty?  The egg salad was so delicious I used the recipe for the Guild luncheon on Monday.

In between these lovely meals I have been enjoying a few sewing projects.  Tuesday at my friend Pam’s house, 3 of us got together and made these fantastic bags using 5″ charm squares.  The pattern is by Penny Sturges and is called Chubby Charmer.

Chubby Charmer bag

I, of course, opened my Scrap Storage System boxes and pulled from the stack of already cut 5″ squares, and collected enough coordinating colors for the project, and opened my “blue bin” of stash yardage and pulled a piece of fabric, circa 2011. Yes, the tag was still on the piece from the purchase.  Well aged fabric and scraps are always the most fun.  The only thing I had to purchase for the project was the fusible fleece, and I needed nearly 3 yards following the pattern instructions.  It consists of 48  – 5″ charm squares, set in a 6×4 grid on each side of the bag. The bag measures 11.5″ deep; and 9×20 “inside”.  The pattern said you could put a “9×12 casserole pan” in the bottom of the bag.

The yardage was used for the handles, the lining, and the inside pockets.

Inside pockets

There are 2 LARGE pockets inside this bag, and I decided to divide them in half when I sewed them to the lining. This is a “substantial bag” with 2 layers of fusible fleece behind the charm squares; 1 layer behind the lining, 1 layer in the pocket and handles.  This project required a “denim needle” for the top stitching around the upper edge of the bag.  I was not happy with the way my standard sewing needle was behaving when I was going thru almost 9 layers.  As soon as I switched to a heavy duty (size 16) needle, it went right through all the layers along the edge where the handles are.

After we constructed the bags, my friend Pam made some notes on the pattern on changes for “next time”. I said I would skip the fusible fleece, and use the Bosal In-R-Form in just one layer.  You wouldn’t have to get the fusible type, as you are quilting it to the bag, and a few pins would keep it in place until your stitching secured it.  Pressing the fusible fleece in 2 layers to our panel of squares, and getting it to adhere nicely was challenging. The other thing I think I would do is make sure my fleece or the Bosal is 1/2″ smaller all around the panel; to give you a little less bulk in the seams.

This bag is big enough to take a quilt to the guild for show and tell, or a bunch of supplies to a sit & sew.  I had a great time with Pam & Nancy while we made our bags.  All 3 of us finished the project the same day we started. Pam teased me and said I could NOT leave her house until I finished. She finished about 15 minutes before me. We started at 9 am, and I finished at 6:30 pm.  We joked about making the “bag in a day” and were determined to finish.

My other projects this week were to work on my flying geese for the Bonnie Hunter Talkin’ Turkey.  I used my Square in a Square ruler, option 3 by Jodi Barrows.

Square in a Square option 3

(My strips are 2.5″ which is wider than need be, but what I had already cut). The first step for cutting is to  put the 90 degree mark in the corner of the square.  Then you do it on the opposite corner and this is what you get below.

Option 3

Then you do something Jodi calls the “Texas two step” – you SHIFT the ruler two lines over from the 90 degree point for the other two corners.

Texas 2 step Option 3

AFTER the Texas 2 step trim

and then you trim the opposite sides.

Texas 2 step for Option 3

and you get this –

After the Texas Two step

I am ready to “cut through the white square” to get 2 perfect flying geese units.

2 perfect flying geese

In summary, by putting the 90 degree in the corner of the white square, you end up with a perfect 1/4″ seam allowance for the top of the goose, and you won’t loose it’s point when you stitch it in the block of the quilt.  The Texas Two step on the other two points eliminates that seam allowance, because the side of the wings will be in the seam allowance.  I’ve put links in a previous post to Jodi’s website and you tube videos on how the ruler is used.  I just thought I would share some close up photo’s of the ones I am making.  I have about 20 left to trim and then I will have my 240 that I need for this part of the project.  My next round of flying geese is for the border of the quilt and they will be red geese with white wings, and there will be a couple of hundred in that round!

One last project is something I did on Monday.  I was “going” to the Embroidery Club in Ocean Pines Maryland.  At least, I intended to go……Our luncheon at Ocean Waves went longer than I expected, and I got stuck in road construction stop & go traffic. By the time I got through the traffic, my time was so short, I ended up coming home and working on the project.  I followed instructions by Embroidery Library and made this little cutie –

Chicken felt stuffie

I haven’t “stuffed” him yet, as I need to use tweezers to get the stuffing through the opening left by the embroidery machine.  I apparently used the “WRONG” type of spray adhesive, as I spent 3 hours making this little gem of a chicken.  Thread breaks, needle jams, broken needle etc because my machine HATED the spray adhesive.  The stuff NEVER dried in the course of the 3 hours.  Had I attended the Embroidery Club, I would have gotten those great tips they had to share about this type of problem.  I wrote to the gals who lead the group and got some good feedback the next day.  Maybe I will try again, but not until I get a different spray adhesive.

What are you up to this week?


Talkin’ Turkey – 2nd round

I have been working off and on over the last 2 weeks making Flying Geese for my Talkin’ Turkey quilt.  The pattern is by Bonnie Hunter (Quiltville) and can be found in her book “String Fling”.

If you are a “regular reader”, you know I went to a workshop in September and started this project along with a second one.  As per my typical behavior, the project bin sat from September until February, when I dug in at a 3 day retreat and got the “first round” of the blocks completed.  Check out the post I wrote in February when the first round was completed here – https://stitchinggrandma.wordpress.com/2017/02/12/a-week-of-loading-and-unloading/

Before I could begin the “second” round on the blocks, I had to square them all up, and re-evaluate how I was going to make the Flying Geese (FG) for the 2nd round on the block.  I settled on the method from Jodi Barrows – using the Square in a Square ruler, option 3.  I have nearly 500 FG to make for this quilt, and I wanted to use the method that gave me the most accuracy.  Since I purchased the Square in a Square “system” last spring, I thought this would be the perfect time to use it.  If you are unfamiliar, check out this quick video where Jodi is demonstrating the ruler at Quilt Market — Option 3 Square in a Square demo .

Once I got about 100 FG finished, I wanted to see how the blocks were going to look, so I got two blocks up on the design wall late yesterday afternoon.

Next step

Hubby thinks “BUSY“, but that is ok….he doesn’t have a vision of the “next round” which is neutral sashing and 9 patches that separate the blocks. Take a look at that link for Bonnie Hunter I posted and you can see what the “end” result will be.  In this round with the FG, I am going scrappy with the FG, but the rectangle that separates them, and the cornerstones on the blocks are all “constant”.  I think having a few constant elements on a scrappy pattern help to “calm” it down somewhat.  I believe my sashing is all cut and it will be “constant” as well.

Each of these blocks takes 8 FG, so I will be back to the “chain piecing” that Jodi Barrows referred to in her short video, I posted above.  For a more detailed look at the method – check out this longer, more instructive video – Square in a Square introduction  .  What I like about this method for the FG is that I can sit at the machine and stitch up 8 or 10 geese, then get up, stretch, press, and go back to sewing. Less of a sweatshop, and if I have just an hour or two to stitch, I can make a lot of progress!  I often bring a stack into the house with me,  save the trimming and cutting for the kitchen, while dinner is cooking and I can chat with the hubby.  I probably won’t “assemble” any more blocks in the “second round” until I get all 280 FG made; but I do have all the neutral bricks and cornerstones cut out and ready to go.

What method do you prefer for Flying Geese?  Have you been working on a big project lately?

Time to go…..more Second Time Around sorting, trimming, pressing, measuring and pricing for the guild (day 2 this week).

A quieter week

I’ve had a couple of quiet days, and time to play a bit more with my Brother PE500 embroidery machine.   I made a few more bibs for the littlest grandchild and delivered them on Thursday when I went to babysit.  As I worked on these I was reminded how important it is (to me) to have an organized filing system.  I say this because I was having trouble “finding” the design that I was looking for.

When I download designs from a website, I try to print out the “color change sheet” at the same time. My intention is to always name the file something that is “close” to what it was called by the designer, and to include any “file code” names as part of the name. I have an embroidery download folder on my computer, and many, many, sub folders. I  break those sub folders down by “type”; for example, Holidays-Valentines Day/Christmas/Easter/St Patrick’s Day; or Animals; Food; Verses etc.  I place the color change sheet in a 3 ring binder in a similar way, using page dividers.  I am up to 4 – three ring binders!

Well – wouldn’t you know, I have a HEARTS folder and a Valentines folder.  Many of the HEARTS are NOT specific to Valentines day.  Darn if the file I was searching for didn’t land in the HEARTS folder, not the Valentines Day Folder.  I wasted a good deal of “stitching time” looking for the file.  (Like 3 days wasted….)

At one point, I gave up and I started with a St Patrick’s Day design, while I “looked” for the elusive Valentine/Heart file.  I did a little stitching and searching.  Finally I selected an alternate Valentine design and set it up to run.  Well in my haste, I had not “removed” the St Patrick’s Day design from the machine before I started the stitch out on the 2nd design.  1/2 way through the first color, I realised it was stitching out my St Patrick’s Day design all over again.  Well, you decide if you like it in pinks and purples instead of the greens!

February Bib Fun for Addy

I decided to just keep on stitching and while it was busy stitching; get the fabric prepped for an alternate Valentine!  So, 3 new bibs completed and that will be it for a while.  The littlest grandchild will be a year old next month and has quite a collection of “StitchingGrandma” bibs.  (Somewhere in the bib process in the last couple of weeks, I lost the great “Bandana” pattern, so she got traditional shaped bibs.  Clean up was in order at the end of this project; and again, the lost pattern was found and stored away properly!)

I took the new Singer Featherweight 221 for a spin on Wednesday.  My quilt bee – Material Girls – had an all day sit & sew; and that new little machine had a great debut.  Tuesday night we got her oiled up (must be 90 oiling / lube  points). She is clean as a whistle.  Had a few challenges “winding” a bobbin, and had to engage the hubby to help.  Got 3 bobbins ready with his help and determined what was causing the trouble.  He adjusted the belt a tad and it worked much better.  (Nice to have a guy with a mechanical mind helping out).

Today, the LED light I ordered arrived (Thank you EBay!).  I installed it and am pleased with the brightness and lower temperature.  The Ebay seller I purchased from had a few photo’s showing the difference in temperature on the light- from 172 degrees on the incandescent  bulb to 74 degrees with the LED bulb.  That will save an accidental burn on a wrist!  The difference in the light was significant – from 139 lumens to 205 lumens.  Hubby said the bulbs look similar to automotive tail lights. He thinks that the new bulb will last a long time, and because it is LED, will be less likely to break due to the handling of the machine transport case.  I will be ordering 2 belts soon, just to have one on hand and to replace the current belt which is at it’s limit of adjustment.   All in all, I am most pleased with this little machine, which was made in January of 1948. She stitches well and should be a fun travel machine!

I have assembled a tote ready to “travel” with the Autumn Jubilee project material.  I can just “grab & go” to a sit and sew, and not have to “think” about what project I am going to take to work on, or worry over what to assemble ahead of time.  (One of the Bee members said this is how she operates and the only time the project gets worked on is at a bee)  I did manage to get 6 more blocks made on Wednesday using the Autumn Jubilee pattern.  I have lots of pieces cut and ready to assemble. My intention is to make 6 – 8 placemats with the lovely leaf pattern. Once I get a “few” more leaves made I can start building the placemats.  At this rate, it will be August before I can set the table; but the timing will be just about right for this project.  I like the idea of “no stress” on which project to take.  The fun of a going to a sit & sew or quilters bee is the company.  I like being able to dedicate a whole day (or 2 or 3) and not have any other tasks taking me away from the fun!  (Note – the Autumn Jubilee project is from a pattern by Carole – From My Carolina Home)

I worked on my Talkin’ Turkey blocks again Wednesday night and again this afternoon.  I have 4 left to add the corner string blocks to. They are “pinned” and ready to stitch.  The Talkin’ Turkey pattern is by Bonnie Hunter and can be found in the String Fling Book. Bonnie Hunter’s blog

I will need to  square up the blocks next.  I am thinking about how I am going to tackle the  “next round” which will include a LOT of flying geese (8 per block x 30 blocks= 240 flying geese units.)  The pattern by Bonnie Hunter suggests you use the Easy Angle and Companion Angle ruler for the Flying Geese or your “favorite method” .

I plan to use my new Square in a Square tool/method –OPTION 3…by Jodi Barrows.  Using the Square in a Square tool by Jodi Barrows,  flying geese will be done with strips and squares; and if I do the math right; it is done with 120 squares and LOTS of strips!! I just have to sit down with Bonnie Hunters pattern and find the “finished unit size) and then check my Square in a Square book and the chart and figure out what size squares and strips I need to start!  More to follow! I like the “methodical” building of units for a big quilt.  240 Flying Geese doesn’t scare me after I did that quilt last winter with 1400+ half square triangles.  I will be making about 4 “test units” just to make sure I have them sized properly before I begin!

Check out the video on you – tube if you have never seen this ruler or method.  https://www.youtube.com/watch?v=GekwRp8_cGU     and    www.squareinasquare.com 

What fun things are you working on??   What is your favorite method for flying geese ?  Do you have any “new tools” or “toys” ??  Do tell………………

Scrap Dance Tango – Step 5 complete and more

I finally got to sew.  After dinner last night, I went out to the sewing room and got busy.  It was nearly 11 pm when I finished, but I have all 142 – 4 patches completed for Step 5 of Scrap Dance Tango Mystery Quilt.  Be sure to check out the instructions by Carole – From My Carolina Home

Scrap Dance Tango Step 5

This month’s “clue” was posted on Friday, May 13th.  I was “just” a little busy with the grandkids. That day we were having a birthday party for a certain little girl and the household was all a-buzz.  We took them to the airport on Saturday morning, and when I got home,  I got to work for a couple of hours, assembling one side of the block.  Carolyn arrived the next day, and we had a FULL calendar.  While she was here, I gave her “exclusive” use of my Janome, and I spent the time while she was sewing putting things away, getting more fabric out for our Pet Mosaic and squaring up 5″ HALF-square triangles for my newest grand daughter’s quilt .

We didn’t have much “at home” sewing time during her visit. She did however, show me her “newest” ruler and block.  There is a bit of a back story first tho…..You see, Gloria Stickney of Sew Fabulous Inc,  Winston-Salem, North Carolina was going to be the guest speaker and teacher at  Helping Hands Quilt Guild in Dover DE while Carolyn was visiting. She was teaching a workshop with the Jodi Barrows Square in a Square ruler.  I had added the workshop on our “things to do” list, but the timing was tight.  Carolyn & I had seen Jodi Barrows demo the ruler at the Houston IQF, so we were familiar with the tool. Then I found this video – Square in a Square overview VIDEO  .  Well, one thing led to another, and before her visit, Carolyn ordered the ruler, and 2 additional books, and brought her blocks with her to work on during the visit.  The books are so well written that it is “easy” to teach yourself, and of course, there is always You-tube to back you up!  We attended the guild meeting and the quilts that Gloria Stickney showed that were all done with the Jodi Barrows “Square in a Square” ruler.  There are so many OPTIONS with the ruler, and every thing is done with strips and squares.  Having seen Carolyn work with hers, I bit the bullet, and purchased my own, along with 2 books.  Now, I have to get busy and play with that tool and see what I can create.  I will let you know when I use it and how it all works out.  (We could not go to the class taught by Gloria, as I had a gathering with my “QUEEN BEES” . )

Also, while Carolyn was here, speaking of busy, we attended 2 “Quilt Bees”.  One was with the Material Girls and the other was with the Queen Bees.  At the Queen Bee’s gathering, we brought our machines, set up and got right to work, building string blocks for charity quilts. And of course, we socialized, and ate, and planned for the coming months, played a fat quarter swapping game.  The Queen Bees really like to get together and work.  We are also lucky in the Queen Bees to have a member who made arrangements with her neighborhood community center for space to work in.  One thing about both Bees is the “planning” ahead for our Fat Quarter swaps!  We have colors selected in both groups through August, and I was able to shop for those FQ on our Fabric Acquisition Road Trip to Lancaster County, PA.

Next in the stack of projects, now that Step 5 is finished, – get more 5″ HST blocks squared up!  I am making a grey, coral, turquoise  and white quilt for my grand daughter Addison.  I picked up a couple more “grey” fabrics and more white during our trip to Lancaster.  I have started  laying out the design of the quilt. (Ok, so she is now 2.5 months old, and she doesn’t have a Stitching Grandma quilt yet, but she hasn’t graduated from college yet…..) Seriously, she will get her quilt before she is ready to exit the crib!!  I have given up sewing days to go cuddle with her, so that is my story, and I am sticking to it. Besides, her mommy said don’t bother with a baby sized quilt, make it a double…for her big bed!  So, I have my marching orders and I am not feeling too guilty for not getting it finished yet.  (I posted about the quilt here – Half Square Triangle fun  )

Today, however, I have a card making class & must gather my materials and come up with a plan for a lovely Birthday card for my friend June.

Happy stitching and crafting!