
I’ve had a couple of quiet days, and time to play a bit more with my Brother PE500 embroidery machine. I made a few more bibs for the littlest grandchild and delivered them on Thursday when I went to babysit. As I worked on these I was reminded how important it is (to me) to have an organized filing system. I say this because I was having trouble “finding” the design that I was looking for.
When I download designs from a website, I try to print out the “color change sheet” at the same time. My intention is to always name the file something that is “close” to what it was called by the designer, and to include any “file code” names as part of the name. I have an embroidery download folder on my computer, and many, many, sub folders. I break those sub folders down by “type”; for example, Holidays-Valentines Day/Christmas/Easter/St Patrick’s Day; or Animals; Food; Verses etc. I place the color change sheet in a 3 ring binder in a similar way, using page dividers. I am up to 4 – three ring binders!
Well – wouldn’t you know, I have a HEARTS folder and a Valentines folder. Many of the HEARTS are NOT specific to Valentines day. Darn if the file I was searching for didn’t land in the HEARTS folder, not the Valentines Day Folder. I wasted a good deal of “stitching time” looking for the file. (Like 3 days wasted….)
At one point, I gave up and I started with a St Patrick’s Day design, while I “looked” for the elusive Valentine/Heart file. I did a little stitching and searching. Finally I selected an alternate Valentine design and set it up to run. Well in my haste, I had not “removed” the St Patrick’s Day design from the machine before I started the stitch out on the 2nd design. 1/2 way through the first color, I realised it was stitching out my St Patrick’s Day design all over again. Well, you decide if you like it in pinks and purples instead of the greens!
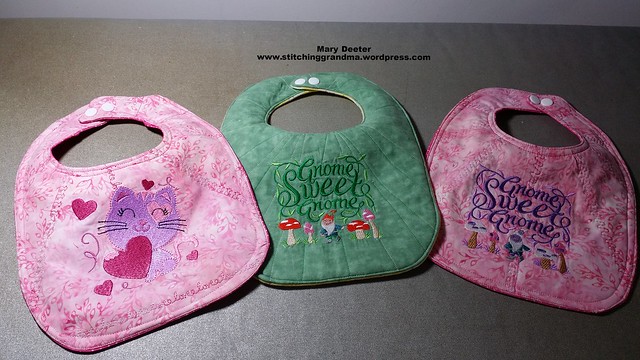
I decided to just keep on stitching and while it was busy stitching; get the fabric prepped for an alternate Valentine! So, 3 new bibs completed and that will be it for a while. The littlest grandchild will be a year old next month and has quite a collection of “StitchingGrandma” bibs. (Somewhere in the bib process in the last couple of weeks, I lost the great “Bandana” pattern, so she got traditional shaped bibs. Clean up was in order at the end of this project; and again, the lost pattern was found and stored away properly!)
I took the new Singer Featherweight 221 for a spin on Wednesday. My quilt bee – Material Girls – had an all day sit & sew; and that new little machine had a great debut. Tuesday night we got her oiled up (must be 90 oiling / lube points). She is clean as a whistle. Had a few challenges “winding” a bobbin, and had to engage the hubby to help. Got 3 bobbins ready with his help and determined what was causing the trouble. He adjusted the belt a tad and it worked much better. (Nice to have a guy with a mechanical mind helping out).
Today, the LED light I ordered arrived (Thank you EBay!). I installed it and am pleased with the brightness and lower temperature. The Ebay seller I purchased from had a few photo’s showing the difference in temperature on the light- from 172 degrees on the incandescent bulb to 74 degrees with the LED bulb. That will save an accidental burn on a wrist! The difference in the light was significant – from 139 lumens to 205 lumens. Hubby said the bulbs look similar to automotive tail lights. He thinks that the new bulb will last a long time, and because it is LED, will be less likely to break due to the handling of the machine transport case. I will be ordering 2 belts soon, just to have one on hand and to replace the current belt which is at it’s limit of adjustment. All in all, I am most pleased with this little machine, which was made in January of 1948. She stitches well and should be a fun travel machine!
I have assembled a tote ready to “travel” with the Autumn Jubilee project material. I can just “grab & go” to a sit and sew, and not have to “think” about what project I am going to take to work on, or worry over what to assemble ahead of time. (One of the Bee members said this is how she operates and the only time the project gets worked on is at a bee) I did manage to get 6 more blocks made on Wednesday using the Autumn Jubilee pattern. I have lots of pieces cut and ready to assemble. My intention is to make 6 – 8 placemats with the lovely leaf pattern. Once I get a “few” more leaves made I can start building the placemats. At this rate, it will be August before I can set the table; but the timing will be just about right for this project. I like the idea of “no stress” on which project to take. The fun of a going to a sit & sew or quilters bee is the company. I like being able to dedicate a whole day (or 2 or 3) and not have any other tasks taking me away from the fun! (Note – the Autumn Jubilee project is from a pattern by Carole – From My Carolina Home)
I worked on my Talkin’ Turkey blocks again Wednesday night and again this afternoon. I have 4 left to add the corner string blocks to. They are “pinned” and ready to stitch. The Talkin’ Turkey pattern is by Bonnie Hunter and can be found in the String Fling Book. Bonnie Hunter’s blog
I will need to square up the blocks next. I am thinking about how I am going to tackle the “next round” which will include a LOT of flying geese (8 per block x 30 blocks= 240 flying geese units.) The pattern by Bonnie Hunter suggests you use the Easy Angle and Companion Angle ruler for the Flying Geese or your “favorite method” .
I plan to use my new Square in a Square tool/method –OPTION 3…by Jodi Barrows. Using the Square in a Square tool by Jodi Barrows, flying geese will be done with strips and squares; and if I do the math right; it is done with 120 squares and LOTS of strips!! I just have to sit down with Bonnie Hunters pattern and find the “finished unit size) and then check my Square in a Square book and the chart and figure out what size squares and strips I need to start! More to follow! I like the “methodical” building of units for a big quilt. 240 Flying Geese doesn’t scare me after I did that quilt last winter with 1400+ half square triangles. I will be making about 4 “test units” just to make sure I have them sized properly before I begin!
Check out the video on you – tube if you have never seen this ruler or method. https://www.youtube.com/watch?v=GekwRp8_cGU and www.squareinasquare.com
What fun things are you working on?? What is your favorite method for flying geese ? Do you have any “new tools” or “toys” ?? Do tell………………


This sweet baby girl has to be the best bibbed baby in the world. 🙂 Love the green.
LikeLiked by 1 person
It is fun to make these for her. I get tickled that her mother likes them too.
LikeLike
You’ve been awfully busy for a ‘quieter week’! Those bibs are darling.
LikeLiked by 1 person
Thanks for stopping by to read. I enjoy those little projects because I am able to get something FINISHED! !
LikeLike
A little tip regarding the Jodi Barrows Square in a Square math. Make a prototype unit first before cutting to see if the unit comes out the right size. I have found I have to normally add an 8th to a quarter inch to the rectangles and strips to get the right size units on a lot of the options. Looks like you are having lots of fun.
LikeLiked by 1 person
Thanks. Great tip. Wonder why ? Fat qtr inch???
LikeLike
It could be that I’m just not as accurate as I think I am, but I would hate to see you do all your cutting and then find you have the same problem.
LikeLiked by 1 person
Been there done that with the crazy 9 patches in Bonnie Hunter’s pattern….
LikeLike