
I just love when I can take some time and work with my Janome 11000 embroidery machine. Early this week, I went to my monthly Embroidery Club. Our leader, Anna, is a whiz with all things embroidery. This month, she spent about an hour showing us her tips and techniques for successful embroidery on T-Shirts and other garments. She gave us a good lesson in marking our item to ensure we get the embroidery exactly where we want it to be.

Using a water erasable marking pen, and your grid that comes with your hoop is beneficial to getting centered. NOTE – keep the iron away until after you remove your marks!
Another trick she showed us was using a “hooping guide”. This hooping guide was made of foam core board and had pins in it. It was made specifically for her hoops, and really helped you line things up when the items were marked.
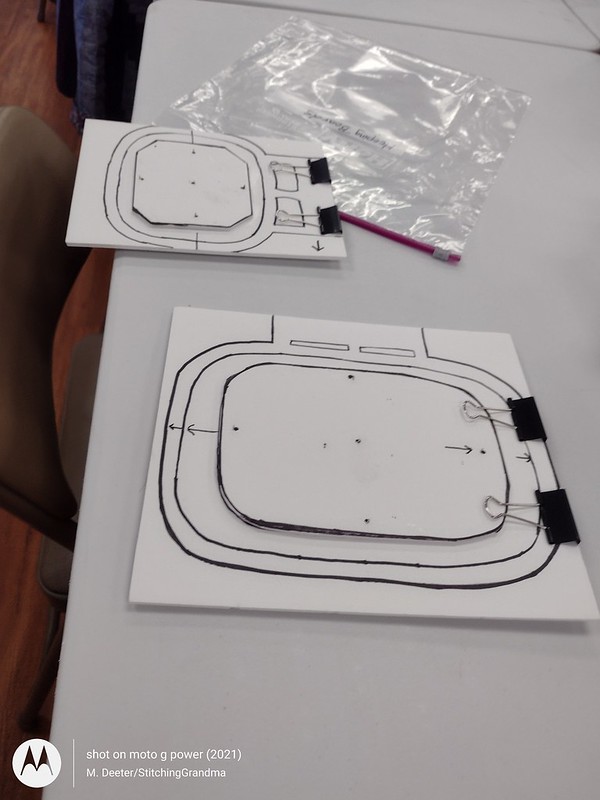
You set your outer hoop over the lines, place your item on the board, and push the tacks thru your markings to hold in place, then put your top hoop on. Really, a genius design. I think I will make a set of those boards!!
Another tip she gave us was to use spray basting to put our stabilizer (no show mesh) on the back of the shirt, and that kept it from shifting around while we worked to hoop the t-shirt. I used 505 spray and that worked for me. It’s a temporary adhesive, so you can trim away the excess after the stitching is done, and it doesn’t show through your shirt as a big rectangle. I’ve ironed on the fusible no show mesh stabilizer, then had to peel it off when the area covered was so much bigger that the area of stitching. Lastly, she reminded us to use a Ball Point needle (75/11) when doing t-shirts.
My first shirt turned out pretty well, but I realized too late, the crew neckline of the shirt is a bit “wonky”. So, I was a bit disappointed in the result, but feel like after I washed the shirt and actually wore it, no one but me would see what was so obvious while it was lying flat on the table.

So, do check the quality of the shirts you plan to work with. I have a dozen HANES t-shirts available to embroider (in the cabinet for 2 + years), so I wasn’t worried about ruining anything. One thing I observed is that the no show fusible mesh has a tendency to shrink a little and that is disappointing. An iron is helpful with these heavy t-s as they do wrinkle up in my washer quite a bit. I suppose after the are washed a few times, they will soften and look a bit better coming straight out of the clothes dryer.
After the club lesson, I decided the next day to do another one at home. Reinforce what I learned etc. Hooping t-shirts is a struggle to get things lined up, and I avoid doing them. I feel like I learned a few things with the demonstrations and having handy guides for measuring, and for hooping really help.

I like to color match my bobbin to my top thread, so I stitched all the blue elements first before switching to a red bobbin and red top thread.

I won’t refer to where this design came from because I have an annoyance with the digitizing of the shadow surrounding the words. If I was to stitch this out again, I would leave that off, because it just stitched poorly.
I do pre wash the tee shirts before stitching on them. They are 100% cotton and I don’t want them to shrink after the embroidery goes on. I do the same thing to dish towels or any other cotton garment. So say, it makes it look “used” if you are gifting. I think that washing them AFTER the embroidery is finished is helpful too, because you handle the heck out of the thing. If you gift it, you can tell the recipient that it is “freshly laundered and ready to wear”. Your iron is essential before stitching and after washing.
This week, one of the Autumn Jubilee projects was involving machine embroidery. Instructions can be found on Carole’s blog – https://frommycarolinahome.com/2022/10/12/autumn-jubilee-embroidery-sew-along-2/ . In her blog post, I am the “Mary” she is referring to. We often talk back and forth about tips and techniques we learn doing machine embroidery.
Here is my set up and I will explain as I go. I chose this design from Julia’s Needle Designs for my project.

I chose the 5×7 design you see above and loaded it in my machine. Because the size was larger than the final block, I used the options in my machine to slightly resize it, reducing it to 80% of the original size.
I created my wording for the block using fonts I have and setting it up in Embrilliance software on my computer. Once I had it saved, I imported it into my machine with the above design. I could see both designs on my screen and maneuver the placement until I was satisfied. Once all the “tech stuff” was done (very easily I might add), I got my fabric and hoop ready.
I hooped cutaway stabilizer in my 8×8 hoop. I cut a piece of Warm & Natural batting to the shape of the hoop, and used a tack down stitch to hold it in place.
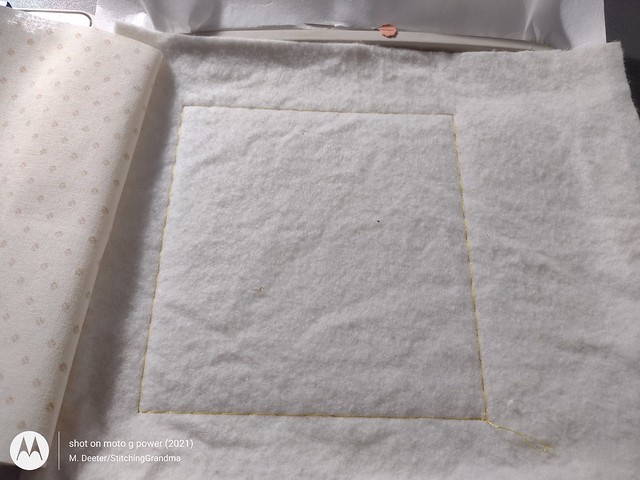
I put pins around my hoop where the stabilizer is sandwiched in. This keeps your stabilizer from being pulled down into the hoop and really helps when you have a very dense design. I do NOT hoop my fabric. Instead, I place it where I want it to lay on top of the hoop. (The only thing hooped is the stabilizer).
Once it is positioned where I want it, I run another tack down stitch. You could use a shot of 505 spray, but with my machine and the tack down, it is unnecessary.

I also tack down my water soluble stabilizer on the top of the fabric. This keeps me from having edges get caught under the foot and making a big mess, and keeps me from putting pins inside my hoop to hold things. That just saves a headache.
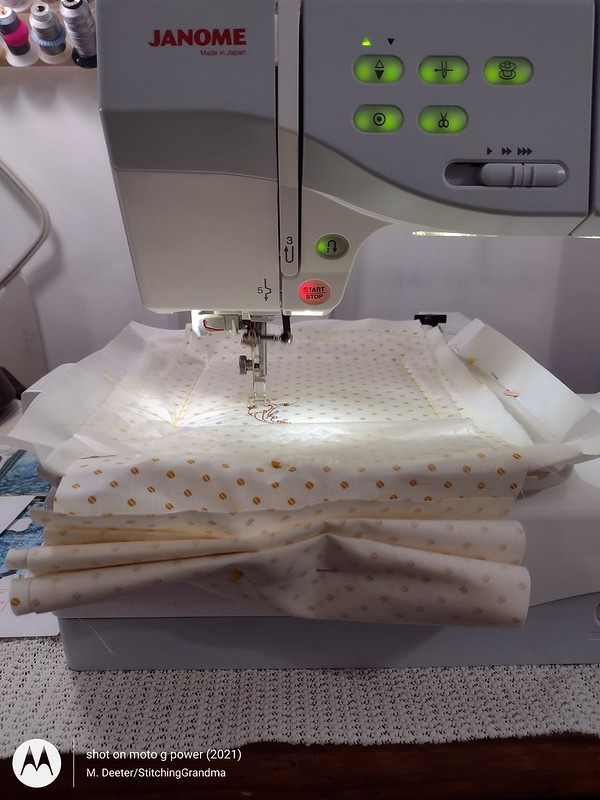
One final thing I do before starting the stitching is to slip a piece of tear away UNDER my hoop. It will tack down with the first few stitches and won’t slide around. So, this set up has 1)water soluble stabilizer, 2)fabric 3)batting (all floating and tacked stitched), 4)hooped cutaway and 5) tear away floating under the hoop. This would work for a design with 30,000 stitches, but you can see looking at my screen, we only need to worry with 10,797 stitches.
The pumpkin border stitched out nicely,
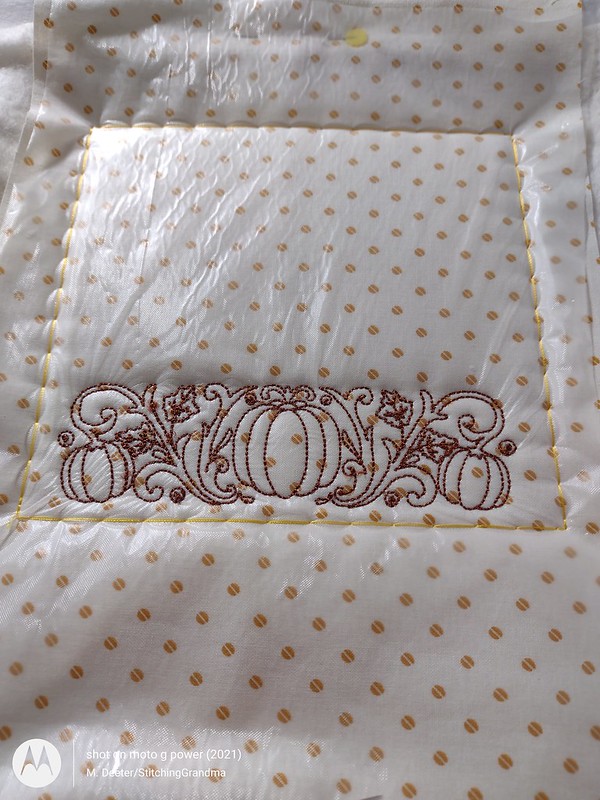
and so did the wording.

All that may sound like overkill, but it does give a nice result. For now, I think I will leave it “in the hoop” and wait to see what the next step will be. I still have the opportunity to add more stitching if I decide, as long as I leave it in the hoop. That makes aligning easy! My machine will save the design for me to “edit” and add another element if I chose. Once you un-hoop, it is not so easy! I’ll wait on the trimming to see what happens next. Don’t you just love a bit of a mystery?
I hope you found my techniques and tips helpful if you are new to machine embroidery or if you are struggling with getting a good quality project done. Do let me know what your tips are for working with your embroidery machine.
Friday when you read this will be the next part of the quilt along! My bin is at the ready for me to sew and I can’t wait to see what we will do with those pieces we made last week and all the cutting we did.
I’m trying to fit all these projects in before I leave on a trip next week, and stay caught up. I’ll miss the rest of the month, but have enjoyed #AutumnJubilee2022 so far. Are you stitching along, or enjoying some of the books and recipes?


Mary, you know more about machine embroidery than most of us would know in a lifetime. Thank you for sharing your knowledge.
LikeLiked by 1 person
Thanks Judy. I’m no expert, but have picked up a lot of useful tips over time. Our little club has been a great motivator and learning experience. Happy to share.
LikeLiked by 1 person
Awesome project, love the pumpkins with your Welcome Autumn! Such great tips for embroidery, and I am so jealous of your machine’s capability!
LikeLiked by 1 person
Thank you Carole. This machine (Janome 11000) is a real workhorse and I just love it. I would have never purchased it new/retail because of the price. It was a real bargain when I picked it up used for less than 10% of the original price. For years I suffered from “hoop envy” with my little Brother 4×4 hoop. I continue to learn when using it, so many features. 🙂
LikeLike
A week of embroidery is always fun. I really like those boards. Great idea!
LikeLiked by 1 person
I’m sure Brenda that somebody sells something like this, but it is a fairly easy thing to build. I’m going to try to make a couple of sizes.
LikeLiked by 1 person
Beautiful work and helpful tips. Do you have trouble placing your T shirts so the back doesn’t get caught up in the embroidery stitching? Or do you have a technic you use to avoid that. Thanks.
LikeLiked by 1 person
It’s scrunchy — I use my red clips, pins, blue tape and anything else I can find to keep everything out of the way. Make sure your neck of the shirt is closest to the part of the hoop where you connect to the machine. You might have to rotate the design. I had better luck with my bigger hoop.
LikeLiked by 1 person
You are an expert at this! I don’t have an embroidery machine, but if I did, you would be my teacher!
LikeLiked by 1 person
That’s kind Kathy. Really, not an expert, but I have picked up a lot of tips in the 9 years I’ve been playing around with my machine. A lot of what I have learned, comes after frustration when something goes wrong. There are some very good resources around the internet and I have always found just “googling” something a great way to find an answer (or 199 answers) to a problem. Trial and error has been a good teacher for me. Getting together with others helps too. There are so many brands of machines, but they essentially all function in a similar fashion. I have a couple of friends who are still “scared to death” of the machine they bought, and won’t try to use it. Makes me sad. I did get “volunteered” at a quilt guild meeting recently to “teach” a lady how to use her machine.
LikeLiked by 1 person
I don’t do embroidery, but yours is pretty impressive! That was quite a week!
LikeLiked by 1 person
It’s funny, I got in a mood for embroidery and really enjoyed spending the time
LikeLiked by 1 person