
Fair warning – lots of photos!
Just a few years ago, I dug in the scrap storage boxes and put together about 30 blocks using Pat Sloan’s pattern Scrap Happy Little Wishes Star Challenge. (See Pat’s post – Scrap Happy Stars for the free pattern)
I wrote about the project once or twice at the time and showed off my blocks, joined together with black sashing here – Just a border or two.
-

- 28 VERY scrappy blocks
-

- 30 Scrap Happy blocks
-

- Scrap Happy Little Wishes Challenge 68.5″ x 78″
Well, if you have been following me for any time at all, you know you sometimes never see the end result…or maybe I left you wondering “what did she decide?”…..
Well, let me tell you….NOTHING for almost 5 years! Honestly, I have told others that I am a “top maker’ not a quilter at times. I have a LOT of tops made, hanging on hangers on my storage shelves that get forgotten because something ‘new and exciting’ comes along. In fact, some are hanging so long I had to put them on NEW hangers because the hook of the hanger was stretched out due to the weight.
I get tempted by shiny new fun patters. Why, just the other day, Pat Sloan started another “new sew along” and I was really feeling tempted. And then, our local quilt shop, Serendipity Quilt Shop in Dagsboro Delaware announced a new sew along. The pattern, Serendipity House in the Pumpkin patch, calls to me. Check it out here – House in the Pumpkin Patch. You know if you follow me that I always have a container of “autumn colors” just waiting on another opportunity! Now I have TWO fun sew alongs to think about.
Before I could l do anything else though, I needed to fold up the massive (111″ x 120″) backing for my Allietare quilt and get the backing and top in the mail to California for quilting by my wonderful sister in law, the One Block Wonder Woman .
Remember the fabrics I was using? (Some of this may be a repeat of a previous post/photos…but I just love this fabric group!)
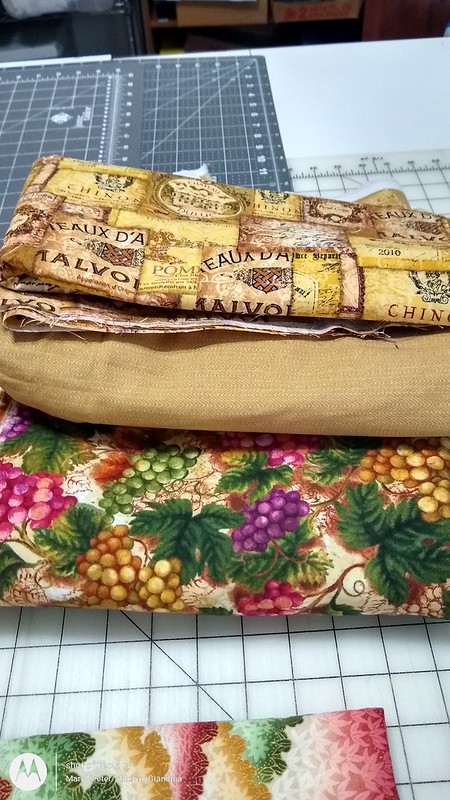
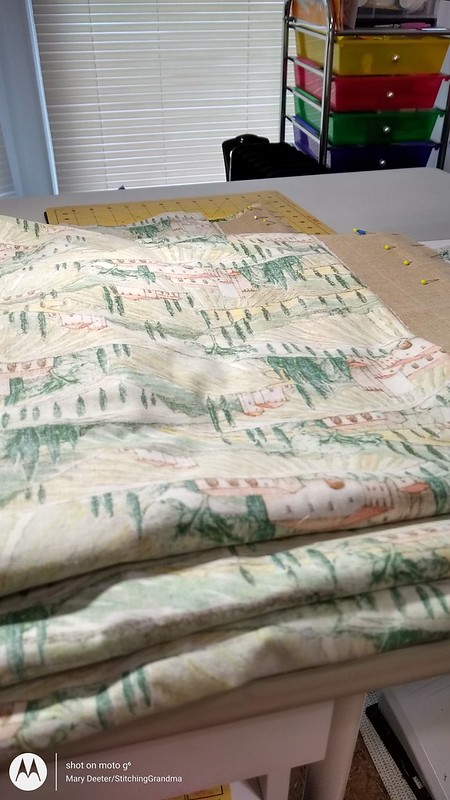
Top fabric (wine labels) is the border fabric. The herringbone gold and the grape fabric are on the back, along with this wonderful Bella Toscana fabric I was inspired by last month –
My plan was pretty simple for the backing – scribbled out quickly. (The quilt will be WIDE because of the drop on our king size bed. I like a quilt to hang over the sides and get to the bottom of the thick top mattress.) My quilt top is 111″ wide by 99 ” long.
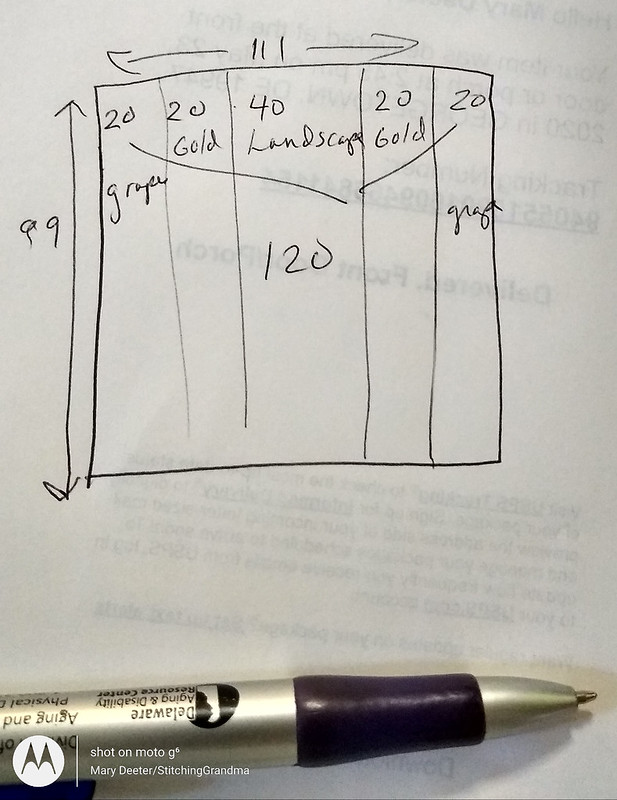
Careful planning…no, what I call “quilt math”, but careful measurements of the actual project, careful cutting etc and I fairly quickly had a quilt back ready. What really slowed me down was ironing those massive pieces before cutting, and after stitching.
Carolyn was kind enough to advise me she needed 4 inches on the sides for the long arm clamps; and to remember to do 1/2″ seams, pressed open. I did leave the selvedge on the edges of the final pieces, as they will be where the clamps are and they will get trimmed off after the quilting. I’d forgotten to take a photo of the backing before I shipped it, but Carolyn, the One Block Wonder Woman was kind enough to snap a picture of it on her design wall. She said it was so big it took over her sewing room! The backing is about 120″ wide by 110″ long.
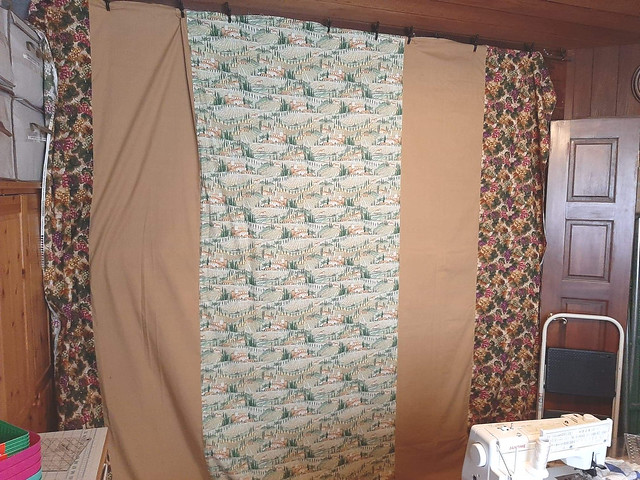
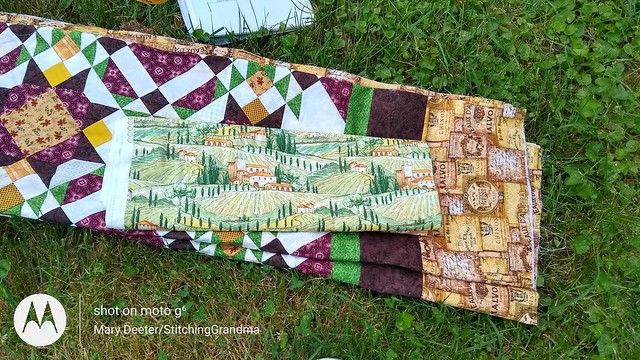
Remember the front?

I’m so glad it arrived by mail without TOO many wrinkles. Hanging up for a bit will help them to shake out I hope. I hate to see her have to iron that beast, enough that she is loading it on the long arm and doing all the quilting. If you quilt for others and they mail you tops/backings, how do you manage the inevitable winkling from the shipping? Does a steamer work or do you have to iron the whole thing?? Allietare is a pattern by the queen of scraps, Bonnie Hunter and the pattern is available on her online store.
Anyway; now that Allietare is ‘under control’ and OFF my table, back to my Pat Sloan Scrap Happy Little Wishes story! I went to the sewing room and looked at one of my cutting tables, buried in STUFF. A disaster zone for sure! I went up with the intent of “cleaning it up” but to be honest, it looks like this 4 days later STILL.
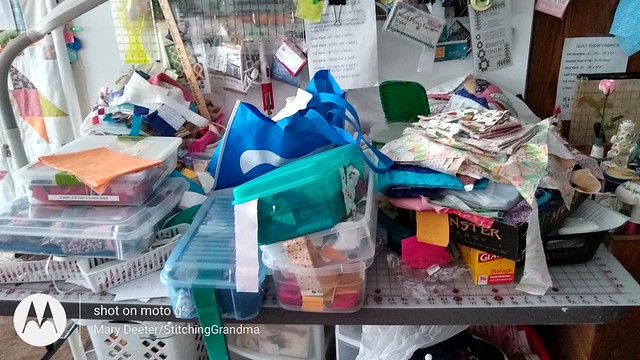
Last week I was making “string blocks” for borders, so there are bins of stings, baskets of scraps and so much more on that table. I had one basket of string blocks made, and decided to join them together into a “string border”. (I wanted to sew, not clean….at least, that is what I told myself when I picked up the baskets). Sewing string blocks uses scraps, which I needed to clear up, right? I use phone book paper as a foundation for my string blocks. At one time, I had my strings sorted by width, then as I was digging for the right color, I resorted by color. Sometimes I have to get in the scrap aver boxes to find the perfect strip. Anyway, working on string blocks is what I do when I have no sewing “plan”, and I hadn’t quite gotten to the Scrap Happy Little Wishes quilt. (I’ve had vertigo for a week now, so mindless sewing of string blocks was about all I could manage) . Honestly, cleaning up from multiple projects was more than my wobbly head could manage last week.
Since my BIG cutting table was cleared off, I could lay out all the string blocks and arrange them so there were not similar fabrics too close together.

Anyway, at some point I measured what I had sewn together and discovered I had enough to go around something that was hanging on a hanger waiting on borders. I had made 268″ of a 6″ wide border, and while getting down my Scrap Happy Quilt, I found 336″ of 4″ borders all done too.

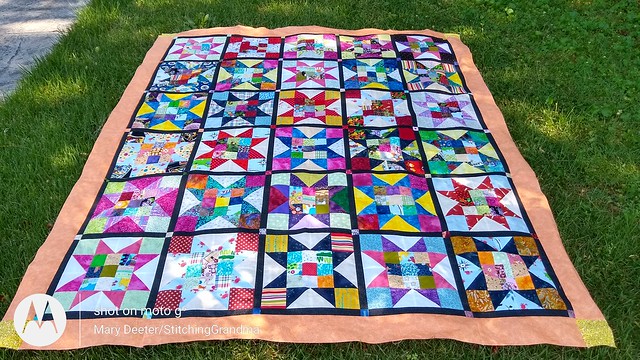
I laid out my Scrap Happy Stars on the table and immediately decided I didn’t want to put either of those string borders “next to the black sashing”.

There JUST wasn’t enough space between the busy scrappy stars and the scrap borders. So, I executed plan B. I got out a bin of reds and oranges and yellows, did some more quilt math, and decided a 4″ border was what would work. I have a tone on tone ORANGE (shown at the top of the photo above) that was also used in the sashing stones, and I decided it was perfect. At this point, the quilt top was feeling rather “dark” to me, but the orange really brightened it up. I cut the sashing into 4″ strips, sewed it all together and then sub cut to length for the sizes I needed. I added some cornerstones from my 4″ scrap storage, and in no time at all I had the borders attached.
At this point, I think I am going to leave “well enough alone” and figure out a backing and start quilting it. My brain this morning was running along the line of putting it on my quilting machine frame (the one with the 9″ throat and the Janome 1500). I need to learn how to use that machine, loading etc, and it is high time. I am glad I bought some wide backing last winter from Marshall’s Dry Goods, but not sure if grey paisley is what I want to use. I have some purple wide backing, but have to check and see if there is “enough”. If not, I may order something else. Did you know they sell 108″ wide back for $7.99 a yard, and you can get a 15 yard BOLT for under $80. Great choices and I am thinking I have some shopping to do.
Sidenote – Serendipity Quilt Shop is a small business in a very small town, and since the onset of the COVID-19 lockdowns, they have converted to totally online sales until it is safe for everyone to shop in person in their store. If you need something, new fabric is arriving daily, and they have $5 flat rate shipping or porch pick-up. Their amazing online shopping website is running well and this week (through July 12) there is 20% off on Moda Grunge. So, if you need some fabric or notions, try to support the small business so they will be there after COVID-19 is history. Serendipity is where I ordered that fabulous Bella Toscana fabric, catching it on sale. I think I bought 7 or 8 yards, so I have enough for matching pillowcases. The facebook post by Serendipity inspired me to get my Bonnie Hunter Allietare off the hanger!!
It is a very nice feeling to move two projects forward that have been “hanging around” for so long. No worries though, I have lots more UFO’s to tackle. All but one of the series of Scrap Dance Mystery Quilts I have done over the years are still “on hangers” . Well, except the last one, it is still on the design wall. Carole is publishing the TWIST soon. When I was looking through photos yesterday I realised I had ONE of the Scrap Dance series finished. I had to go back to my blog and find the post about it. Turns out, I finished it around September 2015, about the same time I was making the blocks for the Scrap Happy Stars!

Scrap Dance Quilt Along Finish!
Seems I like those scrappy projects!!!I was busy that year. (You may see some of the same fabrics in BOTH projects!)
If you made it this far, thanks for reading. I appreciate all of your comments when you take the time to post them. I often say I am slow to blog anymore because I don’t have much to say, or I don’t have any photos to support the post. Today it seems like I might be overwhelming you with photos and narrative. So, I am glad you took the time to get this far, and hope you enjoyed the post.
What are you doing on this hot July day for fun???


Fabulous finish, I’m sure Carolyn will make it sing.
LikeLiked by 1 person
😁 thanks Carole. She quilts freehand and told me yesterday she is making plans on what she is going to do
LikeLike
To answer your question about ironing queen or king backs, any size really, that are recieved a little wrinkled, I learned a nifty trick that makes it less daunting. I pin the back to its roller on the longarm frame, smooth it out as much as possible, spray any wrinkled areas with a mist of water, and roll the rest of the backing up smoothly on the roller, smoothing and spraying lightly every time a new section is exposed in the process and ending by pinning the loose end to the take up roller. Everything ends up fairly tight between the rollers which, along with the quilting, “irons” it. If there are particularly stubborn creases, I get my oversized ironing board that has what I call bun feet installed on the underside and normally sits on two small drawer units, place it on the pantograph shelf at the back of the longarm, making sure it’s under the offending wrinkles, and iron, moving the board and rolling the fabric onto the roller as needed. No wrestling needed with either method.
LikeLiked by 1 person
Wowsers what a great way to manage.
LikeLike
WOW!!! you are amazing
LikeLike
I saw the quilt you sent Carolyn to quilt for you. It is beautiful.
LikeLiked by 1 person
Thank you Mona! She was so gracious to volunteer, and how could I say no? 🙂
LikeLike
I’m busy painting kitchen chairs this week so no sewing, but I’m off to check out the website link. 🙂
LikeLiked by 1 person
Try and stay cool, inspired and creating!
LikeLiked by 1 person
Your quilt is looking good!
LikeLike
Thanks so much! I’m anxious to load the Scrap Happy and start quilting. Waiting for the weather to cool off, as my brain shuts off when the sewing room hits 80 degrees.
LikeLiked by 1 person
Sure do like the Scrap Happy quilt! I look forward to seeing it finished! 🙂
LikeLiked by 1 person
Me too…still hanging over the rails of the quilting machine….but I have chosen a backing! Progress….too hot tho in my sewing room for much action anytime soon.
LikeLiked by 1 person
Hmmmmm…temptation! I just checked out the Pumpkin Patch sew along. I do not need another project! Ha, ha! Yup…I like it!
LikeLiked by 1 person
Oh I know what you are saying….and I just got a pattern I ordered online in the mail too!!!
LikeLiked by 1 person
Hello Stiching Grandma, loved this blog post. What beautiful projects you worked on, I admired them All. You inspire me to sew and although the brain is willing the flesh is weak. Love your scrappy looks.
LikeLiked by 2 people
Thanks Barbara. One block at a time ☺️
LikeLiked by 1 person
Pingback: STUCK in the MIDDLE | Stitching Grandma