
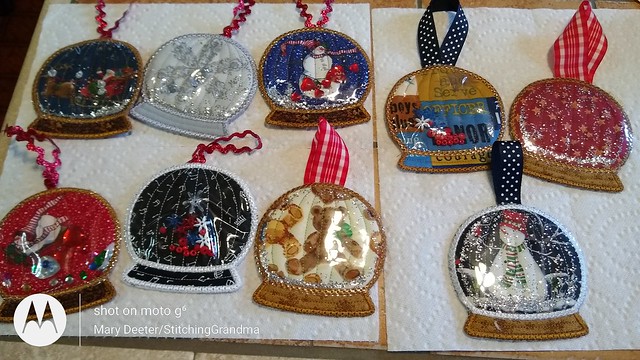
Yesterday I shared a post More fun with Machine Embroidery. In that post I talked about and shared photos of my “Snow Globes”. Today I saw that Kreative Kiwi has a new video up to accompany the free Snow Globe Pattern
COMMENTS — Kreative Kiwi does GREAT instructions that accompany the patterns; and Kay (Kays Cutz) does great videos. It helps somebody like me who has to be shown how to do “new things” a few times to learn! Go check out the Snow Globe video
There has been a ton of discussion and questions, of course, on the Kreative Kiwi Facebook group about the project, and lots of fun pictures too. It’s a great group to check out for inspiration and ideas.
Here are some things I gathered while reading posts –
VINYL —
1)Vinyl comes on a roll at big box fabric stores (JoAnn’s; Hobby Lobby or Walmart); usually in an area near the cutting tables at Walmart. Comes in a variety of weights. For the snow globes, get the thinner vs the thick. I used the thick vinyl for a project bag – Taking Care of Odds and Ends.
2)Vinyl document sleeve protectors in the stationery section. One sleeve for an 8.5 x 11 paper would give you at least 4 – 5″ squares.
3)Vinyl shower curtain from the dollar store. (You could get a BUNCH of 5″ squares out of one STRIP off the bottom.
4)Vinyl zip bags sheets and comforters come from the store in. If there are stickers, peel off and use some alcohol to remove any sticker residue. I got a bunch of squares out of one zipper bag. Some of these were really wrinkled. I cut the seams and zips off and made a flat piece, then used a warm iron, layed the plastic between two pieces of flannel and “warmed up” the vinyl to flatten it out. It softened up; flattened, wrinkles went away. Be sure to let it cool completely before moving it to the cutting table. I like the thinner feel of this vinyl for the project.
STATIC – I recommended a spritz of Static Guard spray on a tissue and wipe both sides of the vinyl. Kay recommends in her video one of those clothes dryer static sheets (like bounce/snuggle). I know the Static Guard works, but I wouldn’t rush out to buy it now if I didn’t have it on hand.
SPARKLES/SNOW – When you watch the video I linked at the beginning of this post, Kay shows you how she inserted the beads and kept them out of the way during stitching of the final round #10, which is when you attach the vinyl. I had read a couple of posts from other people who did something similar. I used another method……
I started my first couple with a tube of glitter for the sparkles/snow. When it was time for round #10, I had my hoop “on the machine, latched in”. Then I simply poured some GLITTER in the center of the globe, and carefully laid the vinyl over the top.

This first couple of globes I was using the thicker vinyl, and had not employed the Static Guard. Yes, the stuff bounces around a bit, but I would stop and use the edge of my stylus to poke the glitter over near the area that had already stitched. I did this on every globe, no matter what my “sparkles/snow” material was. I just started and stopped, poked and moved the stuff away from where the needle was going. (Round #10 is just around the outside of the globe). The bigger objects were actually easier to prod a little. And LESS is best! (That is the consensus on the Kreative Kiwi group too!)

Glitter in the upper left, glass beads and sequins, and metal spacer beads and foil spoke sparkles. I seriously just dug this stuff out of the drawers and boxes of paper crafting, and jewelry making stuff.
I dug deep into a bin of “inherited” crafty stuff and dug up some vintage bits (circa 1997) –
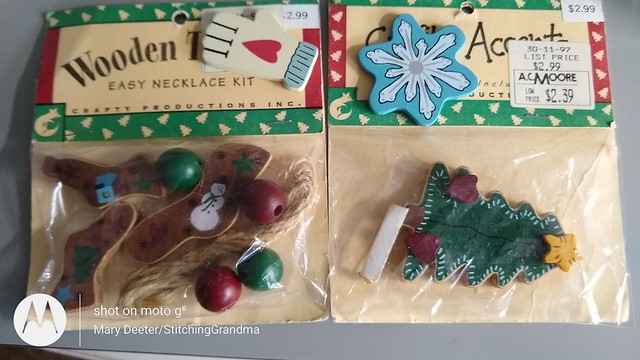
The tree and balls are a little big, but the snowflake mitten and stockings are good sizes for a single item plus glitter.
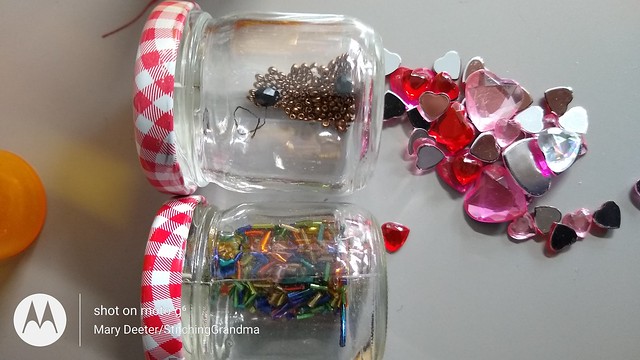
In that same inherited stuff I this -The bits at the top were in a bag in the jewelry making stuff; some kind of stone with tiny holes. The red, green, blue & white was all in a plastic bottle together and were useful. There were even some clear pieces and all different sizes to choose from.

And in another bin I found shiny hearts and crystal looking bits.
Some of these items were kind of thick, but that didn’t seem to be a problem. I just made sure to go slow, stop and push the stuff around as the vinyl stitched down. I even used the edge of the stylus to hold the stuff off to one side during the process.
IF you have to shop, look in the craft aisle at your favorite store. Little bits go a LONG way. I was at Hobby Lobby just yesterday and found all kinds of fun stuff that would make great “snow” in the globes, but since I already have so much at home, I didn’t buy anything. If you are at the dollar store, look for the “confetti” that goes into greeting cards. Think about paper crafting stuff you may have around….you could punch out some stars or snowflakes out of glittery paper. I pretty much made my snow globes with things I had on hand already!
HANGERS – I used a variety of things, from wide ribbon to narrow glittery rickrack. Again; use what you have around. You could also use cording, card crafting bakers twine. One person in the Facebook group was unhappy with the thickness of her cord….so, consider scale. I like the blue ribbon below and the rick rack better than the red plaid ribbon.
I mentioned yesterday that I had to “stop” making these as I ran out of water soluble VILENE stabilizer. Since I had the opportunity to pop into Hobby Lobby, I was able to pick up two yards of 20″ wide, so I will be back to these and finish up the last two for Thanksgiving. (I ordered some from Amazon and Walmart.com and am “still waiting”…..glad I had an excuse to go to Hobby Lobby!),
USE what you have on hand. These really only take 2 – 5″squares of fabric, a 5″ square of batting & a 5” square of vinyl. I used a bit of iron on interfacing on the back of the globe as suggested in the instructions. These were all things I had on hand. I have 2 globes that are not Christmas fabric, and those two were unique to the 2 son-in-laws and their special interests. Go create and have fun!!


Thank you! I finally get it. :-)Your post and the video make it seem quite doable. What is the average time needed to make one?
LikeLiked by 1 person
I would allow 1/2 an hour for each. It takes time to stop and gather supplies, start/stop/trim between stitching rounds. My machine had a “time” for the stitch out but I can not remember. Took me longer to gather supplies and get ready, but I did it assembly line style once I decided to do more than one. I added the names, and that was an “extra” step. I’ve got 2 more to make and will be doing them later tonight or in the morning and I will double check. Honestly, they are fast and fun. 🙂
LikeLike
Thanks Stitching Grandmom, looking forward to trying the snow globes. Will be calling.
LikeLike