
I have been using my Brother PE500 Embroidery machine since I won it in 2013. I’ve learned a lot about machine embroidery and decided if I had the opportunity I would “move on up” to a hoop size bigger than 4″ x 4″.
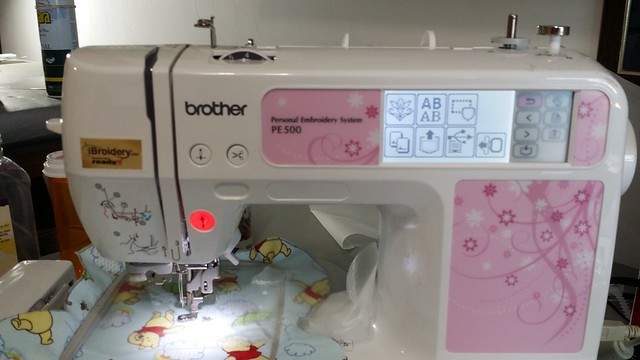
All of my friends who embroider know I have been suffering from “hoop envy”. You see…that sweet FREE Brother could only do 4×4″ projects, and I was seeing all my friends upgrade to 5×7 hoop machines. I just haven’t used my machine enough to warrant an expensive investment. Attending the Embroidery Club once a month has gotten me motivated to do more machine embroidery projects.
This past January a friend of mine was selling a Janome 11000 quilting sewing embroidery machine. I thought it was a great value and the increase in “hoop size” was exciting. This meant a new maximum embroidery size: 8″ x 11″ with the Macro Hoop, and other hoop sizes -5″x 4″ and 8″x 8″.
Well, when I looked at the machine being sold, and saw the capability and did research with one of my Embroidery Club friends…I knew I had to buy the used machine. Even though it was considered by some to be an “older” machine, it had all the bells (really) and whistles. It had a USB port; and a card slot. That means new technology and old technology. There were so many hoops included which made the purchase price a real value. The original price on the machine new was over $6000, and I valued it on E-bay before buying. Today on E-Bay there is a new machine selling for $5495, and used prices run the range of $1100 to $3400. I didn’t nearly that much, just a bit more than a new Brother 770. 
Fast forward to this fall, and I have finally had time to sit down and learn how to operate this machine. From the “sewing” side of things, it has as almost as large a throat and capability as my Janome 8900 which I purchased in 2013. Certainly as many stitches. The screen that is on the machine is fantastic- color-and huge, with lots of “help” videos.
First time I tried to use the automatic needle threader, I just watched the helpful video on the screen and was able to follow along with success. Then, I discovered, even with a huge bag full of hoops and gadgets, that there were some “missing parts”.
I wasn’t worried about not having some of the sewing feet, but I was missing the embroidery foot; and my friend at Embroidery club gave me an extra she happened to have. What was worrisome is there was a part missing that was critical to the operation of the embroidery hoops. It was just a little “filler piece” but without it in place the hoops were not supported and all kinds of jamming up was happening. I was distressed and finally gave up and took the machine in locally for service. The technician was able to locate the part and clean and test run the machine. I was happy to learn that the replacement part was under $5.
When I got the machine back home, I decided I needed to keep my eyes open for a table that would work well for the machine, and not be in the way of all the other stuff I have in my sewing room. I picked up this cute little table on Facebook Marketplace for just $35. It has a thick top (with a little worm wood showing) and is set on this fabulous treadle base…and guess what….The treadle moves! I used a layer of “rubberized shelf lining” under the machine to help reduce vibration. There is plenty of room behind the machine for the hoops to move on the mounting arm. I got out the command trips and starting hanging more hooks on the wall to get those various hoops out of the boxes and hanging up in a convenient spot. Boxes are now safely stored, and all the parts like foot pedal and fabric guide are stored away nearby in a basket.

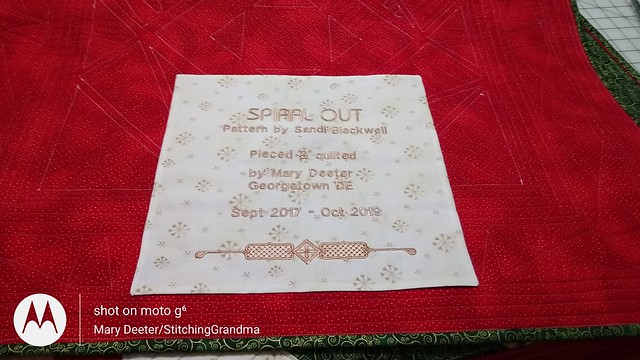
I got it all set up, and put it to work! I set up and stitched out in the big hoop a label for my Spiral Out Quilt I just finished.
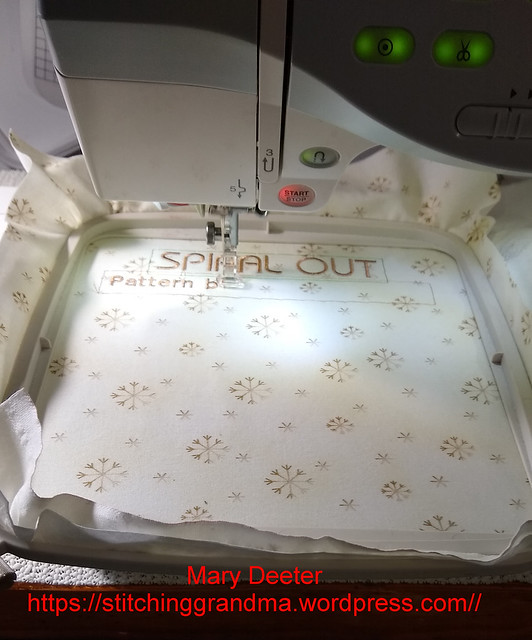
What I liked about this stitch out is I could stitch a temporary “frame” and know my alignment was here I wanted it. If you zoom in on the above photo you can see that “frame”. It was easy to remove after the final stitching was completed.
I had one “flub” on the date “2019”, but otherwise, I learned to set out and space the lines and to even bring in patterns as part of the process. I worked my way through the the screens and options and was pleased with the results. My flub was a lack of “awareness” and a good learning time. A lesson learnt, and mostly a satisfying stitch out.

A little hand stitching and the label was secured. Note about labels — When I make a label, I take a piece of a fusible product, lightweight pellon etc, and stitch it to the label. I stitch completely around, with the fusible side facing the pretty side of the label. Then, I cut a slit in the fusible product and “turn” the label so it has a nice smooth edge. I use my fingers and roll that seam flat, then IRON my label onto my project. This does two things….ensures my label is “hard” to remove, and gives the edge of the label a nice finish. I do hand stitch around the edges as well, and don’t need to battle with pins or shifting while I stitch.
I’ve had fun making a little “teddy” yesterday with my granddaughter. It is available as a free pattern from Kreative Kiwi

Of course, when you hop over to look at the free pattern you will see him in a cute little sleeping bag. I couldn’t resist so I purchased the pattern for the bag and stitched it out last night!

The bear went home with the granddaughter after we made it, but the sleeping bag is going to be a surprise. Poor bear spent a cold night, but he will snuggle into this bag as soon as I can deliver!
I’ve got other projects in mind for Christmas and am heading out to play in the sewing room !
By the way – we got a dusting of snow yesterday in Delaware…the first for the season!

Just a little frosting on the roof and cold temperatures!
Hope you are staying warm where ever you are and having fun in your sewing room!


You are so creative and your abilities have no bounds. The bear you made with your granddaughter is adorable.
LikeLiked by 1 person
It was fun! The embroidery machine makes it easier than it looks.
LikeLike
I’ve got hoop envy and I’m wanting a stand alone embroidery machine so I can extend the life of my regular sewing machine that has an embroider component. I also don’t have a usb or color screen. I’m hoping an affordable used one comes along someday. At least I can go up to 5×7. I enjoy your blog posts!
LikeLiked by 1 person
I bought this from Skip at Quilt Guild. So far I have used the 8×8 hoop. I need to order a 12″ wide roll if cutaway. I pieces my vilene (water soluble) last night to do the sleeping bag. I just cut 2 pieces and zigzaged it on my sewing machine so it would hoop. It worked. Thanks for reading. Understand that hoop envy.
LikeLike
Looks like fun!
LikeLiked by 1 person
It is! Thanks for popping in and for taking time to read!
LikeLiked by 1 person
Love your table and it sure sounds like you got a heck of a bargain. Thanks for the label trick. 🙂
LikeLiked by 1 person
You are welcome. It wasn’t an original idea, I’m sure I read it somewhere a while back. I like that the label is “fused and stitched” to discourage removal. I love the table. Especially when I am sitting waiting to change thread on the embroidery machine and I start moving that treadle ! It’s like a free workout! It is in beautiful shape, and my hubby was impressed with the top and condition of the irons. 🙂 I’ve seen similar in the area for much higher price, and one yesterday for as low as $10. Worth shopping around!
LikeLiked by 1 person
My brother machine is on its last leg, and I can’t use the embroidery unit anymore. Now I have to decide if I want to replace it, or give up on embroidery. Hard when I have a bunch of stuff and 8 computer cards with patterns!!
LikeLike
I am a big fan of “stand alone” machines. My suggestion to you is to find one that will take the computer cards OR get one of those readers for the cards and download the files into your computer (store them in the cloud if space is an issue). I like the ease of use with the Brother. HOOP size is the big deal, you want something that has at least the same capability as the older machine. Babylock uses PES designs like Brother, so that might be an option. I have thousands of PES designs, all 4×4 for my Brother machine (4×4); and am just now downloading larger designs in JEF format for the Janome. Many digitizers give you “all formats & sizes” when you purchase a design, with the exception of Embroidery Library. My dear friend June had a Janome sewing/embroidery machine and the hard drive went out and was “not repairable” according to the local dealer. I’m convinced they were trying to get her to buy new, and her hubby wasn’t falling for it. I have ALL of her embroidery design cards that she had purchased, and as soon as I unearth the box they are in I want to try them out. The technology today is with USB transfers, something my little Brother PE500 couldn’t do, yet this Janome 11,000 can. Makes me go hmmmmm……Just wait until you see what stitched out for a Christmas gift. It will convince you to get working again on embroidery. Replace that old machine!
LikeLike
Pingback: Paper (Thread) dolls | Stitching Grandma