
Do you have those days where you are just uncertain of what to do? I had “free time” last Wednesday in my sewing space! I FINALLY finished putting the backing together for Grandma’s Kitchen Quilt and was at a loss for “what’s next”. (No, no photo yet……) (The backing is so huge, I just can’t find a place to lay it out for a photo!)
I have LOTS of projects but wasn’t sure what I wanted to work on. Some of the hesitation comes from the fact that I am leaving on a big trip this week, and I am not sure I want to dig into something new. (I have LOTS of UFO’s I could work on….) I could “load” Grandma’s Kitchen Quilt and prepare it for quilting on my frame. I could get one or 2 of the scrap quilts off of hangers and order some backing and batting and ship them to OneBlockWonderWoman to practice on when I visit at the end of April. Or, I could play with something new. Or…I could pack up Grandma’s Kitchen Quilt and backing and mail it off to One Block Wonder Woman and quilt it when I visit. (She actually approved of the idea today, so I think we have plan!)
Anyway, during my “free time” on Wednesday, I finally made a decision when the never filed stack of embroidery designs fell off the heap on my desk. Since my big table was clear, I took the papers there and sorted them for filing in my 4 embroidery design binders. Once that was done, I pulled out a couple that I loved, and grabbed some pre-washed towels that I keep at hand and got busy playing with the embroidery machine. These were fun to stitch out, and I played around with different methods for stabilizing, so it was educational along the way! Definitely a fan of hooping tear-away stabilizer, the SPRITZING it lightly with 505 spray, and pressing with my fingers, the towels towels to the now sticky stabilizer. I learned from experiments that plush towel or towels with nap need denser designs. I am pretty pleased with how these turned out.

The design with the spoon is heavy enough to go on a terry towel, but the word KITCHEN on the dark towel is not dense enough. I still need to give them a wash, but I think they turned out well overall. The white towels are from the craft section at Walmart – they are called Aunt Martha’s Vintage towels and come in a package of 3 for a reasonable price. I like them because they are sturdy and have great hanging loops in the corner. The are LARGE too, 18×28 and wear quite nicely. Periodically I stitch them up and use them for gifts. They are meant to be used, and I think with using just tear away stabilizer on the back, they are very usable. The black dishtowel I purchased in a bundle, specifically to embroider on. It is a loop terry, and I won’t buy that kind again. I have a whole box of red terry kitchen towels to play with. I think they will get Christmas motifs. I’ve been saving them for a day just like this!
On Saturday, I had the opportunity to take another class from Cheryl Lynch (www.cheryllynchquilts.com) This class was held at Serendipity Quilt Shop in Dagsboro DE, and was the MINI-Mosaic Class. (More about that class in a minute).
This is the 3rd time I have had the chance to take a class with Cheryl.
In 2014 I did a project in her class called Sensational Silk, when she taught at Ocean Waves Quilt Guild in Lewes De. I was happy to take that project and “show it off” when she lectured in March at Helping Hands Quilt Guild in Dover DE.

Barn Raising in Silk
27 x 39″
This small wall hanging is made from dupioni silk and batik. When I learned how to stabilize the silk for cutting into half square triangles, I had one of those “ah-ha” moments. I was later able to transfer the method to other “non-quilt fabric” when I made this baptism banner for my granddaughter. That shiny gold fabric was just “perfect” for the cross, but would have been a bear to handle without that stabilizing lesson I learned with Cheryl.

Lori’s Baptism Banner, created by Grandma Mary
Then, of course, if you have read my blog for any bit of time, you might remember it was Cheryl who taught me the method for making my Pet Mosaic Quilt “Mittens“. (I wrote about this project ALOT in 2016 & 2017…)
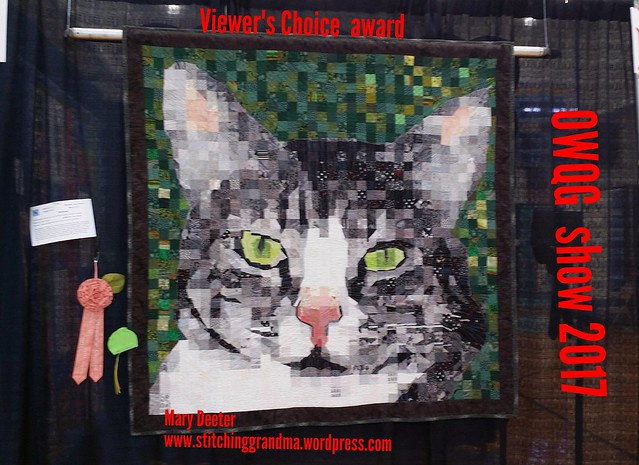
(Mittens is about 56×56″ and hangs in my living room. It was fun to take him “off the wall” and to the Helping Hands Guild meeting too, so Cheryl could see him “finally finished”)
When I had a chance to take another class from Cheryl, I jumped at the opportunity. The mini-mosaic is a “much smaller” project than either the silk or the pet mosaic. We used 3/8″ squares for the project! When I left the “all day class” – I came home and continued to work on the project after dinner.
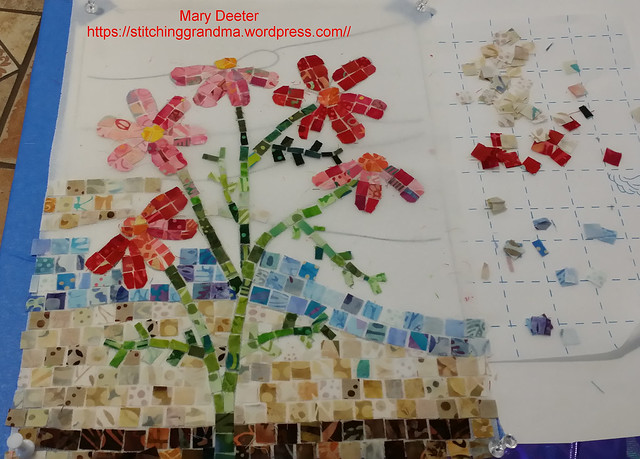
I was so engrossed that I kept at it until I had the entire mosaic completed! Let’s just say midnight was a surprise to me! I have more to do to “finish”, but this is where I have left off for now –

The finish size is somewhere around 11″ x 14″ after quilting, borders and binding. But for now, it is still a “work in progress. There are lots of steps to be taken yet, but Cheryl’s pattern is very clearly written, and I don’t think finishing it is going to be too hard. She was right, it is a bit addictive. In the project container Cheryl gave us everything we need to finish except our borders and backing. She even gave tips in class for hanging.
Meanwhile, the stack of tank tops I was going to embroider “before the trip” this week were left to sit, while my suitcase has been packed. I have a busy week with various things before I head to California! I’m looking forward to a 10 day Baja Peninsula and Sea of Cortez cruise leaving from California on Saturday! Snorkeling, sunshine, sea days await, as does some time with my favorite brother and One Block Wonder Woman(OBWW) after the cruise. Better get busy and pack up Grandma’s Kitchen and send it off to OBWW so it is waiting for me at her house! (I can’t believe I get to quilt it on her new Gammill long arm!)
Just curious – do you ever take classes from the same teacher? We are lucky to have so many venues in the mid Atlantic area where we can !
Note – each of the projects in this post have been written about previously. If you want more info on any of them, you can use the search function and the stated names to find those posts.


There aren’t a lot of classes around here, but I try to take advantage of them when I see them.
LikeLiked by 1 person
I seem to learn a great many lessons even from the students sitting nearby in a class. At Cheryl Lynch’s class I sat across from 2 experienced teachers!!
LikeLiked by 1 person
Wow, you’ve been busy! Have fun on your cruise.
LikeLiked by 1 person
Thanks, I am looking forward to some sunshine and warm weather
LikeLike
The mosaic is lovely. Looking forward to meeting you in California.
LikeLiked by 1 person
Me too. Thanks Mona
LikeLike
I make a lot of kitchen towels too. I usually use the Aunt Martha’s as well, they last through many washings and use. Last year I got some red terry towels at Costco, and like you, the the lettering sank into the terry. I found that putting a piece of clear Solvy wash-a-way on top before embroidering, really helps.
LikeLiked by 1 person
Thanks for taking the time to comment. I do use the water soluble topper on every project. At a Floriani class I took, we experiment with many items, and the WSS was the key every time. I think the density on the towel letters could be a bit heavier.
LikeLike
Wow!those are some nice quilts!
LikeLiked by 1 person
Thanks.
LikeLike
So many amazing projects. I hope you had a wonderful trip. 😊
LikeLike
Pingback: The final chapter of my April travel adventures (and a FINISHED Quilt!) | Stitching Grandma
Pingback: Visiting the 2018 Quilter’s Unlimited Show | Stitching Grandma
Pingback: Fire and Ice Batik Table Runner | Stitching Grandma