
So, I know, you expect to read about quilting. Sorry; not today. I put on my wife hat the last few days and went to help the hubby, Bill, get a model train display ready. His club, DelMarVa Model Railroad Club will have a space in the craft fair at the Apple Scrapple Festival next weekend in Bridgeville DE. (You really have to go to the Apple Scrapple link and read about this very unique fall festival!).
Anyway, back to trains.
Hubby & I took the “lead” to get the display ready, the equipment sorted out, the “stuff” to the festival next week. The train display is a 4′ x 8 ‘ display, built with a foam base and wood framing; that sits on saw horses. Transporting it is a challenge, but it can be done. Thankfully we have a member with a truck bed that is “big enough”.
The display was made by a member over 13 years ago and has been transported once a year, just for this festival. (Typically the club does not set up displays outside of the club facilities). After all those years, the display needed some work to freshen it up somewhat.


The club had a big donation of Bachmann EZ Track, which is “roadbed and rails” on molded plastic. To give the layout a little more ‘realistic’ look, we decided that weathering (painting) the track would give us the look we were after. Rust-oleum makes some GREAT paint products, and we used several different types. Over the last 2 days I have made 1 trip to Lowes, and 2 trips to Wal-mart to pick up “the perfect paint”. I will try to identify the product with the photo’s.
Bill decided on a track plan that made sense to his “operations” mind. He wanted switches, and a yard track, so multiple trains could be run and staged. That is a huge job, deciding on which curved track pieces will fit the parameter of the existing track. The track has different curve radius, and you need the right one to work! (I didn’t take a photo before he got started). He worked on that track plan for several hours on Wednesday night. I showed up with him on Friday afternoon, and we worked until 11 pm getting the weathering done of the track.

We used Rust-oleum Camouflage paint to “dull” the rail, ties and grey plastic molded ballast. The top of the rail cleaned up nicely with a “bright boy” (pumice type stone).

Of course, we taped off all the switches and rail connectors. We lifted & slid the whole yard section off of the layout onto a board, so he wouldn’t have to re-invent the track plan again.
Once the base color dried, we taped off the rails to get ready for the next step – STONE PAINT.

We used a product – Rust-Oleum American Accents Stone Spray – in a grey. Gives great texture to the “ballast area” of the track. It can be pretty messy, so we did as much as possible “off the layout”. It takes HOURS to dry too. Yes, it is back to grey, but it has a really great texture that gives the impression of stones (ballast). The ties are still brown, and the top of the rail has been cleaned up from the brown paint. (An entire roll of painters tape was used in covering the rails while painting.
We left it to dry overnight, and on Saturday afternoon, we set all the track back in place. Not before we considered changing the entire layout though! We wasted an hour trying to figure out a ‘better plan’, and went back to the original. In the process, buildings were pulled out of storage boxes and set around the “town” .
Once we decided on which buildings to use, Bill got busy finding trains that would run on the small layout well, and have a variety to look at. Because of the small radius of the inside track, only cars in the 36′ (scale) could be used. I got busy trying to figure out scenery, and making “bases” for the buildings to set on using foam core board, and lots of spray paint.

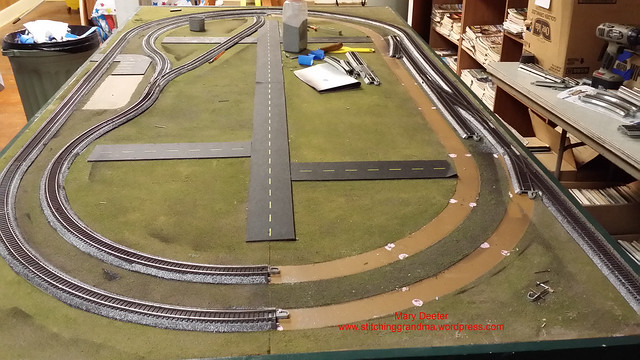
The area where the small auto is sitting was painted with flat grey auto primer, then some more of that “stone paint” in brown on the curve by the track. While the brown was wet I added some green ground cover. The next step for that piece is add some darker grey paint in the parking lot, and perhaps expand the green space between the courthouse building and the track. Once the base is satisfactory, the buildings will be “glued” to the foam core board, and then the whole section will lift off and go in a storage box for transport. You can’t transport this type of layout due to it’s size with the buildings on it. In the photo above the train is handling the curve well, but we find there is a “hump” in the track at the base of the curve (opposite the black road). That is Bill’s project for today. I will work on the main platform scenery too; getting the pink foam, and the brown paint covered up, while Bill also works on extending that road end.
I’ve got lots more scenery work to do; and need to add some “shrubs” on the edges of the foam core board to camouflage the edges. (This board had a plastic coating for photo’s and was a bear to cut decently….but you use what you have and fix it up afterwards). The point of this layout is to represent something you might “build at home quickly”, and to show how you can take it up a notch or 2 from plastic track. We will probably have 40-50 hours into this display for a “one time” viewing. I am learning about products along the way. And, proof that you don’t have to be an expert to have a half decent model display. Of course, if you are building a more permanent display in your basement, or spare room, you will spend much more time. The permanent displays at the DelMarVa Model Railroad club are greatly detailed, and done with precision.

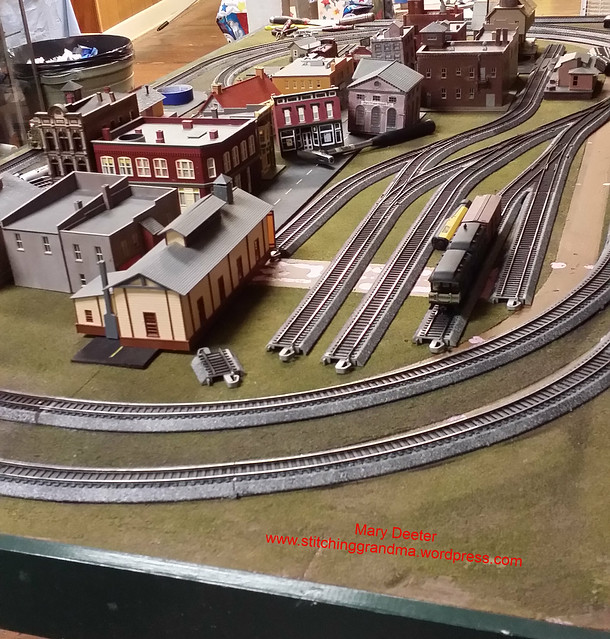
You can really see the texture of the ballast showing in this photo. We tried hard to vary the intensity of the paint so it wasn’t all “uniform”…because in real life, it is not.
I will add a few photo’s after it is finished and set up. We will be at Woodbridge Middle School, in Bridgeville Delaware for the Apple Scrapple Festival on Oct 14. If you are in the area, find the display in the cafeteria. Stop by and say hello and see what you think in person.
NOTE – these are HO trains, and there is one of our special Maryland and Delaware 40 foot box car in the above photo. Maryland Delaware is a regional short line in the area, and they gave us permission to use their logo on the cars. DelMarVa Model Railroad club currently has 40 foot double door box cars for sale, and you can find the order form on the club website http://www.delmarvamodelrailroadclub.org/

Maryland & Delaware Railroad 40-foot double door box car. Athearn HO scale custom built for the Delmarva Model Railroad Club. Completely assembled and ready-to-run with metal wheels and knuckle couplers. Two numbers are available: 1984 & 2011. $19.00 each plus $6.00 each for shipping. Send check or money order (payable to DMRRC) to DMRRC, P.O. Box 19, Delmar, DE 19940


Wow! Looks great. Wish we could see it in person!
LikeLiked by 1 person
🙂 You’ve seen the “big layout” before….this is small potatoes in comparison…but I did work on this one. I told Bill that I like doing the scenery stuff, but was too intimidated to work on the “big layout” at the club. This is just the 2 of us working, and no one there to point out all my “flaws”…lol…..
LikeLike
If only I lived close enough. I’d love to see it. 🙂
LikeLiked by 1 person
🙂 Anytime you are in the “area” you let me know. I know the guy with the keys to the club. 😉
LikeLike
This looks amazing. Very impressive work.
LikeLike
Thank you Lillian. It is fun to hang out with the hubby while he works the mechanical side of things, and I can throw a little creative touch in. It looks even better after spending another 8 or so hours on it on Sunday!
LikeLike
Someday you and your DH need to visit our model trains in the old railroad station in Hendersonville, NC. We have a great club here that loves model trains. And it is nice to read about other aspects of your life, we can’t quilt all the time, LOL!!
LikeLiked by 1 person
🙂 We often take trips solely for the purpose of visiting model railroad displays and events. Not sewing for days on end make me anxious to get back at it!
LikeLike
Way to go for helping out your hubby. I bet he really appreciated it.
LikeLiked by 1 person
(Don’t tell him I skipped a shopping trip to Lancaster PA to help……) 🙂
LikeLike
LOL! I won’t. 🙂
LikeLiked by 1 person