
I have “put off” working on my Pat Sloan – Grandma’s Kitchen blocks while my Janome has been in the shop.
I heard from the repairman last Thursday that it will be at “least” 2 more weeks. My poor Janome 8900 is awaiting parts. Apparently one of the feed-dogs broke (go figure), and bent the bobbin case “cushion” which caused a terrible clatter and was beyond our “tech skills” to fix. I can’t go a whole MONTH without a machine, so I got out one of my other machines. (And thanks to all my friends who have offered to share a machine during this time of desperation ! )
I’ve been sewing on my Brother 6000i since the big machine went into the shop. Brother 6000i has primarily been my travel machine, until I got the Singer Featherweight. I was able to set the Brother in the sewing table the Janome fits in, using the Brother extension table, and sew at a reasonable “height” that doesn’t make me feel like my elbows are adjacent to my ears.
Anyway, I got allowed myself to be distracted last week, playing in the strings that have accumulated.
STRING BLOCKS
If you remember, I was prepping donated fabric for sale at the Ocean Waves Quilt Guild Show for most of the last year. Anyway, the show was in July, and the leftovers were dispatched to the person taking on the committee following my reign of terror. The new chairperson did not want the 2 cribs full of leftover scraps, so I boxed them all up, and carted them home. (Hey, being a scrap-a-holic is something I readily admit to!)
I spent the last month sorting those boxes out by color. I dumped boxes, one at a time on my work table, and smoothed, ironed, trimmed, again, and into my plastic storage containers. About 1/2 way through the 8 or 10 boxes, I started pulling the “strings” out and into a separate container. To me, a string is anything less than 2.5″ wide. I pressed and put them into shoeboxes. Before you knew it, the shoe boxes were overflowing and I decided to get busy and make some string blocks.
I follow the Bonnie Hunter – Quiltville – string block method, using old telephone book pages to act as foundations. (Yes, I still get phone books, and this is my preferred recycling method.) (Check out Bonnie’s book STRING FLING). I got out the paper cutter, pulled pages out of a smaller phone book, and cut 6″ blocks from the pages. I started with 30 pages and quickly used them up. When I stitch on the phone book pages, I shorten the stitch length significantly, so the paper comes off quite easily, after squaring up the blocks. Someone commented to me on Facebook about using fabric for foundations. I have done that, and I have also used a Pellon interfacing for foundation. I really just wanted to recycle what I had, and the phone book pages and strings are doing that without buying something else.
I was also inspired by a quilt I saw on another blog – Quilted Twins . Becky Petersen does scrap quilts and was working with a bunch of 2″ strings and the quilt in her blog gave me some ideas for my strings. She hasn’t published a pattern yet for the quilt in the blog post, but I am certain she will soon.
I made a couple of blocks and then got an idea to “sort those strings by color”. (They had been all stored together.). So, I went for blues to start with, and got busy. Then on to reds, pinks, oranges and yellows, browns and greens. Before you know it, I had 98 blocks. The first 2 random blocks are still “waiting their turn” for a project; but they are not going in THIS project.
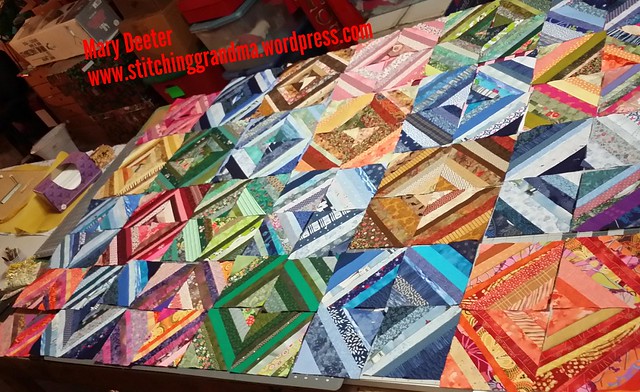
I did not “duplicate” Becky’s pattern, rather, I used her setting as inspiration. I liked the way the white set off the brilliant colors of the string blocks. My hubby is not crazy about the “chaos” of string blocks, but he likes (I think) this setting –

I’ve been doing all the sashing on my little Singer Featherweight along with some of the sewing of string blocks.
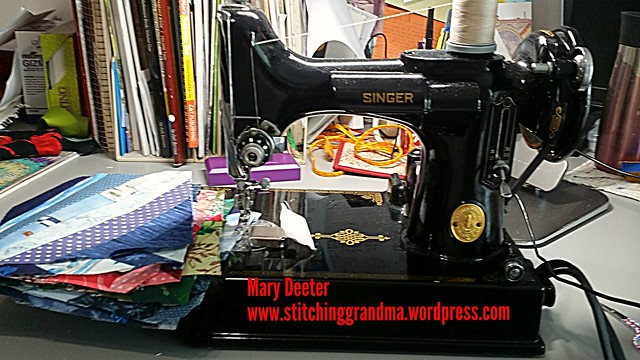
The Brother got tired of string blocks, it started acting crazy, so hubby carried the Featherweight upstairs to the sewing room for me. (I usually store it down at the bottom of the stairs in my to-go trolley). Hubby spent 4 or 5 hours dismantling the Brother 6000i, and determined it was a “timing issue”. Thank goodness for the internet & you-tube videos. I was ready to chuck it down those aforementioned stairs. He has infinite patience and mechanical and troubleshooting skills, so he FIXED it. Today, I will set the Brother back up, in my sewing table, which will give me “more space” for joining those two big sections together, and for adding sashing to the remaining 64 blocks.
GRANDMA’S KITCHEN
Anyway, in between the “making of the string blocks” and the “sashing” of the string blocks, another Wednesday rolled along. I decided to get busy and knock out blocks 9 & 10 of Grandma’s Kitchen. Since I was pulling fabrics for “both” blocks at the same time, I pulled out LOTS of fabrics.
For block 9, I decided I wanted to “see something” out the kitchen window panes. What would Grandma see looking out? I think she would be keeping a watchful eye on all the grandchildren!
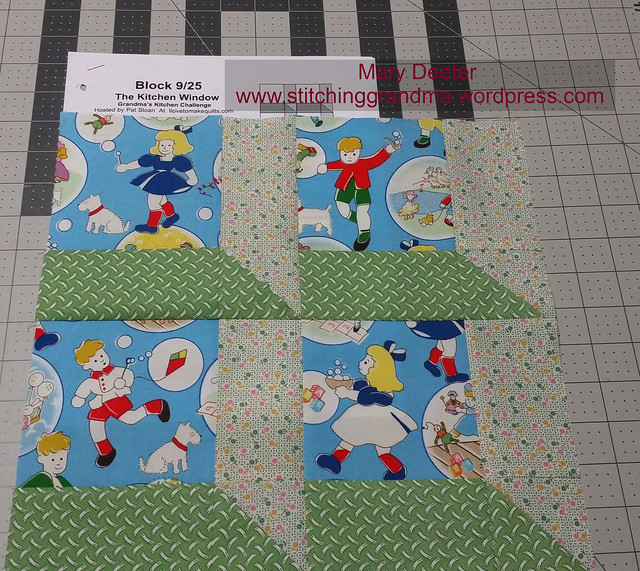
BLOCK 9 – GRANDMA’S Kitchen –
This block was fun to make! I got to use my “design boards” for the first time. I kept seeing Pat Sloan promoting the ones at the Fat Quarter shop, and I thought, heck, I can make those. I even found a tutorial from the Fat Quarter shop on You Tube.
(If you aren’t familiar – check out Lori Holt Fat Quarter Shop Design boards )
I found other tutorials to make the design board, and one used pretty duct tape. I decided to go for the duct tape, so I spent $2 at the Dollar Tree store, for the Foam Core Board and the pretty duct tape. I got 2 boards measuring 15×15 with one little strip left over. I also used Elmers Spray Glue to hold my batting in place instead of hot glue. Since I had the spray glue and batting already, I ended up with 2 – 15×15 boards for a total of $2. (See the end of the post for a link where you can buy ready made 18×18 boards for a mere $12.98 EACH.….)

The duct tape is pretty, but was a challenge to put on straight. It is sticking well to the paper on the back, but it wants to “lift” off the batting on the front. I have “smoothed it” back down a few times, so it is sticking, but I may “re-engineer” my boards. I didn’t want to use hot glue, but may have to. Thus far, no fingers glued together with hot glue or spray glue. And, other than popping into the Dollar Tree on day when I went for groceries at Redners, it took me about 20 minutes total!
On to Block 10 of Grandma’s Kitchen –
I had a pile of fabrics out, and I was looking at all my other blocks too. I decided it was time to pop a little orange into the project. I did my usual with the black and white photo’s so I could be certain I got my light, medium and dark right.

I think it worked out after a “few” tries. I was up to plan “D” & “E”, but I will spare you the photo’s. You “get” the concept!
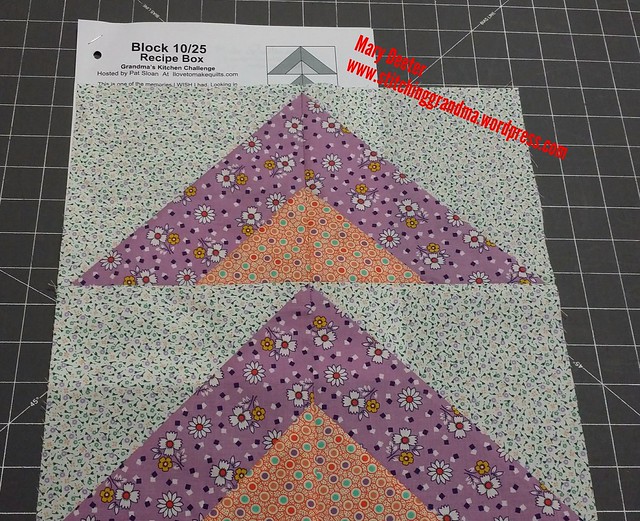
I took an extra minute and did a 2nd line of stitching on the “stitch & flip” corners, and got 4 bonus half-square triangles, which I trimmed up to 2.5″. No waste for me. I tossed them into my “OOPS block” container that I am using for this project. They are not an “oops” but that’s ok. I have a plan in mind for those little bits at the end of the quilt making!

For Grandma’s Kitchen pattern information – check out http://www.ilovetomakequilts.com/grandmas-kitchen-sew-along.html
To purchase a “ready made” design board – look at https://www.fatquartershop.com/teal-happy-text-bee-in-my-bonnet-design-board
I hope you enjoyed this post, and that you might venture into “recycling” fabric scraps into quilts or “crafting your own design board”.
Linking up to Oh Scrap! and Pat Sloan’s link up and OMG – one monthly goal for September
Quick note – I am establishing my One Monthly Goal for September – getting the String Quilt FINISHED….yes, you heard that….sashed, rows joined, and QUILTED & BOUND. My heart wants me to get this ready for a Hurricane Harvey donation as quickly as possible!


Machine isn’t back yet…. yikes. Glad you have back-ups…and a handy Hubby! I love all of the blocks! You’re inspiring me to finally pull out one of the phone books I’ve been saving for a string quilt. Speaking of strings, I bought lots of them at the Quilt Show….I was only there the first day…guess I should have come back to the Second Time Around booth! I think if I’d spent any more time there on Friday, you’d have charged me rent. 🙂
I should probably make a design board. I have a 4′ x 8′ sheet of the foam board (has advertising printed on one side…discard from the phone company). Have never made one….in any size.
Love reading your blog posts!
LikeLiked by 1 person
Wow, you can make a design WALL with a 4×4 foot sheet! I love using strings in borders too. Glad you had a great time shopping at the show.
LikeLike
You are one industrious lady! Love the string blocks! Scrappy by the color. Great idea!
LikeLiked by 1 person
LoL…my time is my own again! 😉 I started a Pinterest board for string block quilts for more inspiration
LikeLike
Once again, you put me to shame with all your energy and what you manage to get done in a day. Thanks for sharing the very useful video. My quilting buddy was over today working on a series of blocks that are very placement sensitive and between the cutting table where she had it laid out and the sewing machine, she got an entire row turned upside down and had to rip out and flip it the right direction. One of these little boards would have saved all that hassle. I would love some for myself too…oh, my, something else to get done.
LikeLiked by 1 person
Oh, it is only because my garden is full of weeds and I haven’t been in the pool in two weeks. 🙂
The board is “Very HANDY” and simple to make. (Took me 20 mins to make 2). Next time you are out and about shopping pick up the supplies (Dollar TREE!) If you save an old rotary blade, it makes cutting the foam core easier. I just grabbed a sharp tool from Bill’s hobby table (SHHH>….don’t tell)
. In fact; get 2 sheets of foam board and make Mona her own set. I like the BIGGER size; 15×15. I got 2 out of the $1 sheet of foam board. Having 2 boards is nice, so if you are doing more than one block at a time you can go back and forth to the iron. They are a nice little “design” wall too. Keep them next to the machine so you can pick up the right pieces. I kept seeing them on the videos that the FQ shop does, and a friend bought a set ($$$). I am too cheap when I know I can make it myself. 🙂
LikeLike
String quilts are just great. Thanks for linking up with Elm Street Quilts One Monthly Goal and good luck with your project.
LikeLiked by 1 person
Thanks!
LikeLike
those string blocks are beautiful! Now I want to go make some!!!
LikeLiked by 1 person
Thanks!! They are fun to stitch and kind of fun…
LikeLike
Love the string blocks and the setting. It is nice to have ‘spare’ sewing machines. I too had my Janome in the shop, and used the Featherweight to fill the gap.
LikeLiked by 1 person
I have to remember that it needs a good cleaning and oiling after the workout I gave it! 😉
LikeLike
Love the strings and the sashing. 🙂
LikeLiked by 1 person
Thanks. It always makes me happy to use something in a quilt that others were going to discard, and have it look so nice.
LikeLiked by 1 person
Pingback: Carolina Hurricane Quilts and Scraps | Stitching Grandma