
Yesterday I was in a quandary about how I was going to border my Scrap Dance – Two Step Mystery Quilt. When I went out to the sewing room mid afternoon, I was still pondering yardage or scrappy.
I decided to stick with the scrappy theme, and make a string border.
I put on my “Bonnie Hunter” thinking cap, grabbed the calculator and a measuring tape and determined an approximate number of inches I needed to get “around” the quilt. Then I divided that number by 10.5 and pulled 12 pages out of the old telephone book I keep on hand for these kinds of projects. Anyone familiar with Bonnie Hunter knows that old phone books are valuable tools in the quilting room! This is a funny post from Bonnie Hunter and String Blocks and explains the “why’s” of the phone book pages.
Anyway, I digress. I have boxes of “strings”. I use Bonnie Hunter’s scrap storage system, and my left over strips go into storage boxes based on their width. I have a box for 1.5″, 2″, 2.5″, 3″ and larger strips. These are all fairly straight, longer pieces, so perfect for what I wanted. I think Bonnie’s strings are “random widths” sorted by color in her storage system. Anyway, I pulled out several boxes so I could get varying widths. Sewing strings is kind of “mindless sewing” in my opinion. No need for absolute perfection. The only thing to consider is starting with a FULL bobbin, and reducing the stitch length to much shorter (I went with 1.5). Also, I swap my 1/4″ foot, as it has a blade that catches the edge of the paper and is annoying.
I stitched the 12 pages, pressing between additions of strings, working on about 4 pages at a time. Once all 12 were stitched, I cut them to size “lengthwise”. Since the paper was 8 .5 x 10.5, I went with a 4″ strip. Yes, I had a little waste, but I am ok with that. Once cut to size, I ‘de-papered’ the strips, and started joining them end to end. After all the pieces were joined I had about 280″ of border to use. I gave them a good “starch” and press (with my new OLISO PRO that arrived late yesterday…) and then cut them to length for attachment to the side borders first.
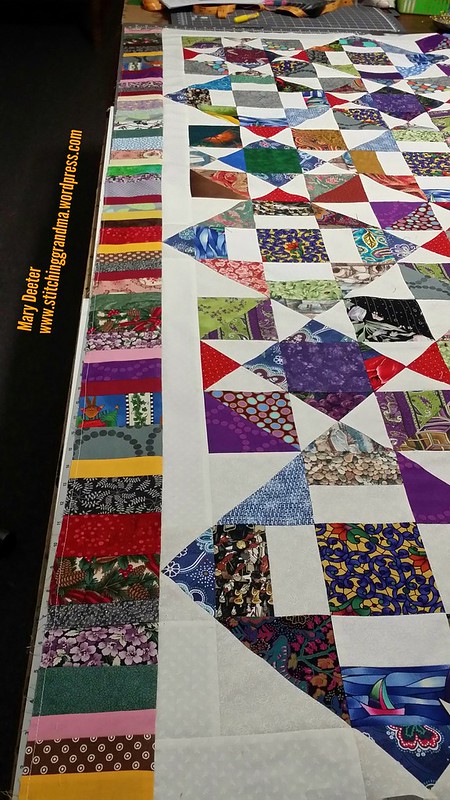
First border is on and I love it!! Note that I “stay stitched” around the outside edge after I pressed the border. I set the stitch length to 3.5″ to keep all those sections from “opening” their seams as I work with the quilt top. (It is best to do this on the wrong (back) side….ask me how I know!)
Anyway……….By midnight I had 3 borders stitched and pressed, and the 4th one pinned on, waiting for me to do the stitching when I gave up for the night. I got a lot accomplished from late afternoon until MIDNIGHT. (I forgot to eat dinner………..until midnight….thank goodness from the leftover crockpot roast & carrots. ) Since the hubby was off playing with model railroad trains, I didn’t have any interruptions.
No, I didn’t get the Grandma’s Kitchen block # 6 done. I was anxious to get the borders on this project! In fact, I left the pattern sitting on the kitchen counter. There is always today!
Note – the pattern for this quilt pattern is by Carole – From My Carolina Home
I am working through this project as part of my August OMG (One Monthly Goal)!


The border is perfect. Makes the quilt.
LikeLiked by 1 person
Thanks Mona. Note…didn’t lower the pile of scraps by very much though
LikeLike
I love it! Beautiful.
LikeLiked by 1 person
Thanks for your kind words! !
LikeLiked by 1 person
Well done as usual
LikeLiked by 1 person
Thanks! !
LikeLike
The scrappy borders are perfect for your quilt. Great project.
LikeLiked by 1 person
Thanks Peggy!! They are so easy to make and a lot of fun. Ok, well, not as easy as a solid piece of fabric for a border, but one of the easiest pieced borders I have done ! 🙂
LikeLiked by 1 person
Your quilt looks beautiful!
LikeLiked by 1 person
Thank you! I love what happens when you put together scraps
LikeLiked by 1 person
They are so fun! It’s one of my favorite techniques. Also very smart to stitch around the outside edge, speaking from a longarmer’s perspective
LikeLiked by 1 person
I love the scrappy border! And I concur with Cindy, stitching around the edge is so smart!
LikeLiked by 1 person
Oh thank you! I wanted to keep it “strictly scrappy” with the exception of the neutral in the first border. I couldn’t dig out enough of the right “off white” to do the whole white border, so cut a few strips of yardage. Only a few scraps really got used in this process, and I am awaiting the “next” scrap dance! Still need to get the last border stitched on, but it will have to wait a couple of days!.
LikeLike