
The last few days have been filled with good food and projects. I won’t bore you with the details, just suffice to say that since Saturday, I have been to a luncheon tea, a church shrimp & rockfish dinner, a guild pot luck luncheon, lunch at a friends house while sewing, and soup supper at church! I just love it when I get to eat different, interesting foods made by other people. The tea sandwiches were so delicious, along with scones and cheesecakes; and the shrimp was gigantic at church. Guild luncheons always bring out the best cooks, and the lunch at my friends house included a fresh baked bread, filled with ham & cheese along with strawberries and chocolate frosted brownies. Soup supper tonight at church included a wonderful Italian salad to complement the 3 soups.

Tea Sandwiches – Starting from the top – meatloaf, bleu cheese and grapes, peas and carrots egg salad flowers, and salmon with radish
Aren’t they pretty? The egg salad was so delicious I used the recipe for the Guild luncheon on Monday.
In between these lovely meals I have been enjoying a few sewing projects. Tuesday at my friend Pam’s house, 3 of us got together and made these fantastic bags using 5″ charm squares. The pattern is by Penny Sturges and is called Chubby Charmer.
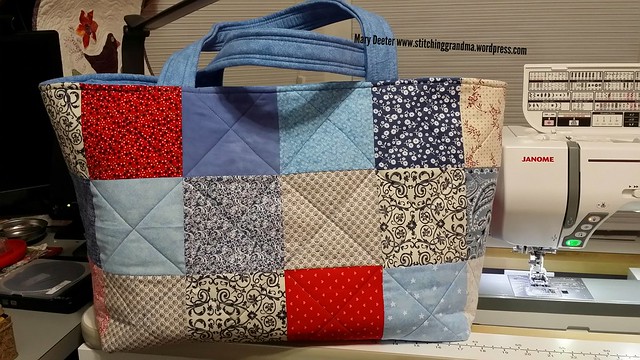
I, of course, opened my Scrap Storage System boxes and pulled from the stack of already cut 5″ squares, and collected enough coordinating colors for the project, and opened my “blue bin” of stash yardage and pulled a piece of fabric, circa 2011. Yes, the tag was still on the piece from the purchase. Well aged fabric and scraps are always the most fun. The only thing I had to purchase for the project was the fusible fleece, and I needed nearly 3 yards following the pattern instructions. It consists of 48 – 5″ charm squares, set in a 6×4 grid on each side of the bag. The bag measures 11.5″ deep; and 9×20 “inside”. The pattern said you could put a “9×12 casserole pan” in the bottom of the bag.
The yardage was used for the handles, the lining, and the inside pockets.

There are 2 LARGE pockets inside this bag, and I decided to divide them in half when I sewed them to the lining. This is a “substantial bag” with 2 layers of fusible fleece behind the charm squares; 1 layer behind the lining, 1 layer in the pocket and handles. This project required a “denim needle” for the top stitching around the upper edge of the bag. I was not happy with the way my standard sewing needle was behaving when I was going thru almost 9 layers. As soon as I switched to a heavy duty (size 16) needle, it went right through all the layers along the edge where the handles are.
After we constructed the bags, my friend Pam made some notes on the pattern on changes for “next time”. I said I would skip the fusible fleece, and use the Bosal In-R-Form in just one layer. You wouldn’t have to get the fusible type, as you are quilting it to the bag, and a few pins would keep it in place until your stitching secured it. Pressing the fusible fleece in 2 layers to our panel of squares, and getting it to adhere nicely was challenging. The other thing I think I would do is make sure my fleece or the Bosal is 1/2″ smaller all around the panel; to give you a little less bulk in the seams.
This bag is big enough to take a quilt to the guild for show and tell, or a bunch of supplies to a sit & sew. I had a great time with Pam & Nancy while we made our bags. All 3 of us finished the project the same day we started. Pam teased me and said I could NOT leave her house until I finished. She finished about 15 minutes before me. We started at 9 am, and I finished at 6:30 pm. We joked about making the “bag in a day” and were determined to finish.
My other projects this week were to work on my flying geese for the Bonnie Hunter Talkin’ Turkey. I used my Square in a Square ruler, option 3 by Jodi Barrows.
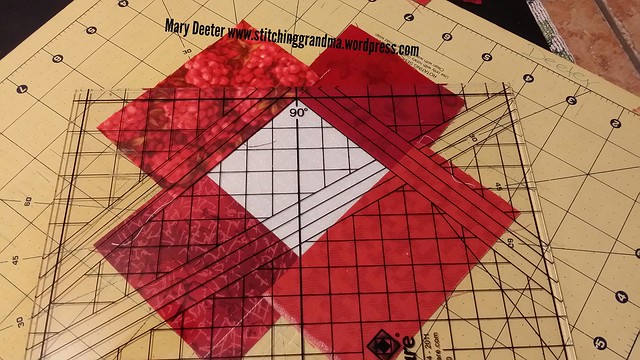
(My strips are 2.5″ which is wider than need be, but what I had already cut). The first step for cutting is to put the 90 degree mark in the corner of the square. Then you do it on the opposite corner and this is what you get below.

Then you do something Jodi calls the “Texas two step” – you SHIFT the ruler two lines over from the 90 degree point for the other two corners.
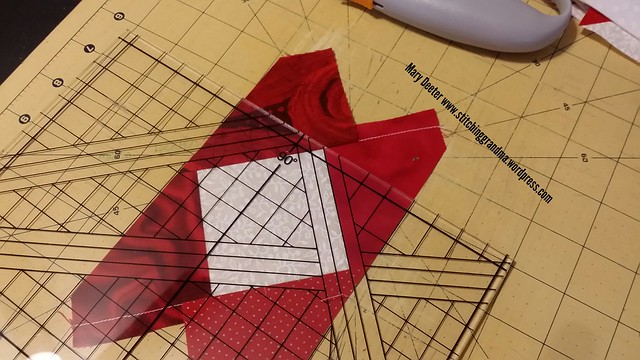

and then you trim the opposite sides.

and you get this –
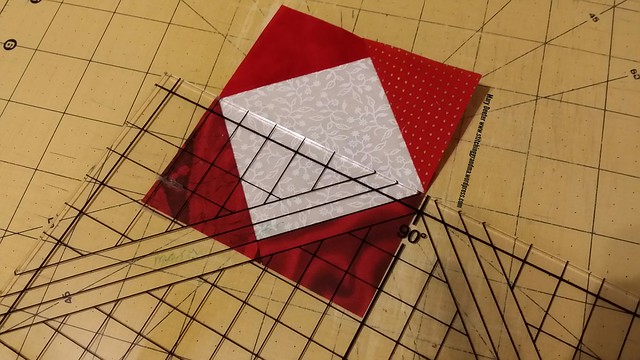
I am ready to “cut through the white square” to get 2 perfect flying geese units.

In summary, by putting the 90 degree in the corner of the white square, you end up with a perfect 1/4″ seam allowance for the top of the goose, and you won’t loose it’s point when you stitch it in the block of the quilt. The Texas Two step on the other two points eliminates that seam allowance, because the side of the wings will be in the seam allowance. I’ve put links in a previous post to Jodi’s website and you tube videos on how the ruler is used. I just thought I would share some close up photo’s of the ones I am making. I have about 20 left to trim and then I will have my 240 that I need for this part of the project. My next round of flying geese is for the border of the quilt and they will be red geese with white wings, and there will be a couple of hundred in that round!
One last project is something I did on Monday. I was “going” to the Embroidery Club in Ocean Pines Maryland. At least, I intended to go……Our luncheon at Ocean Waves went longer than I expected, and I got stuck in road construction stop & go traffic. By the time I got through the traffic, my time was so short, I ended up coming home and working on the project. I followed instructions by Embroidery Library and made this little cutie –

I haven’t “stuffed” him yet, as I need to use tweezers to get the stuffing through the opening left by the embroidery machine. I apparently used the “WRONG” type of spray adhesive, as I spent 3 hours making this little gem of a chicken. Thread breaks, needle jams, broken needle etc because my machine HATED the spray adhesive. The stuff NEVER dried in the course of the 3 hours. Had I attended the Embroidery Club, I would have gotten those great tips they had to share about this type of problem. I wrote to the gals who lead the group and got some good feedback the next day. Maybe I will try again, but not until I get a different spray adhesive.
What are you up to this week?


I’m cutting out pansy appliqué patterns for fifteen aprons (store bought) that I’m doing for our upcoming MG plant sale. I have five more to cut and then next week I’ll start the sewing. 🙂
LikeLiked by 1 person
Are you machine appliqueing that many I hope??? I bet they will look terrific when you finish with them.
LikeLiked by 1 person
Yes, I am going to do the best I can with my trusty Janome.
LikeLiked by 1 person
Somebody at my guild this week had teflon coated machine needles that are made to NOT stitck to adhesive. I’m going to try them when my shop gets them in, but it does sound like you need another adhesive 😬
LikeLiked by 1 person
I haven’t tried the teflon coated. I will take a look around locally and see if I can find them. The brand of spray adhesive I used won’t get used again! My friends from the embroidery club said ” first I would use a 75/11 sharp needle and be very stingy with your spray. You are working with felt so a lot of fibers mixing with that spray could cause build up. Also I use one kind of spray and “stick” with that brand. No pun intended! The one I use is Dritz, yellow top.” Of course, that ISN’T what I was using. I did switch to the 75/11 needle instead of my embroidery needles tho.
LikeLiked by 1 person
Those are some great projects! The chicken is cute, so sorry he was so much trouble. Great tute on the flying geese.
LikeLiked by 1 person
Thanks. I just finished my last ones for this round, so now I can build another round on the blocks.
LikeLike
Pingback: This and That and a little bit more | stitchinggrandma